


Page 6
ENGLISH
Jandy
®
Pro Series VS PlusHP Pumps
|
Installation & Operation Manual
Section 2. General Description
2.1 Introduction
This manual contains information for the proper
installation, operation, and maintenance of Jandy Pro
Series VS Plus HP pumps. Procedures in this manual
must be followed exactly. To obtain additional copies
of this manual, contact Zodiac Pool Systems LLC at
1.800.822.7933 or visit www.zodiacpoolsystems.com.
2.2 Description
The VS Plus HP is a variable-speed pump that can
run from 600-3450 RPM. When connected to the
JEP-R controller, up to eight (8) speed settings may
be programmed and recalled. This allows you to select
the most appropriate speed for your application. Even
more versatile programming is possible when you use
an AquaLink® RS, AquaLink PDA, or AquaLink Z4
controller.
The pump is driven by a variable speed ECM
(Electronically Commutated Motor) directly attached
to the pump impeller which forces water flow. The rate
variability allows for optimal flow during various pump
cycles. As a result, the energy efficiency of the pump is
maximized which means cost savings to the pool owner
while also helping to save the environment.
2.3 Preparation
1. Check the carton for damage. Open the carton
and check for concealed damage, such as cracks,
dents, or a bent base. If you find damage, contact
the shipper or the distributor where the pump was
purchased.
2. Inspect the contents of the carton and verify that
all parts are included. See “Figure 1. Carton
Contents”.
Figure 1. Carton Contents
02
01
03
04
05
06
07
09
08
15
10
11
12
13
14
01
02
03
04
05
06
07
08
09
10
11
12
13
14
15
VSPHP27 Pump
Installation and Operation Manual
Large Drawstring Bag
Universal Union Nut
Tailpiece
O-Ring
Small Drawstring Bag
User Interface Universal Control
Backplate Universal Control
DIP Switch Label
Cable Label
4 Conductor Cable
Terminal Bar 4 Pin
Manilla Envelope
Mounting Screw
1
1
1
2
2
2
1
1
1
1
1
1
1
1
6
ITEM
DESCRIPTION
QTY
For VSPHP27JEP Models only
- For a complete list of replacement parts
please see section 7.1
Section 3. Installation
3.1 Plumbing
3.1.1 Pump Location
WARNING
To Reduce the Risk of Fire, install pool equipment in
an area where leaves or other debris will not collect on
or around the equipment. Keep surrounding area clear
of all debris such as paper, leaves, pine-needles and
other combustible materials.
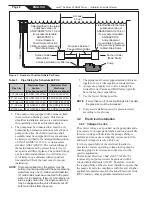
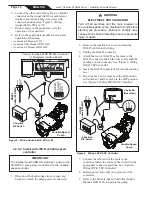
1. Zodiac Pool Systems LLC recommends installing
the pump no more than one (1) foot (30 cm) above
water level. The pump should not be installed
more than five (5) feet above the water level of
the pool. It is recommended that a check valve be
installed when pump is installed more than 3 feet
above water level.
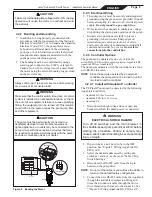
NOTE
The pump is NSF-certified for priming at heights
up to 10 ft. above the water level. However, to
achieve better self-priming, install the pump as
close as possible to the water level of the pool.
2. If the pump is located below water level, isolation
valves must be installed on both the suction
and return lines to prevent pool water back flow
during routine or required servicing.
WARNING
A check valve can interfere with the proper operation
of certain Suction Vacuum Release System (SVRS)
products. To avoid possible entrapment hazard, seri-
ous injury, or death, make sure to review the opera-
tion/owners manual of your particular SVRS product
before installing the check valve.