


Page 13
ENGLISH
Jandy
®
Pro Series, WaterColors RGBW LED Lights
|
Installation Manual
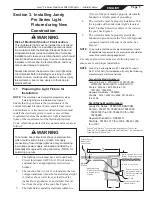
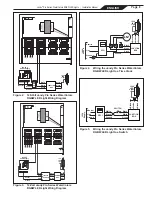
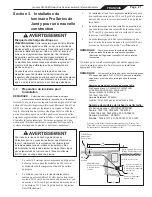
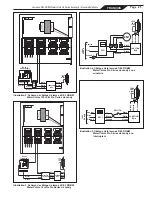
Align arrow of the
lens with the pilot
screw
Align pilot screw with
the arrow located on
the fixture label
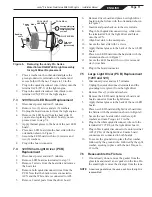
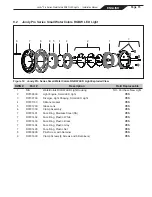
Figure 9. Alignment of the Lens, Face Ring,
Housing and Clamps for WaterColors
Lights
fixture label that reads, “Arrow on this label must
line up with the pilot screw on the Face Ring”.
See Figure 9.
4.
While holding the aligned face ring assembly and
fixture together, turn the assembly upside down
and set it on the old gasket, using the old gasket
as an assembly fixture. This will keep the lens
and gasket assembly from being pushed out of the
face ring while you secure it to the light fixture.
5.
Spread the bottom clamp over the electrical cord
and slide it onto the back of fixture to the top
clamp.
6.
Tighten the Phillips head screws (eight (8) for
large light and six (6) for small light) on the light
in alternating cross-pattern. Torque screws to
approximately 25 in-lbs.
7.
Discard the old gasket.
7.7 Reinstall the Jandy Pro Series Light
Into Niche Fixture.
1.
Coil the extra four (4) feet of cord around the
fixture or into the base of the niche and place the
light assembly into the niche.
2.
Engage the retainer tab on the bottom of the face
ring, then pivot the top of the fixture inward and
tighten the special pilot screw.
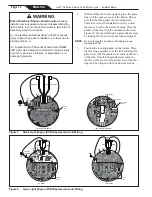
WARNING
Use only the special pilot screw provided with this
underwater light. This screw mounts and electrically
grounds the housing securely to the mounting ring
and wet niche. Failure to use the screw provided could
create an electrical hazard, which could result in death
or serious injury to pool or spa users, installers or
others due to electrical shock.
3.
If pool is empty, Fill the pool until the underwater
light is completely submerged in water before
operating the light for more than 2 minutes. The
light will heat up quickly when operated outside
of water. Turn on main switch or circuit breaker,
and the switch, which operates the underwater
light, to check for proper operation.
WARNING
Never operate this underwater light for more than
10 seconds unless it is totally submerged in water.
Without total submersion, the light assembly will get
extremely hot, which may result in serious burns or in
damage to the light. This may result in serious injury
to pool or spa users, installers, or bystanders or in
damage to property.
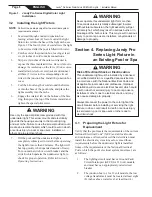
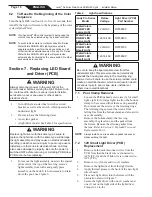
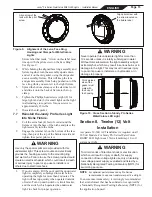
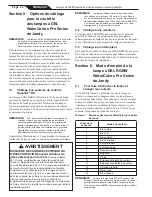
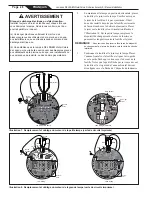
Fixture
Lense
Thick molded
side of the
gasket must
mate with
the body of
the housing
Figure 10. Cross Section of Jandy Pro Series
WaterColors LED Light
Section 8. Twelve (12) Volt
Installation
A separate 12-Volt AC Transformer is required on all
12-Volt Models. For Jandy Pro Series WaterColors
RGBW LED Light use a 150-watt multi-tap 12-volt
system per light.
WARNING
To minimize risk of Electrical shock or electrocution,
which could result in injury or death, for supply
connection of low-voltage lights use only an isolating
low voltage power supply, evaluated and listed by a
Nationally Recognized Testing Laboratory (NRTL) for
swimming pool use.
NOTE
For optimum performance Jandy Pro Series
recommends to use one transformer per 12-volt light.
To ensure maximum safety, it is strongly recommended
that a transformer that has been listed or recognized by
a Nationally Recognized Testing Laboratory (NRTL) for
the application be used.