3
DE -
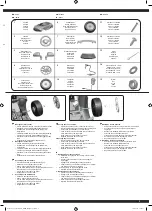
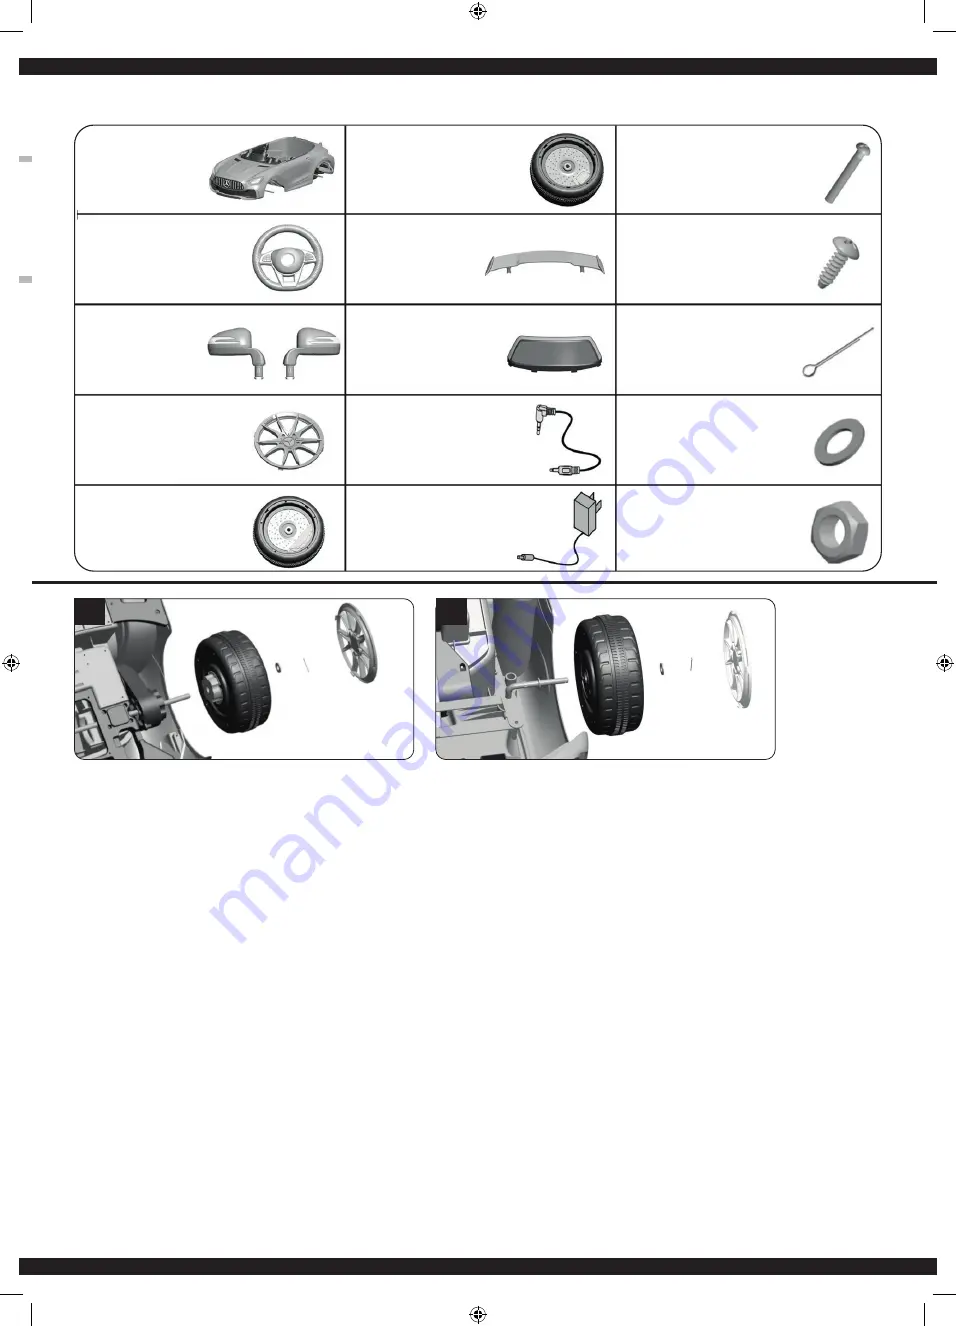
Teile
GB -
Parts
FR -
Pièces
IT -
Parti
ES -
Partes
1
DE
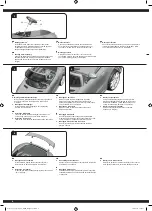
1. Montage der Hinterräder.
•
Stellen Sie die Karosserie mit der Unterseite nach oben
•
Stecken Sie ein Antriebsrad
(6)
auf das Getriebe.
•
Schieben Sie eine Unterlegscheibe
(14)
auf die
Hinterachse.
•
Fixieren Sie das Ganze mit einem Splint
(13).
Mit Hilfe
einer Zange verbiegen Sie das Ende des Splints.
•
Stecken Sie zum Schluss eine Abdeckung
(4)
auf das
Rad
•
Wiederholen Sie dies auf der anderen Seite.
2. Montage der Vorderräder
•
Ziehen Sie ein Rad
(5)
auf die Vorderachse.
•
Schieben Sie eine Unterlegscheibe
(14)
auf die
Vorderachse.
•
Fixieren Sie das Ganze mit einem Splint
(13).
Mit Hilfe
einer Zange verbiegen Sie das Ende des Splints.
•
Stecken Sie zum Schluss eine Abdeckung
(4)
auf das
Rad
•
Wiederholen Sie dies auf der anderen Seite.
GB
1. Assembly of the rear wheels
•
Place the body with the underside facing up.
•
Attach a drive wheel
(6)
to the gear unit.
•
Slide a washer
(14)
onto the rear axle.
•
Fix the whole thing with a plit pin
(13)
. Bend the ends of
the split pin back using a pair of pliers.
•
Finally, put a cover
(4)
on the wheel
•
Repeat this on the other side.
2. Assembly of the front wheels
•
Attach a wheel
(5)
onto the axle.
•
Slide a washer
(14)
onto the axle.
•
Fix the whole thing with a plit pin
(13)
. Bend the ends of
the split pin back using a pair of pliers.
•
Finally, put a cover
(4)
on the wheel
•
Repeat this on the other side.
FR
1. Montage des roues arrières.
• Ajustez la carrosserie avec le dessous vers le haut.
• Montez maintenant une roue motrice
(6)
sur le réducteur.
• Glissez une rondelle
(14)
sur l‘essieu arrière.
• Fixez le tout à l‘aide d‘un Goupille
(13)
. A l’aide d’une
pince tordez le bout de la goupille.
• Enfin, placez un couvercle
(4)
sur la roue.
• Répétez l‘opération de l‘autre côté.
2. Montage des roues avant
•
Montez maintenant une roue
(5)
sur l‘essieu.
•
Glissez une rondelle
(14)
sur l‘essieu.
•
Fixez le tout à l‘aide d‘un Goupille
(13)
. A l’aide d’une
pince tordez le bout de la goupille.
•
Enfin, placez un couvercle
(4)
sur la roue.
•
Répétez l‘opération de l‘autre côté.
IT
1. Montaggio delle ruote posteriori.
•
Sistemare la carrozzeria con la parte inferiore rivolta
verso l‘alto.
•
A questo punto montare una ruota motrice
(6)
sul
ingranaggio.
•
Spingere una rondella
(14)
sull‘asse posteriore.
•
Fissare il tutto con un Spalato spina
(13)
. Con l‘aiuto di
una pinza può piegare la coppiglia.
•
Infine, applicare un coperchio
(4)
sulla ruota.
•
Ripetere l‘operazione sull‘altro lato.
2. Montaggio delle ruote anteriori
•
A questo montare una ruota
(5)
sull‘asse anteriore.
•
Spingere una rondella
(14)
sull‘asse.
•
Fissare il tutto con un Spalato spina
(13)
. Con l‘aiuto di
una pinza può piegare la coppiglia.
•
Infine, applicare un coperchio
(4)
sulla ruota.
•
Ripetere l‘operazione sull‘altro lato.
ES
1. Montaje de ruedas traseras.
•
Coloque la carrocería con la parte inferior hacia arriba.
•
A continuación, montar una rueda motriz
(6)
en el
engranaje.
•
Deslizar una arandela
(14)
sobre el eje trasero.
•
Fijar todo con una Pasador
(13)
. Con
el ayudo de una pinza deformar el final del pasador.
•
Por último, coloque una tapa
(4)
a la rueda.
•
Repita la operación en el otro lado.
2. Montaje de las ruedas delanteras
•
A continuación, montar una rueda
(5)
sobre el eje.
•
Deslizar una arandela
(14)
sobre el eje
•
Fijar todo con una Pasador
(13)
. Con
el ayudo de una pinza deformar el final del pasador.
•
Por último, coloque una tapa
(4)
a la rueda.
•
Repita la operación en el otro lado.
1
2
3
4
5
6
7
15
14
13
12
11
10
9
8
Chassis
Chassis
Chassie
Chassis
Chásis
Lenkrad
Steering wheel
Volant directionnel
Sterzo
Volante
Windschutzscheibe
Windshield
Pare-brise
Parabrezza
Parabrisas
Heckspoiler
Rear Spoiler
Aileron arrière
Spoiler posteriore
Alerón trasero
Antriebsrad 2x
Driving wheels 2x
Roue d‘entraînement 2x
Ruota motrice 2x
Rueda motriz 2x
MP3 Kabel
MP3 Cable
Cable MP3
Cavo MP3
Cable MP3
Radkappe 4x
Wheel cap 4x
Protection de roue 4x
Copriruota 4x
Llanta 4x
Rückspiegel 2x
Rearview mirror 2x
Rétroviseur 2x
Retrovisore 2x
Retrovisor 2x
Vorderrad 2x
Front wheel 2x
Roue avant voorwiel 2x
Ruote anteriori 2x
Ruedas delanteras 2x
Splint
Split pin
Goupille
Spalato spina
Pasador
U-Scheibe 6x Ø 10 mm
Washer 6x Ø 10 mm
Rondelles 6x Ø 10 mm
Rondella 6x Ø 10 mm
Arandela 6x Ø 10 mm
Mutter
Nut
Ecrou
Dado
Tuerca
Ladegerät
Charger
Chargeur
Caricatore
Cargador
Schrauben 1x Ø4x12
Screws 1x Ø4x12
Vis fixe 1x Ø4x12
Vita 1x Ø4x12
Tornille 1x Ø4x12
Schrauben 1x Ø5x38
Screws 1x Ø5x38
Vis fixe 1x Ø5x38
Vita 1x Ø5x38
Tornille 1x Ø5x38
2
460361_62_63_Mercedes_AMG_GTR_46_20.indd 3
460361_62_63_Mercedes_AMG_GTR_46_20.indd 3
12.11.2020 15:27:06
12.11.2020 15:27:06


