

DE -
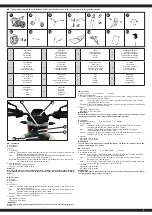
Teile/Armaturenbrett |
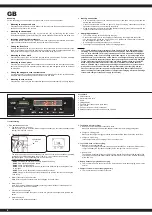
GB -
Parts/Dashboard |
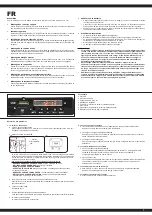
FR -
Pièces/Tableau de bord |
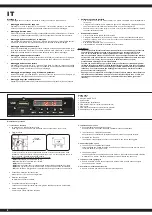
IT -
Parti/Cruscotto |
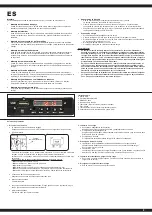
ES -
Partes/Salpicadero
7
14
1
8
3
10
4
11
5
a
b
c
12
6
13
2
9
1
Karosserie
Body
Carrosserie
Carrozzeria
Carrocería
2
Stützräder
Support wheel
Roues porteuses
Rotelle laterali
Ruedas de apoyo
3
Lenker
Steering wheel
Volant directionnel
Sterzo
Volante
4
Handgriffprotektoren
Handle protector
Protecteurs de poignées
Protezioni per le maniglie
Protectores de mangos
5
Gabelstange
Fork rod
Tige de chape
Asta a gomito
Varilla de la horquilla
6
Frontmaske
Front mask
Masque frontal
Maschera frontale
Máscara frontal
7
Radschutz vorne
Fender, front
Protections de roue
Protezione della ruota
Protector de la rueda
8
Vorderrad
Front wheel
Roue avant voorwiel
Ruote anteriori
Ruedas delanteras
9
Vorderradachse
Front wheel axle
Axe avant
Asse anteriore
Eje anterior
10
Seitenspiegel
Mirrors
Rétroviseur
Specchietto retrovisore
Espejo retrovisor
11
Sitz
Seat
Siège
Sedile
Asiento
12
Schutzblech
Mudguard
Garde-boue
Parafango
Guardabarros
13
Schrauben
Screw package
Vis
Vita
Tornille
14
Ladegerät
Charger
Chargeur
Caricatore
Cargador
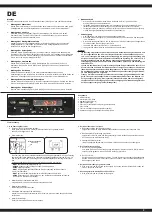
DE
- Funktionen
A Zündschloss
B Soundboard
C Hupe
D Schaltknopf
Vorwärts: Stellen Sie den „Forward-Backward“ Knopf in die „Forward“ Position. Drücken Sie das
Gaspedal damit das Modell vorwärts fährt.
Stop:
Das Modell stoppt sobald der Fuß vom Gaspedal gehoben wird. Stellen Sie den
„Forward-Backward“ Knopf in die Neutralstellung.
Rückwärts: Stellen Sie den „Forward-Backward“ Knopf in die „Backward“ Position. Drücken Sie
das Gaspedal damit das Modell rückwärts fährt.
E Geschwindigkeit
High speed - Geschwindigkeit erhöht
Low speed - Geschwindigkeit niedrig
WICHTIG!
Das Fahrzeug muss zu einem Stillstand kommen sobald die Fahrtrichtung oder Geschwin-
digkeit geändert werden soll. Ansonsten könnte das Getriebe und/ oder der Motor beschädigt
werden.
GB -
Functions
A Key hole
B Soundboard
C Horn
D Shift Lever:
Forward: Press the “Forward-backward switch” on the “Forward” position. Press the foot pedal,
the model drives forward.
Stop:
The model will brake automatically, when your child’s foot remove from the foot pedal.
Press the “Forward-backward switch” in the middle.
Reverse: Press the “Forward-backward switch” on the “Backward” position. Press the foot
pedal, the model drives backward.
E Speed
High speed - Fast speed
Low speed - Slow speed
IMPORTANT!
Always stop vehicle when changing the speed or direction to avoid damage the gears and
motor.
FR
- Fonctions
A Clé de contact B Soundboard C Klaxon
D Bouton du changement:
En avant: Placez le commutateur „avant-arrière“ en position „avant“. Appuyez sur la pédale des
gaz afin que votre voiture avance.
Stop:
La voiture s’arrête dès que vous lâchez la pédale des gaz. Placez le commutateur
„avant-arrière“ en position „Stop“.
En arrière: Placez le commutateur „avant-arrière“ en position „arrière“. Appuyez sur la pédale des
gaz afin que votre voiture recule.
E Vitesse
High speed - Grande vitesse
Low speed - Vitesse plus petite
IMPORTANT!
La voiture doit s’arrêter pour pouvoir changer de sens de marche ou de vitesse. Dans le cas
contraire il est possible d’endommager l’entraînement et/ou le moteur.
IT
- Funzioni
A Blocchetto accensione B Scheda audio C Clacson
D Leva del cambio
Avanti:
Impostare il pulsante „Forward-Backward“ nella posizione “Forward”. Premere il
pedale del gas in modo che il veicolo si muove in avanti.
Stop:
Il veicolo si ferma quando si solleva il piede del gas. Impostare il pulsante
„Forward-Backward“ nella posizione “Stop”
Indietro: Impostare il pulsante „Forward-Backward“ nella posizione “Backward”. Premere il
pedale del gas in modo che il veicolo va retromarcia.
E Velocità
High speed - alta velocità
Low speed - bassa velocità
IMPORTANTE!
Il veicolo si deve fermare quando si cambia la direzione o la verloci ta. Altrimenti si puo dan-
neggiare l´ingranaggio e/o il motore.
ES
- Funciones
A Interruptor de encendido B Tarjeta de audio C Claxon
D La palanca de cambios:
Adelante: Primir el botón „Forward-Backward“ en la posición „Forward“. Presione el pedal de
gas de modo que el vehículo se mueve hacia adelante.
Stop:
El vehículo se frena cuando se levante el pie del gas. Primir el botón „Forward-
Backward“ en la posición „Stop“
Atras:
Primir el botón „Forward-Backward“ en la posición „Backward“. Presione el pedal de
gas de modo que el vehículo se mueve hacia atras.
E Velocidad
High speed - alta velocidad
Low speed - baja velocidad
IMPORTANTE!
l modelo debe llegar a detenerse tan pronto como se cambia la dirección y la velocidad. Si
no se puede dañar el engranaje y/ o el motor.
A
E
D
B
C
3