4
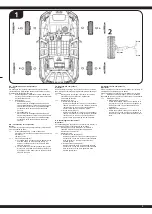
DE - Zusammenbau der Komponenten
1.2.
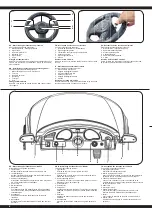
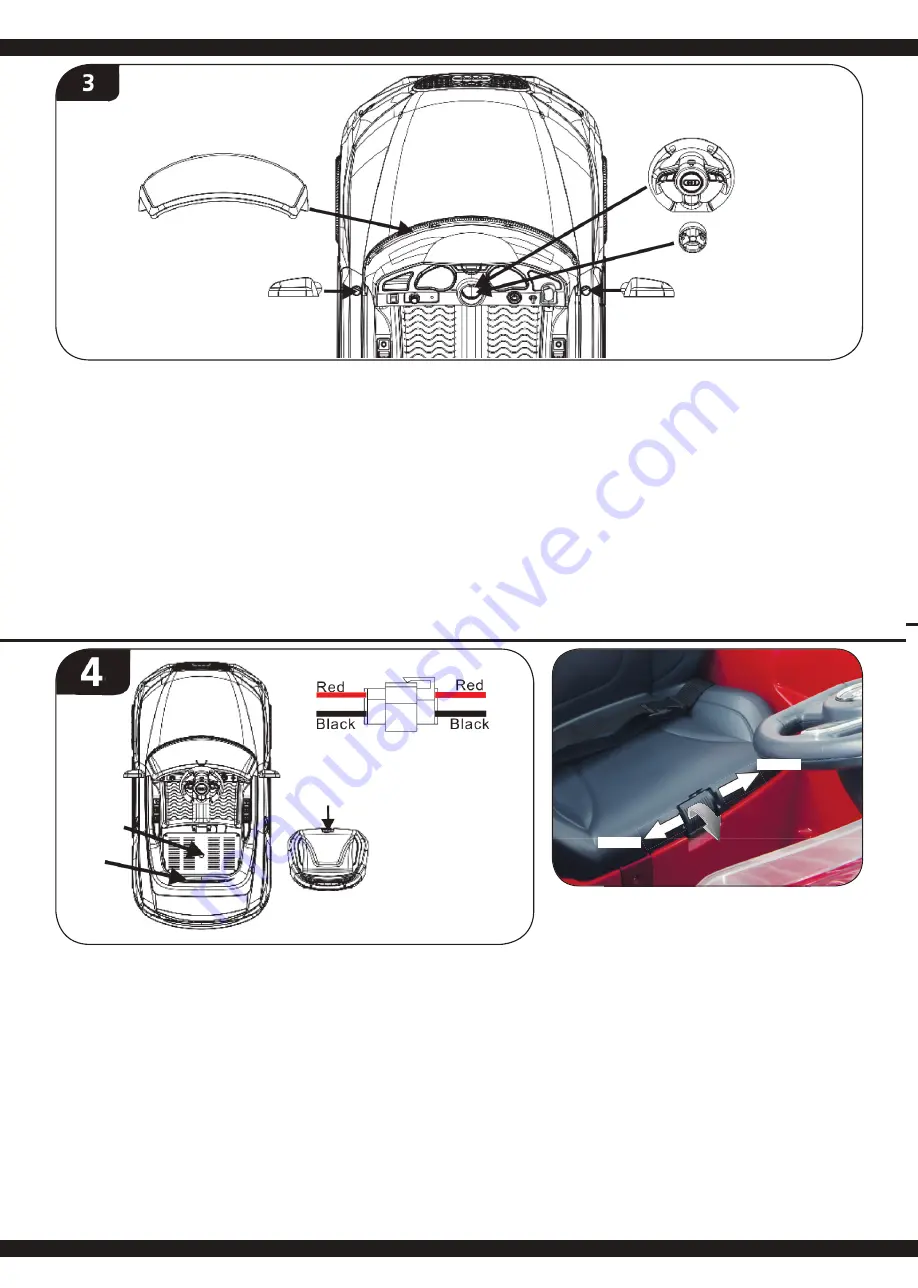
Montage Windschutzscheibe, Spiegel und Lenkrad
1.2.1
Bringen Sie die Windschutzscheibe in die vorgesehe-
ne Position, siehe Bild.
1.2.2
Bringen Sie die Rückspiegel in die vorgesehene
Position.
1.2.3
Verbinden Sie das Kabel vom Lenkrad mit dem Kabel
am Armaturenbrett. Installieren Sie das Lenkrad in der
vorgesehenen Position und sichern es mit der Sicher-
ungsschraube und der Mutter, siehe Bild.
● Sollten Sie das Modell länger nicht in Betrieb
nehmen, entfernen Sie den Akku.
GB - The assemby for components
1.2.
Components assembly, as fi g. 3 shown:
1.2.1
Put the windscreen into the slots as fi g. shown
1.2.2
Put the right and left mirrors into the slot
1.2.3
Connect the cable of steering wheel to the cable of
dash board (mechanical steering has one cable, and
electronic steering has two.); Second, fi t the steering
wheel into the steering tube, use screw and nut to
secure them, as fi g. 3.
● Take off the battery if not use for long time.
FR - Montage des composants
1.2
Montage pare-brise, rétroviseurs et du volant
1.2.1
Placez le pare-brise dans la position prévue, voir
image.
1.2.2
Fixez le rétroviseur dans la position prévue.
1.2.3 Branchez le câble du volant pour le câble sur le
tableau de bord. Installez le volant dans la position
correcte et le fi xer avec la vis et l‘écrou de sécurité,
voir photo.
• Veuillez retirer l’accu en de non-usages prolongés.
IT - Assemblaggio dei componenti
1.2.
Montaggio del parabrezza, specchi e volante
1.2.1
Posizionare il parabrezza nella posizione prevista, vedi
immagine.
1.2.2
Posizionare il specchietto nella posizione prevista.
1.2.3
Collegare il cavo del volante con il cavo sul cruscotto.
Installare il volante nella posizione prevista e fi ssarlo
con le vite e dato di bloccaggio, vedi immagine.
● Se non si utilizza il modello, rimuovere la batteria.
ES - Montaje de los componentes
1.2.
Montaje del parabrisas, espejo y volante
1.2.1
Posiciónar el parabrisas en la posición programada,
ver imagen.
1.2.2
Posiciónar el espejo retrovisor en la posición
programada.
1.2.3
Conectar el cable del volante con el cable en el
salpicadero. Instale el volante en la posición correcta y
fi jarlo con el tornillo y tuerca, ver imagen.
● Si no utiliza el modelo, extraiga la batería.
.
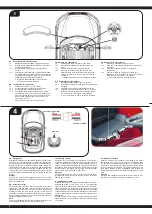
DE - Montage Sitz
Verbinden Sie den Akku mit dem Model, achten Sie auf die richti-
ge Polung (rot -> rot und schwarz -> schwarz). Die Stecker müs-
sen sich ohne großen Kraftaufwand zusammen stecken lassen.
Bringen Sie den Sitz in die Einbauposition, haken Sie die hin-
teren Zapfen in die Nuten ein. Drücken Sie den Sitz senkrecht
nach unten bis er hinten einrastet und verriegeln Sie den Ver-
schluss indem Sie ihn nach links schieben. Zum öffnen muss der
Verschluss nach rechts geschoben und zusätzlich weg gedrückt
werden.
Achtung:
Der Sitz ist mit einem Gurt ausgestattet, dieser ist nur zu De-
korationszwecken gedacht und darf nicht zur Absicherung eines
Kindes benutzt werden.
GB - Assemble the seat
Connect the battery with the model, pay attention to the correct
polarity (red -> red and black -> black). The plugs have to be put
together without much effort. Place the seat (3) in the mounting
position, hook the rear pins into the grooves. To lock the seat,
push down vertically and verriegeln Sie ihn, indem auf der linken
Seite zu sperren schieben. To open the lock must be pushed to
the right and pushed further away.
Note:
The seat is equipped with a belt, this is intended only for decora-
tive purposes and may not be used to protect a child.
FR - Montage du siège
Connectez l’accu au modèle. Faire attention à ce que les bor-
nes soient correctement connectées (rouge sur rouge ; noire sur
noire). La connexion des fi ches ne devrait opposer aucune ré-
sistance. Tenez le siège en position de montage puis enclencher
les tenons à l’arrière du siège dans les rainures prévues et ver-
rouillez l’arrêt en le glissant vers la gauche. Pour déverrouiller,
glissez vers la droite puis appuyer pour retirer.
Attention:
Le siège est équipé d’une ceinture. Celle-ci ne sert qu’à des ef-
fets décoratifs et ne doit en aucun cas servir comme ceinture de
sécurité pour un enfant.
IT - Montaggio del sedile
Collegare la batteria con il modello, prestare attenzione alla cor-
retta polarità (rosso -> rosso e nero -> nero). Le spine devono
essere facilmente collegati tra loro senza molto sforzo. Portare il
sedile in posizione di montaggio, agganciare il perno posteriore
nelle scanalature. Premere il sedile verso il basso fi no a quando
si incastra dietro e bloccare la chiusura spingendo verso sinistra.
Per aprire deve spingere la chiusra verso destra e spingere fuori.
Attenzione:
Il sedile é dotato di una cintura, questo é destinato soltanto a
scopo decorativo e non può essere utilizzata per salvaguardare
un bambino.
ES - Montaje del asiento
Conectar la batería con el modelo, prestar atención a la polari-
dad correcta (rojo -> rojo y negro ->negro). Los enchufes debe
ser fácilmente conectados entre ellos sin mucho esfuerzo. Lleve
el asiento en la posición de montaje, enganche el perno trasero
en las ranuras. Pulse el asiento hacia abajo hasta que encaja
hacia atrás y bloquear el cierre empujándola hacia la izquierda.
Para abrir tiene que empujar la cerradura a la derecha y empujar
fuera.
Atención:
El asiento está equipado con un cinturón, esto es soló para fi nes
decorativos y no puede ser usado para proteger a un niño.
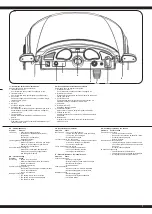
Connetor of signal box
Connetor of battery
Seat lock
OPEN
Close


