background image

RAC Plus I User’s Manual

4-8

Step 2

Using the numeric keys, enter the 
interval distance that you want the 
DPO signal generated, based on your 
selected unit of measurement (feet, 
mile, meter).

Step 3

Press the 

Enter

 key and you will be 

prompted to enter how long the DPO 
signal should last. You can key in a 
desired signal duration from 10 milli-
seconds (key in 1) to 2.55 seconds (key 
in 255). Keep in mind that if you select 
a long output duration your signals may 
run together at high speeds. A 10 millisecond pulse duration is usually 
adequate for sending pulses to a laptop computer and will not overlap at 
normal highway speeds.

Step 4

Press 

Enter

 and you will be prompted 

to select whether or not you want an 
audible tone to sound when the DPO 
signal is triggered. The 1 in D-1 signi-
fies that the tone is 

on

. If you want a 

tone with each output pulse, leave 1 in 
D-1. If you 

do not

 want a tone, enter zero (0) or press the Clear key.

Step 5

Once you have selected whether you 
want a tone or not, press 

Enter

. D-2 

will then indicate that the DPO signal 
has been activated.

Step 6

Press 

Enter

 to return to the initial menu screen, then press 

Enter 

again 

to exit the menu function. You are now back in the normal mode with the 
DPO signal set.

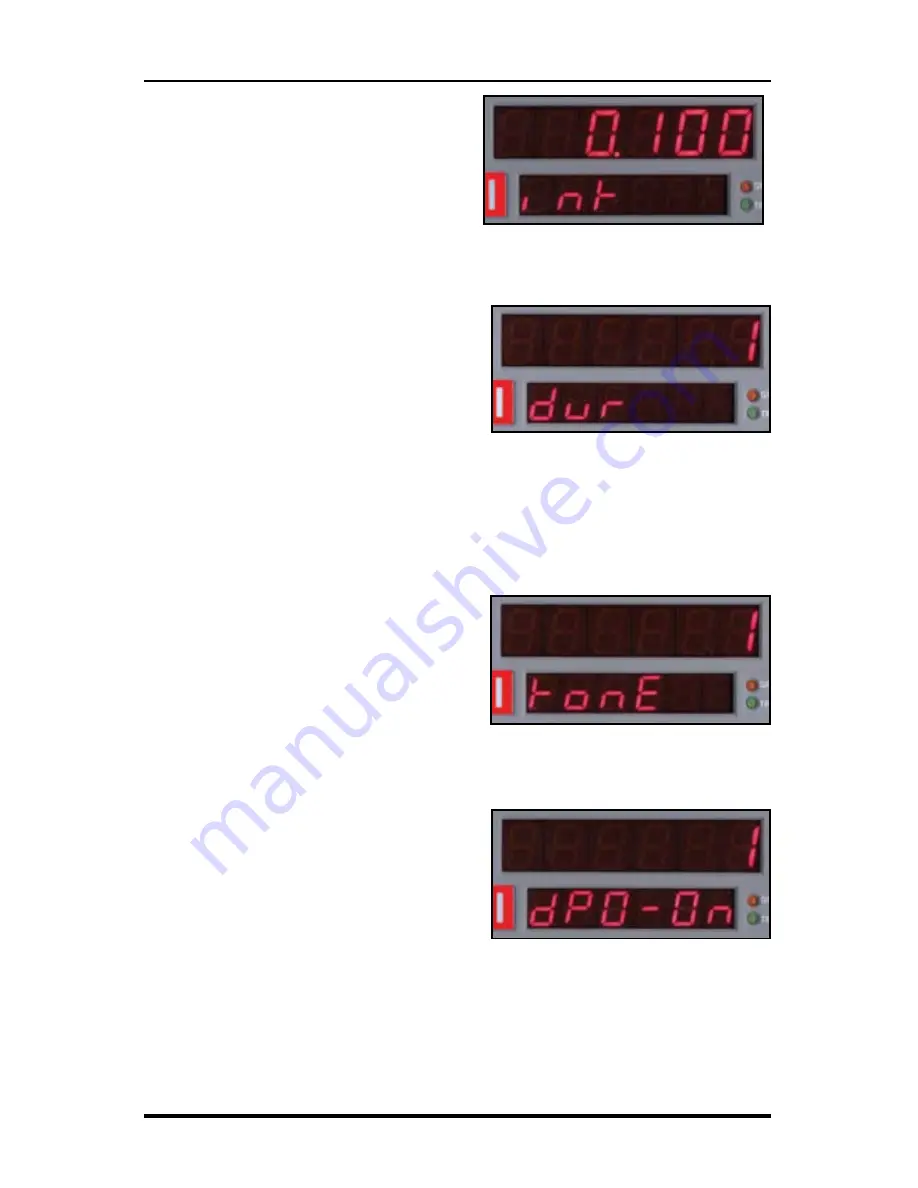
Fig. 4.9 —  DPO Distance Entered

Fig. 4.10 —  Enter DPO Duration

Fig. 4.11 —  DPO Tone On

Fig. 4.12 —  DPO Activated

Содержание RAC Plus I

Страница 1: ...i RAC Plus I User s Manual ...

Страница 2: ...in exchange for any part of any instrument of its manufacture which under normal installation use and servicediscloses such defect The instrument must be returned to the JAMAR factory or authorized service agent intact for examination with all transportation charges prepaid This warranty does not extend to any products which have been subject to misuse neglect accident incorrect wiring not our own...

Страница 3: ...R Technologies Inc 1500 Industry Road Suite C Hatfield PA 19440 We are pleased that you have chosen the RAC Plus I for your distance measuring needs We have strived to develop a unit that is easy to use and has the options that our customers require The RAC Plus I has undergone extensive testing to verify the accuracy of its operations and each unit is tested before it leaves our facility However ...

Страница 4: ...talling the Magnetic Distance Sensor 2 10 Installing the RAC Instrument 2 15 Calibration 3 1 Automatic Calibration Procedure 3 2 If Your RAC Fails to Calibrate 3 5 Manual Calibration Procedure 3 7 Key Functions Operating Procedures 4 1 RAC Plus I Key Functions 4 2 RAC Plus I Menu Functions 4 5 RAC Plus I Additional Features 4 10 Troubleshooting 5 1 Frequently Asked Questions 5 2 Appendix A 1 RAC P...

Страница 5: ... vehicle Once your RAC has been calibrated you should perform a test measurement over a known distance This will ensure that the instrument has been calibrated correctly To do a test measurement drive to your starting point and stop Turn on the RAC and wait until zero is shown on the larger upper display and CH is shown on the smaller lower display Next press the CH count hold button to release th...

Страница 6: ...RAC Plus I User s Manual vi ...

Страница 7: ...1 1 Chapter 1 Introduction to the RAC Plus I Chapter 1 Introduction to the RAC Plus I ...

Страница 8: ...Plus I is an accurate easy to use distance measuring instrument DMI that uses state of the art microprocessor technology It has been designed with features to provide you with a versatile and functional instrument that can be learned in a very short time Fig 1 1 RAC Plus I Distance Measuring Instrument ...

Страница 9: ... are used by a wide variety of customers who often have different needs and in a wide variety of vehicles that don t all work the same The simple breakdown of the three is that the AutoLink sensor is the new est and easiest to install plug and play no tools required but that ease of install trades a degree of accuracy The magnetic sensor is the most precise but much more intensive to install than ...

Страница 10: ...RAC Plus I User s Manual 1 4 ...

Страница 11: ...2 1 Chapter 2 Installation Chapter 2 Installation ...

Страница 12: ...k plugs or engine coil Do not install the wires or sensor near any objects that will get hot such as the manifold The installation wires or sensor can melt if they are too close to a heat source Do not install wires near any objects that could vibrate and cut the wires Tire pressure should be the maximum suggested by the tire manu facturer typically 32 35 PSI cold The tire should have ample tread ...

Страница 13: ...icle and the RAC Plus Distance Measuring Instrument Note Your RAC and vehicle should be turned off while plugging in the AutoLink cables Step 1 Plug the large OBD cable attached to the AutoLink II into the vehicle OBD connector The OBD connector is typically found under your dash near your steering wheel column Step 2 Connect the grey telephone style cable from the AutoLink II to the RAC Plus Powe...

Страница 14: ... be on constantly this is normal The self adhesive mounting tabs and the tie wraps included can be used to secure the OBD and the telephone style cable as desired Step 4 Calibrate the RAC as described in Chapter 3 You are then ready to start collecting data For Best Results OBD speed signals are generally not available below 1 MPH As such the AutoLink II is not recommended for use where the vehicl...

Страница 15: ...ehicle is idle for an extended time with the RAC connected and turned on This is particularly true if your battery is in poor condition The AutoLink II is turned on and off by the RAC s power switch and as such can be left connected to the OBD port while not in use Note that this was not the case with the original AutoLink I The AutoLink I should always be disconnected from the OBD when not in use...

Страница 16: ...ucks and autos you can go to the cruise control signal or to the vehicle ECU which is often located under the dashboard Note Vehicle wiring changes from year to year and model to model For technical support in lo cating the vehicle speed signal wire call JAMAR at 215 361 2244 Your local Auto Truck dealer can also usually tell you where the VSS can be located on your vehicle 3 Route the red and bla...

Страница 17: ...d solder the connections Insulate using electrical tape or silicone 4 Plug the connector of the VSS cable into the hole labeled VSS Input located on the right side of the MDS as shown in Figure 2 4 5 Route the black DMI cable from the MDS to the desired instrument location This will usually be routed between the doorpost and the dashboard Make sure the cable will not be pinched when closing the do...

Страница 18: ...he front of the MDS as shown in Figure 2 7 The adjustments go from 1 to 1 1 pulse into the sensor 1 pulse out through 64 to 1 64 pulses into the sensor 1 pulse out Although your particular vehicle may vary generally Chrysler and Ford vehicles use a 4 to 1 ratio position 4 on the switch while General Motors vehicles use a 16 to 1 ratio position 16 on the switch To adjust the ratio use a small screw...

Страница 19: ...ce connectors are supplied for convenience on initial installation However we recommend removing the tap splice connectors and reconnecting using wire to wire solder once you are sure all connections to the VSS are proper Insulate with sealant electrical tape as needed Fig 2 9 MDS Installation Diagram Vehicle Speed Sensor VSS Fire Wall Fire Wall Tap Splice Connector Battery RAC Connector Ground Bl...

Страница 20: ... different sensor skip this section For the installation you will need the Magnetic Sensor Kit shown below A Magnets B Epoxy C Zip Ties D Mounting Bracket E Hardware Kit F Magnetic Sensor G Extension Cable and the Vehicle Installation Kit shown below H Terminal Block I Power Cable J Ground Cable K DMI Connector Cable L Velcro M Zip Ties F G D B A E C Fig 2 10 Fig 2 11 H I J K L M ...

Страница 21: ...mount Terminal Block under dash inside vehicle Otherwise mount under hood in convenient location left fender well to accommodate necessary wiring K H Red Green Yellow Black Black White Red Ground 12 VDC Red fuse Sensor assembly must not be mounted more than 45 from perpendicular 45 max Sensor Green body 3 8 nuts 1 4 to 1 2 air gap 1 Minimum 1 Minimum Epoxy Magnets to Drive Shaft alternating polari...

Страница 22: ...ie the magnets in place after the epoxy dries to make sure they stay in place Mount the first magnet with the SOUTH pole side dashed line facing toward the hub or shaft Mount the second magnet with the NORTH pole side facing toward the hub or shaft as shown in Figure 2 14 A test magnet should be used after installation to ensure the magnets have been placed correctly Pass the test magnet over the ...

Страница 23: ...ng of about to inch The cable coming from the Magnetic Sen sor will be used as part of the next step Step 3 Installing and Wiring theTerminal Block Mount the Terminal Block H provided with the Vehicle Instal lation Kit under the dash inside the vehicle if possible If it is not possible to mount it inside the vehicle mount on the driver s side fender well or other con venient location The terminal ...

Страница 24: ... cut the plug off the end of the smaller magnetic sensor cable strip the wires and attach to the terminal block as shown in Figure 2 17 Once the magnetic sensor has been properly connected to the terminal block connect the terminal block to the vehicle s battery using the black and red cables provided The RED wire with the in line fuse 12VDC should be connected to the POSITIVE terminal on the batt...

Страница 25: ...t of the dashboard using the Velcro provided Two plastic L brackets are also provided to facilitate mounting to the top of the dashboard if that is your preferred location For best results attach the L bracket so that the bottom of the L is facing away from the RAC as shown in figure 2 8 Using the two L brackets allows you to compensate for curved dashboards even if it requires the RAC to be mount...

Страница 26: ...RAC Plus I User s Manual 2 16 Once you have mounted your RAC and connected it to the distance sensor proceed to the calibration instructions in the following chapter ...

Страница 27: ...3 1 Chapter 3 Calibration Chapter 3 Calibration ...

Страница 28: ...ce more than 500 feet One thousand feet is ideal but the course can be any distance over 500 feet for example 623 feet from pole to tree Your course should be straight and accurate so take the time to measure the course using a 100 tape or hand wheel Mark the beginning and ending points so they can be seen from inside your vehicle Remember the course length can be any accurate distance over 500 fe...

Страница 29: ... This is not the distance being traveled so don t panic when the display doesn t equal the actual length of your calibration course When you reach the end of the course stop your vehicle so you are exactly aligned using the same reference point in the vehicle with the end course marker Step 6 Press the CH key The calibration factor will then be shown in D 1 You should record the calibration number...

Страница 30: ...should be between 500 and 1 200 If your calibra tion number is below this range you need to use a higher division factor such as 16 on the Modular Distance Sensor MDS Of course if your calibra tion number is too high you can lower the number by using a lower number such as 1 on your MDS This is done by adjusting the rotary switch on the MDS so the slot points to 1 2 8 16 32 or 64 Note The adjustab...

Страница 31: ...RAC did count everything from the MDS up to the RAC is okay and the problem is most likely either a poor connection at the vehicle s speed sensor or the connection is not at the correct location to get the vehicle speed signal The speed sensor output is generally at the transmission or the rear differential If you are unsure about being attached to the correct output disconnect the plug and move t...

Страница 32: ...p and Test positions four or five times Note that when the switch is turned clock wise until it stops it is at the Test position The RAC should register The count shown does not matter just as long as the RAC did register a count If it did count the cable from the MDS to the RAC and the instrument itself are OK If the RAC did not count the problem is most likely a bad cable to the RAC or the RAC i...

Страница 33: ... following procedure assumes the calibration number for a particular vehicle has already been determined and is stored in memory Step 1 Slide the ON OFF switch to ON The RAC Plus will complete a brief Self Test during which a tone will sound and the active calibration number will be displayed in D 1 while the vehicle number is displayed in D 2 After the self test 0 is shown in D 1 0 000 if the mil...

Страница 34: ...ration number for the vehicle selected Step 5 Press Enter to return to the initial menu screen then press Enter again to exit the menu function The new vehicle number and or calibration number is stored in memory and the RAC is back to normal measuring mode Once your DMI is properly installed and calibrated you are ready to begin accurately measuring distance Fig 3 9 Calibration Number Cleared Fig...

Страница 35: ...4 1 Chapter 4 Key Functions Operating Procedures Chapter 4 Key Functions Operating Procedures ...

Страница 36: ...power to the RAC Plus When turned on the RAC will do the following 1 Initiate internal Self Test sequence 2 Display calibration number in D 1 and vehicle number in D 2 along with a 3 second tone 3 Set itself in Count Hold with CH displayed in D 2 4 Set the unit of measuring feet mile meter and the vehicle number to be the last one used when the RAC was turned off 5 Set itself to count up 6 Set the...

Страница 37: ... allows you to turn on or off the display of speed mph or kph in D 2 The display of speed is not interrupted by either the Count Hold or Display Hold keys The Menu key allows you to select from a variety of func tions After pressing the Menu button the Add and Sub keys can be used to scroll through the options which are displayed in D 2 To select an option press the ENT Enter key The options are M...

Страница 38: ...ssed the brightness will drop one level until the lowest level is reached It will then jump back to the high brightness level Both D 1 and D 2 as well as the LED indicators are controlled by the Dim key The Clear key is normally used to clear the D 1 distance display as well as the Interval Distance in D 2 if that function has been selected Clear can be used on the run while measuring which allows...

Страница 39: ...to subtract off a distance currently on display in D 1 Note The RAC must be in Count Hold to use Pre Distance Step 1 Press the Menu key the 3 key then the Enter key At this point the unit is ready to have a distance entered Step 2 Using the numeric keys key in the desired distance up to 6 digits then press Enter Step 3 PressEntertoreturntotheinitialmenu screen then press Enter again to exit the me...

Страница 40: ...lear key or just let it continue to run To return to normal mode press the Menu key then the Enter key To Set Timer to Real Time Step 1 Press the Menu key then the 4 key then the Enter key D 1 shows the elapsed time since the RAC was powered on as shown in Figure 4 6 above Step 2 Press the Clear key Using the number keys key in the time you wish to dis play hh mm ss format This can be either 12 or...

Страница 41: ...e interval and signal dura tion This low level signal is provided on the red wire in the power signal cable The 5VDC signal can be used to send distance pulsed to a computer or other device that can accommodate low voltage low current signals Should you wish to control a 12 VDC high current device you will need our optional DPO Amplifier In addition to creating a DPO pulse at the pulse interval on...

Страница 42: ...aptop computer and will not overlap at normal highway speeds Step 4 Press Enter and you will be prompted to select whether or not you want an audible tone to sound when the DPO signal is triggered The 1 in D 1 signi fies that the tone is on If you want a tone with each output pulse leave 1 in D 1 If you do not want a tone enter zero 0 or press the Clear key Step 5 Once you have selected whether yo...

Страница 43: ...dicatethattheDPOsignalhasbeen deactivated Step 4 Press Enter to return to the initial menu screen then press Enter again to exit the menu function You are now back in the normal mode with the DPO signal turned off Note WhentheRACisturnedoff theDPOdistanceintervaldurationresets to zero 0 thereby deactivating the output If you turn the RAC off you must reset this if you want the DPO to be activated ...

Страница 44: ...nce while D 2 will be used to show the Interval Distance Step 2 As you pass each reference point press the Enter key D 1 continues to show overall distance travelled while D 2 will lock on the current interval distance Each time the Enter key is pressed D 2 will update to the most recent interval distance There is no limit to the number of times you can use the Enter key to update the inter val di...

Страница 45: ...5 1 Chapter 5 Troubleshooting Chapter 5 Troubleshooting ...

Страница 46: ...ction you have chosen the correct plug wires 3 Perform a Sensor Test Locate the Sensor Test button on the front upper right of the Modular Distance Sensor When pressed this will generate an internal low level signal that is fed directly into the VSS Input circuit First unplug the VSS Input connector from the right side of the MDS Second turn on the RAC and press the CH key just like you would prio...

Страница 47: ...lf are OK If the RAC did not count the problem is most likely a bad cable to the RAC or the RAC itself is bad If available try another RAC and repeat the Tap Test If the second RAC doesn t count the problem has to be the cable between the MDS and the RAC Once the test is complete return the Rotary Switch to the previous position 5 If after checking these items the RAC still does not count contact ...

Страница 48: ...rrect locations 2 There may be a problem with the telephone jack on the power signal cable Check to make sure the contacts are not bent Q My RAC counts in increments of 2 5 10 etc What s wrong A Your calibration number is too high The calibration number should be between 500 and 1 200 You can lower the calibration number by adjusting the rotary switch on your modular distance sensor Refer to Chapt...

Страница 49: ...A 1 Appendix Appendix ...

Страница 50: ...ower up w display of calibration vehicle number Automatic Distance Conversion Miles thousandths to Total Feet to Meters kilometers Count Hold Stops accumulation of distance Display Hold Freezes display without loss of distance Pre distance Capability of starting at known distance or Add Subtract desired distance value from current distance display Interval Distance Display of distance between sele...

Страница 51: ...A 3 Appendix Power Connection Wiring 4 3 2 1 Pin 1 Yellow 12 VDC Pin 2 Green Sensor Input Pin 3 Red DPO Pin 4 Black Signal Ground ...

Страница 52: ...the RAC that resets the distance or time to zero Page 4 4 CH Count Hold red button on the RAC which stops the computation of distance pulses Page 4 2 DH Display Hold red button on the RAC which stops the display but allows the RAC to continue accumulating distance internally Page 4 3 DMI generic industry term meaning Distance Measuring Instrument The RAC Plus I and Plus II are DMIs DPO Distance Pu...

Страница 53: ...rough a sensor are read by the RAC to calculate distance traveled Page 1 3 pulse rate the frequency at which pulses are sent to the RAC They can vary from 4 000 to more than 100 000 per mile Page 1 3 P Dis Pre Distance menu function of the RAC it allows you to enter a known distance into the RAC Page 4 5 RAC Road Analysis Computer Brand name for JAMAR s distance measuring instruments SP Speed blac...

Страница 54: ..._________ Veh No ______________________ Cal Factor _________________ Veh Odometer _______________ User Initials ________________ Date _________________________ Veh No ______________________ Cal Factor _________________ Veh Odometer _______________ User Initials ________________ Date _________________________ Veh No ______________________ Cal Factor _________________ Veh Odometer _______________ Us...

Страница 55: ...A 7 ...

Страница 56: ...RAC Plus I User s Manual A 8 ...

Отзывы: