

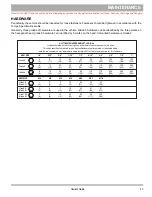
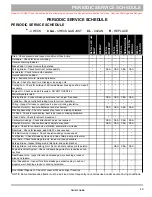

PERIODIC SERVICE SCHEDULE
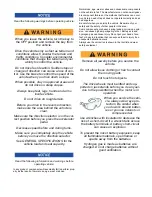
Read all of SAFETY and this section before attempting any procedure. Pay particular attention to Notices, Cautions, Warnings and Dangers.
49
Owner’s Guide
PERIODIC SERVICE SCHEDULE
PERIODIC SERVICE SCHEDULE
*
- CHECK
C&A
- CHECK & ADJUST
CL
- CLEAN
R
- REPLACE
REMARKS
Bef
o
re ea
ch us
e
DA
IL
Y
WEE
K
L
Y
20
h
rs
MONTHL
Y
50
h
rs
QUAR
TER
L
Y
12
5 hrs
SEMI-ANN
UAL
25
0 - 30
0 hrs
AN
NUAL
50
0 hrs
5 YEARS
Tires - Check pressure and inspect condition of tires & rims.
*
*
*
*
*
*
Hardware - Check for loose or missing.
*
*
*
*
*
*
Reverse Warning Indicator
*
*
*
*
*
*
Brake Pedal - Check for smooth operation
*
*
*
*
*
*
Parking Brake - Check for correct hold capability.
*
*
C&A
C&A
C&A
C&A
Accelerator - Check for smooth operation.
*
*
*
*
*
*
Overall Vehicle Condition
*
*
*
*
*
*
Tires - Examine for cuts, wear and pressure.
*
*
*
*
*
Wheels - Check for bent rims, missing or loose lug nuts.
*
*
*
*
*
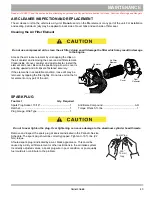
Cooling Fan - Check for build-up of dirt inside blower housing and fins; clean if
necessary
*
*
*
*
*
Engine Oil - Check and add if required - DO NOT OVERFILL
*
*
*
*
*
Starter/Generator Belt
*
*
*
*
*
Parking Brake - Conduct brake performance test; adjust if required.
C&A
C&A
C&A
C&A
Controller - Check controller braking force for correct operation.
*
*
*
*
Wiring - Inspect for loose connections, broken or missing insulation.
*
*
*
*
Direction Selector - Inspect attachment and mechanism.
C&A
C&A
C&A
C&A
Steering Assembly - Check for excess play, loose or missing hardware.
*
*
*
*
Tie Rods - Check for excess play, bent rods, loose or missing hardware.
*
*
*
*
Choke Cable - Check for smooth movement
*
*
*
*
Carburetor Linkage - Check attachment; adjust as required.
C&A
C&A
C&A
C&A
Direction Selector - Check attachment; adjust as required.
C&A
C&A
C&A
C&A
Engine - Check for unusual noise, vibration, acceleration, oil leaks
*
*
*
*
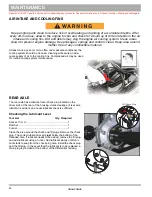
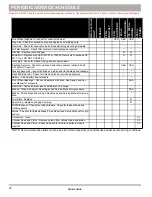
Rear Axle - Check for leakage; add SAE 30 oil as required
*
*
*
*
Throttle/Governor Linkage - Check operation and governed speed
*
*
*
Fuel System - Check for leaks at tank, cap, lines, filters, pump, carburetor
*
*
*
Front Axle - Check for damage to axle, loose or missing hardware.
*
*
*
Parking Brake - Inspect linkage rods, latch arm and catch bracket.
*
*
*
Parking Brake - Lubricate with light oil. Do not lubricate cables or brake latch.
C&A
C&A
C&A
Engine Electrical System - Check coil/spark plug wires for cracks/loose con-
nections
*
*
*
Rear Suspension - Inspect for shock oil leakage, worn bushings, loose or
missing hardware.
*
*
*
Front Suspension - Inspect for strut oil leakage, excessive play in hubs or
kingpins, worn bushings, loose or missing hardware.
*
*
*
Front Wheel Alignment - Check for unusual tire wear; align if required
*
*
*
*NOTE: Some maintenance items must be serviced more frequently on vehicles used under severe driving conditions.


