background image

GB-15

RANSOMES HR3806 Series: DZ

SAFETY AND OPERATORS MANUAL

6

CONTROLS

6.10

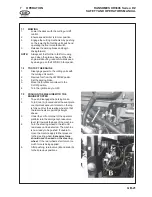
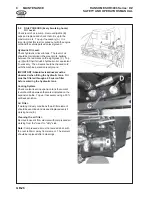
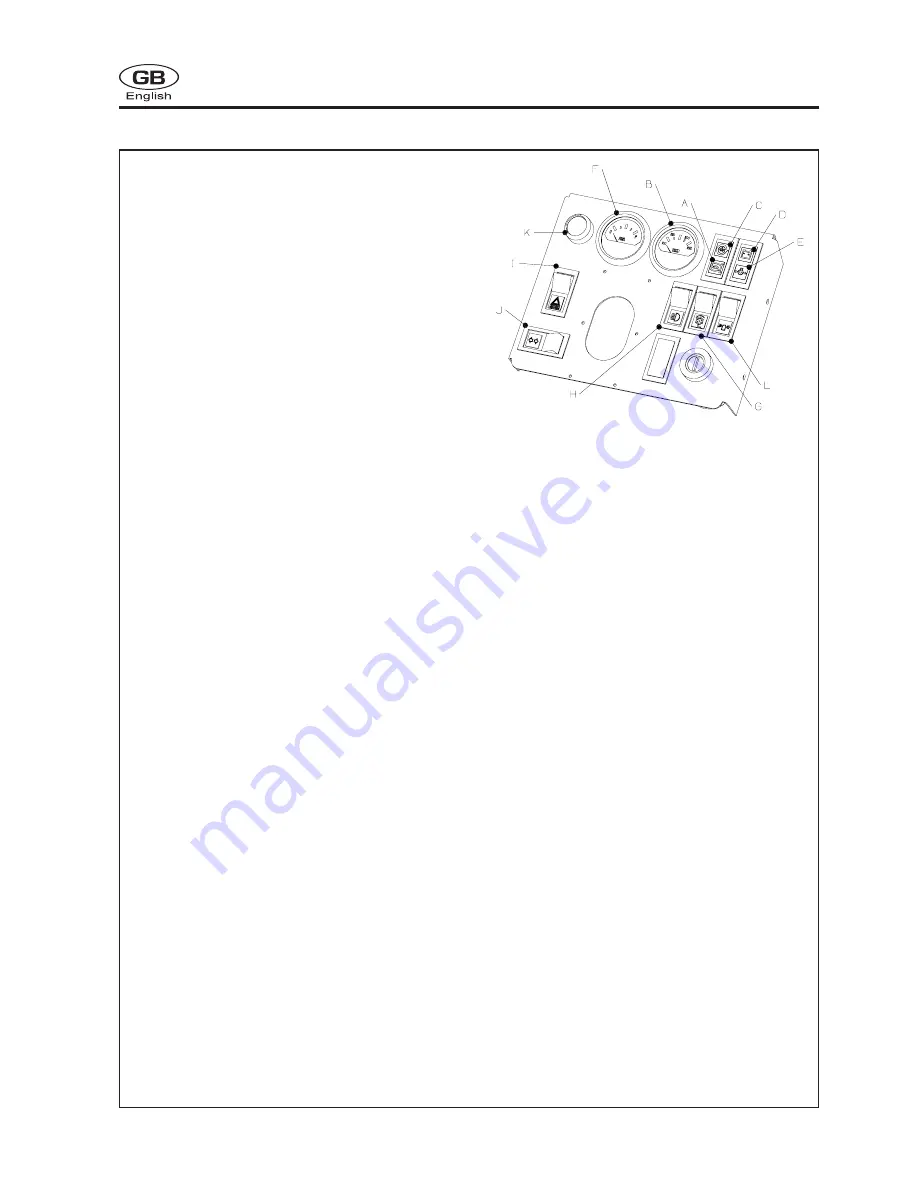
INSTRUMENT PANEL

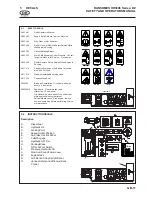
A.

ENGINE PREHEAT INDICATOR LAMP

Colour green, on when the ignition switch is turned
clockwise to the pre-heat position.  Once the lamp
goes out the engine can be started.

B.

ENGINE TEMPERATURE GAUGE

Indicates current temperature of engine, whilst
running.

C.

HYDRAULIC OIL WARNING LAMP

Colour red, on when the hydraulic oil temperature
reaches a preset level.  If the lamp comes on bring
the machine to a stop, disengage the cutting units,
apply the parking brake and stop the engine.  The
lamp will also turn on when the charge filter is
blocked.

D.

CHARGING WARNING LAMP

Colour red, on when ignition is switched on and will
go out when the engine is started.  If the light comes
on while the engine is running, the fan belt may be
slipping or broken or a fault in the electrical system
is indicated and should be investigated.  STOP
IMMEDIATELY
.

E.

ENGINE OIL PRESSURE WARNING LAMP

Colour red, on when the ignition is switched on, and
will go out once the engine has started.  If the light
comes on while the engine is running - STOP
IMMEDIATELY
 as this indicates that the engine oil
pressure is too low.  Check the level of oil in the
sump and top up as necessary.  Check the oil
pressure sender switch.  Continued operation may
cause extensive damage to the engine.

F.

FUEL GAUGE

Located to the left of the engine temperature gauge.
Monitors fuel level.

G:

PTO SWITCH

To commence cutting ensure the decks have been
lowered  Push  bottom of the rocker switch (A) and
depress foot switch.  Push top of rocker switch to
stop cutter unit rotation.  (Cutting units stop rotating
automatically when raised.)

H:

HEADLIGHT SWITCH

(Optional equipment )-Push switch half way for
running lights. Push down fully for headlights

I:

HAZARD LIGHTS SWITCH

(Optional equipment)- Push down for flashing hazard
lights.

J:

TURN SIGNAL LIGHTS SWITCH

(Optional equipment )-rotate switch handle
counterclockwise for L.H. turn and clockwise for a
R.H. turn.

K:

HORN

(Optional equipment) press switch to operate the
horn.

L:

ROTATING BEACON

(Optional equipment) Press the bottom half of the
switch to activate the flashing beacon.

Содержание ransomes hr3806

Страница 1: ...l impiego della macchina devono essere informati dei pericoli e devono leggere l intero manuale Safety and Operation Manual Manuale Operativo e di Sicurezza WARNING If incorrectly used this machine can cause severe injury Those who use and maintain this machine should be trained in its proper use warned of its dangers and should read the entire manual before attempting to set up operate adjust or ...

Страница 2: ... 2004 Ransomes Jacobsen Limited All Rights Reserved ...

Страница 3: ... 5 1 SAFETYDECALS 11 5 2 INSTRUCTIONDECALS 11 6 CONTROLS 6 1 STARTERKEYSWITCH 12 6 2 THROTTLECONTROLLEVER 12 6 3 STEERINGWHEELRAKEADJUSTMENT 12 6 4 TRACTIONFOOTPEDAL 12 6 5 SPEEDLIMITER 12 6 6 PARKINGBRAKE 13 6 7 DIFFLOCKCONTROL 13 6 8 HYDRAULICLIFTLEVERS 14 6 9 CUTTINGUNITSWITCHES 14 6 10 INSTRUMENTPANEL 15 6 11 HOURMETER 16 6 12 HORN 16 6 13 BONNETRELEASEKEY 16 7 OPERATION 7 2 TRAILERTIEDOWNSFOR...

Страница 4: ...th and strict adherence to the conditions of operation service and repair as specified by the manufacturer also constitute essential elements of the intendeduse Before attempting to operate this machine ALL operators MUST read through this manual and make themselves thoroughly conversant with Safety Instructions controls lubrication and maintenance Accident prevention regulations all other general...

Страница 5: ... the Highway Code both on and off the roads Keep alert and aware at all times Watch out for traffic when crossing or nearroadways Stop the blades rotating before crossing surfaces other than grass Remember that some people are deaf or blind and that children and animals can be unpredictable Keep travelling speeds low enough for an emergency stop to be effective and safe at all times in any conditi...

Страница 6: ...r Make sure that other people are not touching any cutting units as rotation of one unit can cause the others to rotate To reduce the fire hazard keep the engine silencer and battery compartments free of grass leaves or excessive grease Replace worn or damaged parts for safety When working underneath lifted parts or machines make sure adequate support Is provided Do not dismantle the machine witho...

Страница 7: ... or moderate injury and property damage It may also be used to alert against unsafe practices IMPORTANT Transport speed is for highway use only Never select transport speed on grass areas or uneven or unsurfaced roads or tracks California Proposition 65 Engine Exhaust some of its constituents and certain vehicle components contain or emit chemicals known to the state of California to cause cancer ...

Страница 8: ...licTank Capacity 18 8 litres Battery Exide 065 S E R U S S E R P E R Y T t c u d o r P l e e h W t n o r F l e e h W r a e R e z i S e r y T e p y T e r y T e r u s s e r P e r y T e z i S e r y T e p y T e r y T e r u s s e r P e r y T 6 0 8 3 R H 2 1 0 0 3 1 x 4 2 s i x x a M r p 4 S 5 6 1 C n r e t t a p d a e r t i s p 0 2 r a b 7 3 1 8 0 0 0 1 x 0 2 r p 6 c a r T f r u T n a t i T i s p 0 2 4...

Страница 9: ... 0 6 0 8 3 R H S E M O S N A R 0 6 m 2 5 1 h t i w Z D s e i r e S k c e d o r i v n E n o i t a r e l e c c A m r A d n a H l e v e l H R r o H L x a M s m s n o i t a r e l e c c A 2 q e A X q e A Y q e A Z 0 8 5 0 5 9 3 0 9 8 5 0 e u l a V t n a n i m o D 9 8 5 0 6 0 8 3 R H S E M O S N A R 2 7 m 2 8 1 h t i w Z D s e i r e S k c e d o r i v n E n o i t a r e l e c c A m r A d n a H l e v e l H...

Страница 10: ...I S O C S I V L I O F 7 7 C 5 2 E V O B A 0 3 E A S r o 0 3 W 0 1 E A S 0 4 W 0 1 E A S F 7 7 o t F 2 3 C 5 2 o t C 0 0 2 E A S r o 0 3 W 0 1 E A S 0 4 W 0 1 E A S F 2 3 C 0 W O L E B W 0 1 E A S r o 0 3 W 0 1 E A S 0 4 W 0 1 E A S Hydraulic Oil Shell Tellus 46 Grease Shell Darina R2 or equivalent 4 7 CUTTINGPERFORMANCE AREA 152cmModel 1 44 hectares hr at 12 km hr 160cmModel 1 52 hectares hr at 12...

Страница 11: ...en Amendementen alsmede aan de verordeningen die deze omzetten in nationale wetgeving den Bestimmungen der folgenden Europa Richtlinien einschließlich aller Änderungen und Ergänzungen sowie den Vorschriften die diese in das nationale Recht umsetzen entspricht soddisfa quanto previsto dalle seguenti direttive ed emendamenti europei e dalle normative che li riportano in legge nazionale Overholder be...

Страница 12: ...guente standard armonizzato o requisiti tecnici Overholder følgende harmoniserede standardbestemmelser eller tekniske bestemmelser Uppfyller följande harmoniserade standard eller tekniska definitione täyttää seuraavat harmonisoidut standardit tai tekniset edellytykset Cumple con los siguientes estándares de hramonización o provisiones técnicas Está em conformidade com a norma harmonizada ou com as...

Страница 13: ...um permitable working slope A911434 Caution Diesel Fuel 2000643 Blade bolt installation Fit conical washer as shown See manual 009239810 See Above Where relevant and Hydraulic oil See manual Fire Hazard Remove debris from under seat plate and in engine compartment Service Maintenance Stop engine remove key and spark plug before performing service or maintenance 5 2 INSTRUCTIONDECALS Description A ...

Страница 14: ...knob A is situated on the side of the control console on the left hand side To adjust turn the clamping knob anticlockwise to release and pivot the steering wheel backwards and forwards to obtain desired setting then lock in position by turning clamping knob clockwise 6 4 TRACTIONFOOTPEDAL To move the machine forward press the front of the foot pedal A To reverse depress the rear of the foot pedal...

Страница 15: ... brake must be applied to start the machine and when stopping and leaving the seat CAUTION The parking brake must not be applied whilst the vehicle is moving 6 7 DIFFLOCKCONTROL The Diff lock A is operated by depressing the foot switch When the foot switch is released the Diff Lock ceases to operate The Diff Lock should only be used in severe situations and should never be used on hard sufaces in ...

Страница 16: ...ower Movetheleverfullyforwardsandrelease the unit will lower to ground level DO NOT hold lever in forwardposition NOTE Theunitwillonlyliftandlowerwhentheengine is running IMPORTANT If when cutting the lift control lever is accidentally pulled back the cutting unit will not float over ground undulations until the lever is pushed fully forward and allowed to return to neutral again 6 9 CUTTINGUNITSW...

Страница 17: ...ed on when the ignition is switched on and will go out once the engine has started If the light comes on while the engine is running STOP IMMEDIATELY as this indicates that the engine oil pressure is too low Check the level of oil in the sump and top up as necessary Check the oil pressure sender switch Continued operation may cause extensive damage to the engine F FUELGAUGE Located to the left of ...

Страница 18: ... the engine immediately and resolvetheproblem b Horn A sounds intermittently this indicates a low engine oil pressure condition If this occurs turn off the engine immediately and resolve the problem 6 13 BONNETRELEASEKEY Release bonnet by inserting key A into base of the latch bracket and lever the rubber strap out of the base 6 11 HOURMETER Located on the left hand side of the steering tower abov...

Страница 19: ...ECTION 1 Perform a visual inspection of the entire unit look for signs of wear lose hardware and missing or damaged components Check for fuel and oil leaks to ensure connections are tight and hoses and tubes are in good condition 2 Check the fuel supply radiator coolant level crankcase oil level and air cleaner indicator All fluids must be at the full mark with the engine cold 3 Remove all grass d...

Страница 20: ... during test 4 3 Refer to the chart below for each test and follow the check tick marks across the chart Shut engine off between each test Test1 Represents normal starting procedure The operator is seated parking brake is engaged the operators feet are off the pedals and the mower engagement device is off The engine should start Test 2 The engine must not start if the mower engage device is on Tes...

Страница 21: ...to bystanders and or damage to their property 6 Use discretion when mowing near gravel areas roadway parking areas cart paths etc Stones discharged from the implement may cause serious injuries to bystanders and or damage the equipment 7 Disengage the drive motors and raise the implements when crossing paths or roads Look out for traffic 8 Stop and inspect the equipment for damage immediately afte...

Страница 22: ...t goes off 5 10sec 3 Turn ignition key fully clockwise to the start position and operate the starter motor until the engine starts should only take a fewseconds 4 When the engine starts release the key immediately and it will return to the RUN position 5 If the engine does not start preheat the glow plugs and try again NOTES Warm engine When the engine is warm becauseofsurroundingtemperatureor rec...

Страница 23: ...arking brake 3 Move the throttle control lever to the SLOW position 4 Turn the ignition key to OFF 7 9 PUSHING THE MACHINE WITH THE ENGINESTOPPED 1 To push disengage the parking brake 2 Turn Knob A located under the seat plate counter clockwise until marker on the top is fully out Set the steering wheel so that the rear wheels are pointing straight ahead 3 Under the LH front corner of the operator...

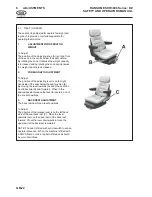
Страница 24: ...sting lever is on the right hand side of the seat below the seat cushion B By moving the lever towards the seat the seat can be slid backwards and forwards When in the desired position release the lever to locate in one of the pre set positions 3 BACKRESTADJUSTMENT The back rest has three preset positions To Adjust The position of the release lever is on the left hand side of the seat back rest C ...

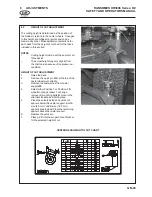
Страница 25: ...m the chart value because of tire pressure or condition HEIGHTOFCUTADJUSTMENT 1 Raise the deck 2 Remove the quick pin Q from the top of the caster wheel pivot spindle 3 Remove the caster wheel from caster support M 4 Select either Position 1 or Position 2 for wheel mounting bracket To change remove 4 mounting bolts R move to the alternate location and bolt in place 5 Place the selected size and nu...

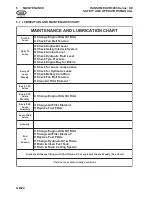
Страница 26: ...i d n o C y r e t t a B k c e h C z n o i s n e T t l e B n a F k c e h C z t n e m e l E r e t l i F r i A n a e l C 0 0 1 y r e v E s r u o h 0 5 2 y r e v E s r u o h y l h t n o M z r e t l i F l i O l i O e n i g n E e g n a h C 0 0 5 y r e v E s r u o h y l r e t r a u Q z t n e m e l E r e t l i F r i A e g n a h C z s r e t l i F l e u F e c a l p e R 0 0 0 1 y r e v E s r u o h y l l a u ...

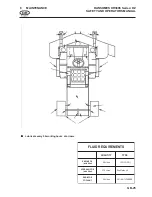
Страница 27: ...L F Y T I T N A U Q E P Y T L I O E N I G N E r e t l i f h t i w s e r t i L 0 6 D C 0 3 W 0 1 L I O C I L U A R D Y H r e t l i f h t i w s e r t i L 0 7 3 6 4 s u l l e T l l e h S R O T A I D A R T N A L O O C s e r t i L 5 5 E Z E E R F I T N A 0 5 z z z z z Lubricate every 50 working hours at arrows ...

Страница 28: ...hould be checked cold with the machine parked on level ground IMPORTANT Absolute cleanliness must be observed when filling the hydraulic tank Oil must be filtered through a 25 micron filter before entering the hydraulic tank Cooling System Check coolant level in expansion tank the coolant level should be between the marks indicated on the expansion bottle Top up if necessary using a 50 antifreezes...

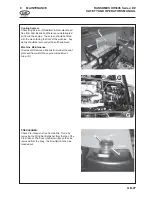
Страница 29: ...sh facing the front of the machine Any debris should be removed with a soft hand brush Machine Maintenance Fire Hazard Remove all debris from under the seat plate and from within the engine compartment Area G 9 MAINTENANCE PRE CLEANER Check Pre Cleaner is free from debris This is by removing the Wing Nut Washer from the top of the Pre Cleaner The Cover A Bowl B can then be removed from the body th...

Страница 30: ...The use of non recommended oil or lubricant nullifies the guarantee Damage through transport or normal wear does not come under the guarantee The warranty is extended to the original purchaser only and is not transferable to subsequent owners The warranty period begins on the date the product is delivered to the end user customer unless otherwise agreed with the manufacturer At the end of the firs...

Страница 31: ...ERRUTTOREDIAVVIAMENTO 12 6 2 LEVADELL ACCELERATORE 12 6 3 REGOLAZIONEDELL ANGOLOD INCLINAZIONEDELVOLANTE 12 6 4 PEDALEDELLATRAZIONE 12 6 5 LIMITATOREDIVELOCITÀ 12 6 6 FRENODISTAZIONAMENTO 13 6 7 COMANDODELBLOCCAGGIODELDIFFERENZIALE 13 6 8 LEVEDISOLLEVAMENTOIDRAULICO 14 6 9 INTERRUTTORIDELL UNITÀDITAGLIO 14 6 10 QUADROSTRUMENTI 15 6 11 CONTAORE 16 6 12 AVVISATOREACUSTICO 16 6 13 CHIAVEDIRILASCIODEL...

Страница 32: ...oso ed il suo utilizzo per qualsiasi altra operazione è considerato contrario all uso previsto Gli elementi essenziali dell uso previsto comprendono la rigorosa osservanza delle condizioni d impiego manutenzione e riparazione in conformità alle istruzioni del fabbricante Prima di utilizzare questa macchina TUTTI gli operatori DEVONO leggere attentamente il presente manuale e familiarizzarsi con le...

Страница 33: ...da siasu strada che al di fuori di essa Prestare in tutti i casi il massimo livello d attenzione e prendere atto delle situazioni circostanti Prestare attenzione al traffico se si devono attraversare delle strade o si deve lavorare in prossimità di strade Interrompere la rotazione delle lame prima di attraversaresuperficinonerbose Considerare la possibile presenza di persone non vedenti e non uden...

Страница 34: ... tutte le parti mobili siano ferme Innestareifreniescollegaretutteletrasmissioni Leggere tutte le istruzioni pertinenti all assistenza Usaresololepartidiricambiooriginalifornitedal produttore Assicurarsi che altre persone non tocchino le partitaglienti perchélarotazionediuntamburo può far girare anche gli altri tamburi Per ridurre i rischi d incendio mantenere il motore ivanidelmotore delsilenziat...

Страница 35: ...erbatoio all interno di un locale dove i vapori potrebbero venire a contatto con fiamme vive o scintille Se è necessario svuotare il serbatoio del combustibile farloall aperto Nondisperderedelcarburantesopracomponenti caldi NONFUMAREetenerelontanelefiammevive durante l assistenza tecnica alle batterie Noncollegarealcunoggettometallicoaiterminali Proposta 65 della California Il sistema di scarico d...

Страница 36: ...ico 18 8 litri Batteria Exide 065 i c i t a m i e n P l e D e n o i z a c i f i t n e d I o t t o d o r P i r o i r e t n A i r o i r e t s o P i c i t a m u e n P o p i T e n o i s s e r P i c i t a m u e n P o p i T e n o i s s e r P 6 0 8 3 R H 2 1 0 0 3 1 x 4 2 s i x x a M r p 4 S 5 6 1 C n r e t t a p d a e r t i s p 0 2 r a b 7 3 1 8 0 0 0 1 x 0 2 r p 6 c a r T f r u T n a t i T i s p 0 2 4 ...

Страница 37: ...d e r o l a V 5 5 4 0 6 0 8 3 R H S E M O S N A R k c e d o r i v n E n o c Z D s e i r e S m 2 5 1 e n o i z a r e l e c c a i d o l l e v i L o i c c a r b o n a m s m x d o x s x a m e n o i z a r e l e c c A 2 q e A X q e A Y q e A Z 0 8 5 0 5 9 3 0 9 8 5 0 e t n a n i m o d e r o l a V 9 8 5 0 6 0 8 3 R H S E M O S N A R k c e d o r i v n E n o c Z D s e i r e S m 2 8 1 e n o i z a r e l e c ...

Страница 38: ...6 Grasso Shell Darina R2 o equivalente 4 7 PRESTAZIONIDITAGLIO AREA Modello152m 1 44 ettari ora a 12 km ora Modello160cm 1 52 ettari ora a 12 km ora Modello182cm 1 73 ettari ora a 12 km ora È consentita una tolleranza del 10 per gli overlap normali e le svolte al termine di ogni taglio a r u t a r e p m e T o i l i o l l e d à t i s o c s i V F 7 7 C 5 2 I A R P O S 0 3 E A S r o 0 3 W 0 1 E A S 0...

Страница 39: ... en Amendementen alsmede aan de verordeningen die deze omzetten in nationale wetgeving den Bestimmungen der folgenden Europa Richtlinien einschließlich aller Änderungen und Ergänzungen sowie den Vorschriften die diese in das nationale Recht umsetzen entspricht soddisfa quanto previsto dalle seguenti direttive ed emendamenti europei e dalle normative che li riportano in legge nazionale Overholder b...

Страница 40: ...gen Rispetta il seguente standard armonizzato o requisiti tecnici Overholder følgende harmoniserede standardbestemmelser eller tekniske bestemmelser Uppfyller följande harmoniserade standard eller tekniska definitione täyttää seuraavat harmonisoidut standardit tai tekniset edellytykset Cumple con los siguientes estándares de hramonización o provisiones técnicas Está em conformidade com a norma har...

Страница 41: ...zione bullone della lama Montare la rondella conica come illustrato Vedi manuale 2720293 Vedi sopra Ove applicabile Olio idraulico vedi manuale Pericolo incendio togliere i detriti da sotto la piastra del sedile e dal vano motore Assistenza Manutenzione Spegnere il motore togliere la chiave di accensione e la candela ad incandescenza prima di realizzare interventi di assistenza o manutenzione 5 2 ...

Страница 42: ...elvolantevieneregolataagendosulla manopola di sbloccaggio A sul fianco sinistro della plancia Girareinsensoantiorariolamanopola quindi spostare il volante avanti e indietro fino ad ottenere la posizionerichiesta perbloccarlogirarelamanopolain sensoorario 6 4 PEDALEDELLATRAZIONE Premerelapuntadelpedale A perfaremarciaavanti ed il tallone del pedale per la retromarcia Quando si toglie il piede il pe...

Страница 43: ...macchina per fermare la macchina e prima di lasciare il posto di guida ATTENZIONE Non usare il freno di stazionamento mentre la macchina è in movimento 6 7 COMANDODELBLOCCAGGIODEL DIFFERENZIALE Ilbloccodifferenziale A vieneazionatopremendo l interruttore a pedale Quando l interruttore a pedale viene rilasciato il blocco differenziale cessa di funzionare Ilbloccodifferenzialedeveessere utilizzato s...

Страница 44: ...comando A situata a destra del sedile dell operatore che viene azionata come segue NOTA Sel apparatovienealzatoperunapausadilavoro e di nuovo abbassato per riprendere il lavoro dovete premere l interruttore a pedale prima che la lama giri Per alzare spostate indietro la leva e tenetela in questa posizione finché l apparato non raggiunge l altezza opportuna Perabbassare spostatelalevacompletamentei...

Страница 45: ...ira FERMARSIIMMEDIATAMENTE in quanto la pressione dell olio motore è troppo bassa Controllare l olio nella coppa e rabboccare Controllarel interruttoretrasmittentelapressione dell olio Continuando ad utilizzare la macchina si potrebbedanneggiaregravementeilmotore F INDICATOREDILIVELLODEL CARBURANTE Situato a sinistra della temperatura del motore monitorizza il livello del carburante G INTERRUTTORE...

Страница 46: ... e risolvere il problema b L avvisatore acustico A suona in modo intermittente ciò indica una condizione di bassa pressione dell olio motore Nel caso in cui si verifichi ciò spegnere immediatamente il motore e risolvere il problema 6 11 CONTAORE Si trova a sinistra della torretta dello sterzo sopra il freno di stazionamento A Registra le ore di marcia delmotore A 6 13 CHIAVEDIRILASCIODELCOFANO Per...

Страница 47: ...care la presenza di eventuali segni di usura componenti allentati assenti o danneggiati Controllare la presenza di perdite di carburante e olio per accertarsi che i raccordi siano serrati e che i tubi e i condotti siano in buone condizioni 2 Controllare la fornitura del carburante il livello del refrigerante nel radiatore il livello dell olio nella coppa ed il pulitore dell aria Tutti i fluidi dev...

Страница 48: ... operatore si trova seduto il freno di stazionamento è innestato i piedi dell operatore sono fuori dai pedali ed il dispositivo di innesto di taglio è spento Il motore deve avviarsi Prova2 Il motore non deve avviarsi se il dispositivo di innesto di taglio è acceso Prova3 Il motore non deve avviarsi se il freno di stazionamento è premuto Prova4 Avviare il motore al solito modo spingere il regolator...

Страница 49: ...tosaerba vicino ad aree contenente ghiaia strade parcheggi sentieri non asfaltati ecc I sassi scaricati dall apparecchio possono causare gravi lesioni agli astanti e o danneggiare l apparecchio 7 Disinnestare i motori di comando e sollevare gli attrezzi quando si attraversa la strada o un sentiero Prestare attenzione al traffico 8 Fermareedispezionarel apparecchiaturaperrilevareidannieventualmente...

Страница 50: ...tamente in senso orario fino alla posizione di avvio ed azionare il motorino di avviamento finché il motorenonsiavvia questaoperazione richiede solo pochi secondi 4 Quando il motore si sarà avviato rilasciare immediatamente la chiave che ritorna in posizione di marcia RUN 5 Se il motore non dovesse avviarsi preriscaldare le candele ad incandescenza e avviaredinuovo NOTE Motore caldo Nei casi in cu...

Страница 51: ... Togliere il piede dal pedale di marcia avanti retromarcia 3 Innestare il freno di stazionamento 4 Spostare la leva dell acceleratore sulla MINIMA 5 Girare la chiave di accensione in posizione OFF 7 9 SPINGERELAMACCHINAAMOTORE SPENTO 1 Prima di spingere disinnestare il freno di stazionamento 2 Girate in senso antiorario la manopola A situata sotto la piastra del sedile fino ad estrarrecompletament...

Страница 52: ...azione si trova a destra del sedile sotto il cuscino B Spostare la leva verso il sedile e muovere il sedile avanti o indietro Ottenuta la posizione ottimale rilasciare la leva in una delle posizioniprefissate 3 REGOLAZIONEDELLOSCHIENALE Lo schienale è regolabile in tre posizioni prefissate La leva di sbloccaggio si trova a sinistra dello schienale C Per spostare in avanti la parte superiore dello ...

Страница 53: ...TEZZADITAGLIO PIANO CENTRALE 1 Sollevareilpiano 2 Togliere il perno a scatto rapido Q dalla parte superioredelfusogirevoledellaruotaorientabile 3 Togliere la ruota orientabile dal sostegno della ruota M 4 Selezionare la Posizione 1 o la Posizione 2 per il supporto di montaggio della ruota Per modificare togliere i 4 bulloni di montaggio R spostare sulla collocazione alternativa ed imbullonareinpos...

Страница 54: ...i n o i z i d n o c e l e r a l l o r t n o C e r o 0 0 1 i n g O z a i r a l l e d o r t l i f l e d o t n e m e l e l e r i l u P e r o 0 5 2 i n g O e s e m i n g O z o i l o l l e d o r t l i f l i d e e r o t o m o i l o l e r a i b m a C z a l o t n e v a l l e d a i h g n i c a l l e d e n o i s n e t a l e r a l l o r t n o C e r o 0 0 5 i n g O e r t i n g O i s e m z a i r a l l e d o r ...

Страница 55: ...le frecce O D I U Q I L L E D I T I S I U Q E R À T I T N A U Q O P I T E R O T O M O I L O o r t l i f n o c i r t i L 6 G S F S E S 0 3 W 0 1 O C I L U A R D I O I L O o r t l i f n o c i r t i L 0 7 3 6 4 s u l l e T l l e h S O D I U Q I L E T N A R E G I R F E R E R O T A I D A R i r t i L 5 5 O L E G I T N A 0 5 ...

Страница 56: ... avere parcheggiato la macchina su terreno piano IMPORTANTE Mantenere la pulizia più assoluta quando si riempie il serbatoio idraulico Filtrare l olio con un filtro a 25 micron prima di versarlo nel serbatoio Sistema di raffreddamento Controllare il livello del refrigerante nel serbatoio di espansione D Ilrefrigerantedevetrovarsifrale tacche riportate sulla tanica All occorrenza rabboccare con una...

Страница 57: ...a verso la parte anteriore della macchina Occorre eliminare eventuali sfridi con una spazzola manuale soffice Manutenzione della macchina Pericolo incendio togliere i detriti da sotto la piastra del sedile e dal vano motore G 9 MANUTENZIONE PREFILTRO Verificate che il prefiltro sia esente da corpi estranei A questo fine togliete il dado ad alette e la rondella dall alto del prefiltro Togliete quin...

Страница 58: ...aranzia Danni derivanti dal trasporto o l usura normale non sono coperti da questa garanzia La garanzia è estesa esclusivamente all acquirente originale e non può essere trasferita ai proprietari successivi Il periodo di garanzia inizia alla data di consegna del prodotto all utentefinale cliente amenochenonsiaaltrimenticoncordatoconilfabbricante Alla fine del primo anno il proprietario deve fare e...

Страница 59: ......
Страница 60: ...rete internazionale di rivenditori e tecnici altamente qualificati gode del supporto esclusivo del servizio Ransomes Jacobsen Parts Xpress unico per affidabilità e qualità dei prodotti Qualità prestazioni e assistenza di livello internazionale Equipment from Ransomes Jacobsen Limited is built to exacting standards ensured by ISO 9001 registration at all our manufacturing locations A worldwide deal...

Отзывы: