


6 ADJUSTMENTS (ALL UNITS)
36
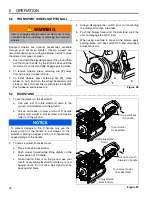
6.6
FRONT ROLLER WEIGHT ___________________________________________________
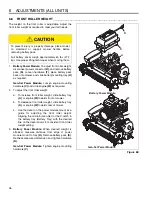
The weight on the front roller is adjustable. Adjust the
front roller weight as required to meet your turf needs.
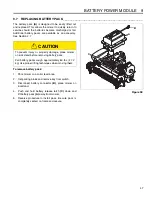
1.
Battery Power Module:
To adjust front roller weight,
disconnect power connector
(R)
,
and remove battery
pack
(S)
. Loosen hardware
(T)
, place battery pack
back onto mower, and slide battery mounting tray
(U)
as required.
Gen-Set Power Module:
Loosen engine mounting
hardware
(V)
and slide engine
(W)
as required.
2.
To adjust the front roller weight:
a.
To increase front roller weight, slide battery tray
(U)
, or engine
(W)
towards front of mower.
b.
To decrease front roller weight, slide battery tray
(U)
, or engine
(W)
towards rear of mower.
c.
Use the decal on the power module mount as a
guide for adjusting the front roller weight.
Aligning the oil drain (Gen-Set) or the V-notch in
the battery tray (Battery Tray) with the desired
line on the decal allows for consistent front roller
weight setting.
3.
Battery Power Module:
When desired weight is
attained, measure distance from edge of power
module mount to tray
(U)
. Remove battery pack
(S)
.
Recheck measured dimension and tighten hardware
(R)
.
Gen-Set Power Module:
Tighten engine mounting
hardware
(V)
.
Figure 6E
CAUTION
To prevent injury or property damage, place mower
on kickstand or support mower handle before
removing battery pack.
Full battery packs weigh approximately 60 lbs (27.2
kg). Use proper lifting techniques when moving them.
!
R
S
W
Battery Power Module
Gen-
S
et Power Module
V
U
T