Jacobsen Eclipse 118 63313 Скачать руководство пользователя страница 43

MAINTENANCE    11

43

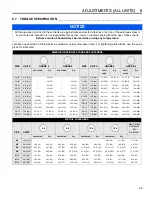
11.4 BACKLAPPING AND GRINDING______________________________________________

Check for damage to the bedknife and reel blades.
Refer to (Section 6.2).

1. Determine if backlapping or grinding will restore the

proper cutting edge.

2. For optimum performance use a bedknife grinder to

touch-up the blade then reassemble and adjust the
bedknife to the reel as described in (Section 6.2).

3. Start unit in backlap mode.

a. Turn key 

(D) 

to start position and release. Press

both orange buttons 

(G and H)

 when Jacobsen

Version X.XX is on the display 

(A)

. Use the

orange buttons 

(G or H) 

to select and the black

button 

(F) 

to enter the four digits for the

Superintendents mode pin. 

[Section 4.3]

b. Place reel switch

 (E)

 in backlap position.

BACKLAP YES NO screen will display. Select
YES to backlap. If NO is selected, TURN
BACKLAP SWITCH OFF will be displayed.

c. Engage O.P.C. bail

 (C)

 and release. Reel motor

will begin turning, a slow beeping (1 every three
seconds) alarm will sound and a five minute
timer will start.

d. Adjust reel speed between 10% and 100% using

the orange buttons 

(G or H)

.

e. Apply lapping compound with a long handle

brush along the entire length of the reel, (180 grit
is recommended, Section 2.7).

f.

Continue lapping and at the same time make a

fine adjustment on the reel and bedknife until
there is a uniform clearance along the full length
of the cutting edges.

g. Exit backlap mode by allowing the five minute

timer to end, placing reel switch 

(E) 

in the OFF

position, moving the O.P.C. bail 

(C) 

or moving

the thumb lever 

(B)

.

h. Turn key switch 

(D)

 to off position.

4. Carefully and thoroughly remove all lapping

compound from reel and bedknife 

before running

the reel in forward direction

.

Figure 11B

Figure 11C

A

F

G

H

E

B

C

D

JACOBSEN

VERSION X.XX

TURN BACKLAP

SWITCH OFF

BACKLAP 5 MIN

<     50%     >

Standard start up
screen

Display timer and
adjust backlap
reel speed

Place Reel Switch
in Backlap position.
Select yes or no.

Engage Bail and
release to start
backlapping

Press both orange
buttons during
start screen.
Enter PIN

Exit backlap
mode.

ENTER PIN?

XXXX

BACKLAP?

YES        NO

ENGAGE BAIL

AND RELEASE

Содержание Eclipse 118 63313

Страница 1: ...ry Pack 63302 Eclipse 122 22 11 Blade Reel Gen Set 63311 Eclipse 122 22 11 Blade Reel Battery Pack 63303 Eclipse 122F Floating 22 11 Blade Reel Gen Set 63312 Eclipse 122F Floating 22 11 Blade Reel Bat...

Страница 2: ...rning This product contains or emits chemicals known to State of California to cause cancer and birth defects or other reproductive harm FOREWORD Suggested Stocking Guide To Keep your Equipment fully...

Страница 3: ...ction Belts 27 6 5 Front Roller Weight 28 6 6 Torque Specification 29 7 FIXED HEAD REEL ADJUSTMENTS 7 1 General 30 7 2 Reel To Bedknife 30 7 3 Bedknife Adjustment 31 7 4 Cutting Height 31 8 FLOATING H...

Страница 4: ...near the machine while in operation The owner operator can prevent and is responsible for injuries inflicted to themselves to bystanders and damage to property 11 Never operate equipment that is not i...

Страница 5: ...e devices securely fastened in place By following all instructions in this manual you will prolong the life of your machine and maintain its maximum efficiency Adjustments and maintenance should alway...

Страница 6: ...in 660 mm 7 blade reel and InCommand control system Gen Set power module 63315 Eclipse 126 base unit with 26 in 660 mm 7 blade reel and InCommand control system Battery power module Serial Number An i...

Страница 7: ...ing listed System Voltage 48 Volt DC Batteries 4 12 volt valve regulated non spillable sealed lead acid batteries Charger 5 Amp 48 Volt DC dual input voltage 115 230 Volt AC 50 60 Hz Recommended Batte...

Страница 8: ...emovable Battery Pack Does not include batteries 68668 Mower Caddy Battery Pack Mounting Kit 68660 Transport Tires 62293 Mower Caddy 68648 Mower Caddy 18 Fixed Head Latch Kit 68649 Mower Caddy 22 Fixe...

Страница 9: ...nnector before working on machine or emptying grass catchers DANGER Keep hands and feet away from the cutting unit to prevent serious injury DANGER 1 Keep a safe distance from the machine Keep bystand...

Страница 10: ...e operation of the mower REPLACE DAMAGED DECALS IMMEDIATELY 3002753 4165241 4172240 Read the manual before adjusting front roller weight Disengaged Parking Brake Engaged Reel Switch Forward Rotation P...

Страница 11: ...DECALS 3 11 63302 101 6 Kg 63303 109 3 Kg 63311 113 0 Kg 63312 123 5 Kg 101 6 kg 109 3 kg 113 0 kg 123 5 kg Mower Weight To Engage Traction 1 Slide bail to the left 2 Squeeze bail to handle...

Страница 12: ...n RUN position to start units equipped with Gen Set power module E Reel Switch The reel switch is used to start and stop the reel and to enable backlap F Circuit Breaker Used to protect controllers Pu...

Страница 13: ...stem voltage is above 60 Volts DC and a fast 2 per second beeping alarm will sound If not corrected controller will shut down after 60 seconds Check generator output before restarting system See Secti...

Страница 14: ...set the fixed reel speed the FOC setting must be set to 0 then press either of the orange buttons K or L on the front cover until the set reel speed screen is on the LCD display Press the black butto...

Страница 15: ...ange Max Mow Speed Mow Speed Setting Select motor used Motor Selection Calibrate Throttle Paddle Display Units Change Display Units Throttle Paddle Setting Calibrate Bail Lever Bail Lever Setting MNT...

Страница 16: ...22 0 089 2 268 0 087 2 217 2 1 3 38 0 112 2 845 0 109 2 768 0 106 2 695 0 103 2 626 0 101 2 56 0 098 2 498 0 096 2 438 0 094 2 382 0 092 2 328 2 2 3 54 0 117 2 98 0 114 2 9 0 111 2 823 0 108 2 751 0 1...

Страница 17: ...169 0 165 0 161 0 156 0 153 0 149 0 145 0 142 0 139 4 18 4 305 4 188 4 078 3 974 3 874 3 78 3 69 3 604 3 522 2 7 0 176 0 171 0 167 0 162 0 158 0 155 0 151 0 147 0 144 4 35 4 47 4 35 4 235 4 127 4 023...

Страница 18: ...4 354 2 6 0 218 0 212 0 206 0 201 0 196 0 191 0 187 0 182 0 178 4 18 5 535 5 385 5 243 5 109 4 981 4 86 4 744 4 634 4 528 2 7 0 226 0 220 0 214 0 209 0 204 0 199 0 194 0 189 0 185 4 35 5 748 5 592 5...

Страница 19: ...arting and for restarting a warm engine P Fuel Valve Lever The fuel valve opens and closes the connection between the fuel tank and the carburetor The fuel valve lever must be in the ON position for t...

Страница 20: ...perator releases the O P C Operator Presence Control bail 2 To test the system a Place mower on the kickstand b Make certain reel switch is off 3 Gen Set Power Module Start the engine 4 Energize the u...

Страница 21: ...rs and or damage the equipment 9 Disengage the reel switch to stop blades when not mowing 10 Disengage the reel switch when crossing paths or roadways Look out for traffic 11 Stop and inspect the equi...

Страница 22: ...rtup display for 5 seconds then switch to system voltage If system fails to initialize check to see if power connector is properly attached or if circuit breaker F is tripped Reset circuit breaker if...

Страница 23: ...and 4 guiding the mower with your right hand This method makes it possible to turn around quickly with very few steps Figure 5C 4 To assure complete even cutting overlap swaths by 1 to 2 in 25 to 50...

Страница 24: ...ip 4 Always disengage reel switch prior to transporting the mower more than a few feet 5 Push the mower forward off the kickstand start the unit and engage the O P C bail 6 When using a vehicle to tra...

Страница 25: ...ansfer fuel 6 Store fuel according to local state or federal ordinances and recommendations from your fuel supplier e Check the engine oil at the start and end of each day before starting the engine I...

Страница 26: ...to adjust the brake cable then tighten nut A 2 If adjustments cannot be made at the handle remove the transport wheel and make the adjustment at the brake band 3 Loosen screw C and pull cable to obta...

Страница 27: ...hex nut L to bottom of bearing bracket H Loosen nuts J 2 Place bedknife gauge bar M on top of roller and under screw K Tighten screw K until belt G deflects 1 10 2 5 mm with 1 2 lb 0 45 0 91 kg load...

Страница 28: ...f mower b To decrease front roller weight slide battery tray U or engine W towards rear of mower c Use the decal on the power module mount as a guide for adjusting the front roller weight Aligning the...

Страница 29: ...lb Nm 75 8 4 100 11 3 107 12 1 143 16 1 9 16 18 ft lb Nm 92 124 122 165 129 174 172 233 1 4 28 in lb Nm 85 9 6 115 13 0 120 13 5 163 18 4 5 8 11 ft lb Nm 113 153 151 204 159 215 211 286 5 16 18 in lb...

Страница 30: ...A flat surface of at least 1 32 in 0 8 mm minimum must be maintained on the front face of the bedknife Use a standard flat file to dress the bedknife 3 If wear or damage is beyond the point where the...

Страница 31: ...n freely and will cut a piece of newspaper along the full length of the reel when the paper is held at 90 to the bedknife Figure 7B Figure 7C 7 4 CUTTING HEIGHT _______________________________________...

Страница 32: ...tained on the front face of the bed knife Use a standard flat file to dress the bedknife 3 If wear or damage is beyond the point where the reel or bedknife can be corrected by the lapping process they...

Страница 33: ...r B down Clockwise to close gap a Slide a feeler gauge or shim stock 0 001 0 003 0 025 0 075 mm between the reel blade and the bedknife Do not turn the reel b Adjust the trailing end of the reel to th...

Страница 34: ...__________________________ Any end play or radial play indicates bad bearings a weak tension spring or a backed off nut 1 Check bearing housing mounting hardware Tighten or replace components as requi...

Страница 35: ...he body and eyes with extended flushing with clear water Contact a physician immediately Always wear a safety shield or approved safety goggles when charging batteries Hydrogen is explosive in concent...

Страница 36: ...will be left on the batteries which is conductive and will contribute to the discharge of the batteries The correct cleaning technique is to spray the top and sides of the batteries with a solution o...

Страница 37: ...battery charger is used with 115 V 60 Hz North America input voltage only If you live in an area where 115 V 60 Hz input voltage is not used a new AC power cord must be purchased locally The battery...

Страница 38: ...wn in Figure 9C and tighten the battery post hardware securely Protect the battery terminals and battery wire terminals with a commercially available protective coating Battery Pack Assembly 1 Install...

Страница 39: ...move battery tray 1 Park tractor on a solid level area 2 Set parking brake and remove key from switch 3 Disconnect battery connector B place mower on kickstand 4 Push and hold battery release latch C...

Страница 40: ...d 3 Change the engine oil after the first 20 hours of operation 4 Refer to Section 13 2 and Engine Manual for specific maintenance intervals 10 2 ENGINE OIL ___________________________________________...

Страница 41: ...nect generator power connector 10 4 FUEL ____________________________________________________________________ Handle fuel with care it is highly flammable Use an approved container the spout must fit...

Страница 42: ...e motors 11 2 TIRES OPTION ___________________________________________________________ 1 Keep tires properly inflated to prolong tire life Check pressure only when the tires are cool 2 Use an accurate...

Страница 43: ...econds alarm will sound and a five minute timer will start d Adjust reel speed between 10 and 100 using the orange buttons G or H e Apply lapping compound with a long handle brush along the entire len...

Страница 44: ...scharge the battery Disconnect the charging plug from the mower power connector The batteries must be cleaned and all deposits neutralized and removed from the battery case to slow self discharge The...

Страница 45: ...closed 3 Open fuel shut off valve 4 Engine Spark Plug 4 See Engine Manual 5 Engine switch off 5 Turn engine switch to On Engine hard to start or runs poorly looses power or stalls 1 Choke in wrong pos...

Страница 46: ...4 remove L H transport wheel and mounting bracket E to gain access to fitting Turn the traction drum if pulley F is blocking the fitting then insert grease gun through hole and carefully apply grease...

Страница 47: ...___ F C D B A L 4 L 6 L 6 L7 E L 3 L L5 2 L1 L L5 L5 2 L 2 L1 L1 L1 L1 L1 L1 Reel Roller Bearing L2 Reel Motor Bearing Housing L3 Right Side Traction Drum Bearing Housing L4 Left Side Traction Drum Be...

Страница 48: ...14 NOTES 48 14 NOTES...

Страница 49: ...on the order 2 Explain where and how to make shipment 3 Give product number name and serial number that is stamped on the name plate or serial plate of your product 4 Order by the quantity desired the...

Страница 50: ...nto produkt obsahuje alebo vyp ta chemik lie ktor podla t tu Kalifornia sp sobuj rakovinu a poruchy plodu alebo in zdravotn probl my spojen s reprodukciou VOD Sprievodca odpor can m skladovan m Na zac...

Страница 51: ...ene 27 6 6 Zat a enie predn ho valca 28 6 7 Hodnoty ut ahovacieho momentu 29 7 NASTAVENIE NEPOHYBLIVEJ SEKACEJ HLAVY 7 1 V eobecn inform cie 30 7 2 Vzdialenost sekacej hlavy od no a 30 7 3 Nastavenie...

Страница 52: ...u vajte zariadenie ktor nie je v dokonalom pracovnom stave bez t tkov chr ni ov krytov v stupn ch deflektorov alebo in ch pevne pripevnen ch ochrann ch zariaden 12 Nikdy neodp jajte ani nepremost ujte...

Страница 53: ...zachov te jeho maxim lnu innost Nastavovanie a dr bu by mal v dy vykon vat za kolen technik Ak potrebujete al ie inform cie alebo slu by kontaktujte autorizovan ho predajcu v robkov zna ky Jacobsen kt...

Страница 54: ...dul 63304 Z kladn jednotka Eclipse 126 s 660 mm 7 lopatkovou sekacou hlavou a riadiacim syst mom InCommand Benz nov gener tor 63315 Z kladn jednotka Eclipse 126 s 660 mm 7 lopatkovou sekacou hlavou a...

Страница 55: ...uveden amp rhodiny Syst mov nap tie 48 V Bat rie 4 12 V regulovan ventilom utesnen oloven bat rie ktor nevyte Nab ja ka 5 A 48 V du lne vstupn nap tie 115 230 V 50 60 Hz Odpor an bat rie Spolo nost Ja...

Страница 56: ...k 68660 Premiest ovacie koles 62293 Ochrann puzdro kosa ky 68648 Pripev ovacia s prava pre premiest ovac voz k a kosa ku s 457 mm nepohyblivou hlavou 68649 Pripev ovacia s prava pre premiest ovac voz...

Страница 57: ...sa rukami ani nohami k sekaciemu zariadeniu preto e by ste sa mohli v ne zranit NEBEZPE ENSTVO 1 Udr ujte bezpe n vzdialenost od stroja Nedovo te okolostojacim osob m aby sa pribli ovali k stroju 2 Po...

Страница 58: ...E PO KODEN T TKY 3002753 4165241 4172240 4104282 Pred nastavovan m zat a enia predn ho valca si pre tajte n vod Deaktivovan Parkovacia brzda Aktivovan Sp na sekacej hlavy Poloha pre ot anie dopredu OF...

Страница 59: ...motnost kosa ky 63302 101 6 Kg 63303 109 3 Kg 63311 113 0 Kg 63312 123 5 Kg 101 6 kg 109 3 kg 113 0 kg 123 5 kg Postup aktivovania trakcie 1 Posunte pr tlacn poistn sp nac dolava 2 Pritlacte pr tlacn...

Страница 60: ...ybaven ch benz nov m gener torom v polohe RUN kosenie E Sp na sekacej hlavy Sp na sekacej hlavy sa pou va na spustenie a zastavenie sekacej hlavy a aktivovanie lapovania F Preru ova Pou va sa na ochra...

Страница 61: ...10 3 Obrazovka REEL MOTOR FAULT porucha motora sekacej hlavy sa zobraz ak sa zist skrat v obvode motora sekacej hlavy alebo ak odber pr du v motore sekacej hlavy st pne nad 30 A na dlh ie ako jednu se...

Страница 62: ...rozsahu od 3 2 a 5 5 km hod Pevn r chlost sekacej hlavy Ak chcete nastavit pevn r chlost sekacej hlavy intenzita sekania mus byt nastaven na 0 Potom stla te jedno z oran ov ch tla idiel K alebo L na...

Страница 63: ...an ho motora 4160533 4153940 OK 4160533 4153940 OK V ber motora THUMBLEVER CALIBRATE Kalibrova ovl daciu p ku Kalibr cia p ky krtiacej klapky SELECT UNITS Nastavi jednotky Zobrazovacie jednotky UNITS...

Страница 64: ...63302 63303 63311 63312 63313 63314 tandardn sekacia hlava R chlost kosenia Ot ky sekacej hlavy 1800 1850 1900 1950 2000 2050 2100 2150 2200 2 0 3 22 0 107 2 709 0 104 2 636 0 101 2 567 0 098 2 501 0...

Страница 65: ...725 3 634 3 548 3 465 3 387 2 6 0 169 0 165 0 161 0 156 0 153 0 149 0 145 0 142 0 139 4 18 4 305 4 188 4 078 3 974 3 874 3 78 3 69 3 604 3 522 2 7 0 176 0 171 0 167 0 162 0 158 0 155 0 151 0 147 0 144...

Страница 66: ...78 5 042 4 913 4 79 4 673 4 562 4 456 4 354 2 6 0 218 0 212 0 206 0 201 0 196 0 191 0 187 0 182 0 178 4 18 5 535 5 385 5 243 5 109 4 981 4 86 4 744 4 634 4 528 2 7 0 226 0 220 0 214 0 209 0 204 0 199...

Страница 67: ...artovan zohriateho motora P Uzatv ranie pr vodu paliva palivov ventil zatv ra a otv ra prepojenie medzi palivovou n dr ou a karbur torom P ka palivov ho ventila mus byt v zapnutej polohe ON aby motor...

Страница 68: ...r monitorovania pr tomnosti oper tora 2 Postup testovania syst mu a Postavte kosa ku na stojan b Skontrolujte i sp na sekacej hlavy je vypnut 3 Benz nov gener tor Na tartujte motor 4 Zapnite zariadeni...

Страница 69: ...alebo po kodit zariadenie 9 Ak nekos te vypnut m sp na a sekacej hlavy zastavte lopatky 10 Vypnite sp na sekacej hlavy ke prech dzate cez chodn ky alebo cesty Sledujte prem vku 11 Ak naraz te na prek...

Страница 70: ...brazit obrazovka tartovania a potom by sa mala prepn t na syst mov nap tie Ak sa syst m neaktivuje skontrolujte i nap jac konektor je riadne pripojen a i preru ova F nie je rozopnut V pr pade potreby...

Страница 71: ...svojej rky do ava oto te ju doprava 3 a 4 a usmer ujte kosa ku pravou rukou T to met da umo uje r chle ot anie pomocou len nieko k ch krokov Obr zok 5C 4 Aby sa dosiahlo kompletn rovnomern kosenie pre...

Страница 72: ...4 Pred premiest ovan m kosa ky na vzdialenost viac ne nieko ko metrov v dy vypnite sp na sekacej hlavy 5 Zatla te kosa ku smerom dopredu zo stojana na tartujte zariadenie a stla te pr tla n poistn sp...

Страница 73: ...pod a miestnych a celo t tnych nariaden a odpor an ktor v m poskytol dod vate paliva 7 Na za iatku a konci ka d ho d a pred tartovan m motora skontrolujte motorov olej Ak je hladina oleja n zka odmont...

Страница 74: ...m matice B nastavte brzdov k bel a potom dotiahnite maticu A 2 Ak nedok ete dosiahnut spr vne nastavenie na rukov ti odmontujte premiest ovacie koleso a nastavte brzdu na brzdnom lanku 3 Povo te skru...

Страница 75: ...tice J 2 Umiestnite mierku nastavenia spodn ho no a M na horn stranu vretena a pod skrutku K Ut ahujte skrutku K a k m sa reme G nevych li 2 5 mm pri aplikovan sily 0 45 0 91 kg v strede po a 3 Utiahn...

Страница 76: ...cete zn it zat a enie predn ho valca posu te podnos bat riov ho modulu U alebo motor W smerom k zadnej asti kosa ky c Pou ite t tok na mont nom prvku nap jacieho modulu ako pom cku pri nastavovan zat...

Страница 77: ...1 109 148 115 156 154 209 1 4 20 in lb Nm 75 8 4 100 11 3 107 12 1 143 16 1 9 16 18 ft lb Nm 92 124 122 165 129 174 172 233 1 4 28 in lb Nm 85 9 6 115 13 0 120 13 5 163 18 4 5 8 11 ft lb Nm 113 153 15...

Страница 78: ...yt pevne utiahnut N mus byt rovn a ostr c Na prednej strane no a mus byt zachovan rovn povrch o ve kosti najmenej 0 8 mm Pou ite tandardn ploch piln k na o etrenie no a 3 Ak je sekacia hlava alebo pil...

Страница 79: ...t a a ak k spodn mu no u prilo te v 90 uhle novinov papier vreteno ho po celej d ke odsekne Obr zok 7B Obr zok 7C 7 4 V KA KOSENIA __________________________________________________________ Pozn mka P...

Страница 80: ...a mus byt zachovan rovn povrch o ve kosti najmenej 0 8 mm Pou ite tandardn ploch piln k na o etrenie no a 3 Ak je sekacia hlava alebo piln k nadmerne opotrebovan alebo po koden a stav m e byt napraven...

Страница 81: ...smerom dole v smere hodinov ch ru i iek uzatvorte medzeru a Zasu te p romer alebo podlo ku s hr bkou 0 025 0 075 mm medzi lopatku sekacej hlavy a n Neot ajte sekaciu hlavu b Nastavte rovnak medzeru na...

Страница 82: ...EJ HLAVY _________________________________________________ Axi lna v a resp radi lna v a znamen e lo isk s v zlom stave pru ina m slab pnutie alebo matica je ve mi uvo nen 1 Skontrolujte pripev ovacie...

Страница 83: ...ostane elektrolyt na telo alebo do o opl chnite ich vyplachovan m istou vodou Ihne kontaktujte lek ra Pri nab jan bat ri v dy noste ochrann t t alebo schv len bezpe nostn okuliare Vod k je v bu n u v...

Страница 84: ...kcie alebo bet nov asfaltov podlahu Po opl chnut bat ri na bat ri ch ostan zvy ky ktor s vodiv a ktor sp sobuj vyb janie bat ri Spr vny postup istenia je nastriekanie hornej a bo n ch str n bat ri roz...

Страница 85: ...V 60 Hz Severn Amerika Ak sa nach dzate v oblasti v ktorej sa nepou va vstupn nap tie 115 V 60 Hz mus te si lok lne zak pit nov nap jac k bel Nab ja ka bat ri mus plne nabit bat riov modul za pribli...

Страница 86: ...bat riov koncovky a koncovky bat riov ch vodi ov pomocou be ne dostupn ho ochrann ho povlaku Mont bat riov ho modulu 1 Osa te bat rie do podnosu bat riov ho modulu 2 Utiahnite zostavu poistkov ho vod...

Страница 87: ...nej rovnej ploche 2 Aktivujte parkovaciu brzdu a vyberte k zo sp na a 3 Odpojte konektor bat rie B a umiestnite kosa ku na stojan 4 Zatla te a podr te uvo ovaciu z padku bat riov ho modulu C smerom do...

Страница 88: ...din ch prev dzky 4 Inform cie o pecifick ch intervaloch dr by n jdete v asti 13 a v pr ru ke k motoru 10 2 MOTOROV OLEJ _________________________________________________________ Na za iatku ka d ho d...

Страница 89: ..._____________________________________________________________ Manipulujte s palivom opatrne je vysoko hor av Pou vajte schv len n dobu ktorej hrdlo sa mus zmestit do palivov ho plniaceho hrdla Nepou v...

Страница 90: ...nacie motory 11 2 KOLES DOPLNKOV ____________________________________________________ 1 Udr iavajte koles riadne nahusten aby sa pred ila ich ivotnost Merajte tlak len ak s koles studen 2 Pou vajte pr...

Страница 91: ...00 pomocou oran ov ch tla idiel G alebo H e Pomocou kefy s dlhou n sadou naneste lapovaciu zmes na cel d ku vretena odpor a sa hrubost 180 pozri ast 2 7 f Pokra ujte v lapovan a s asne jemne nastavujt...

Страница 92: ...usadeniny neutralizovat a odstr nit z puzdra bat rie aby sa spomalil proces samovyb jania Bat rie musia byt testovan a dob jan v tridsat d ov ch intervaloch Bat riov nap jac modul po skladovan 1 plne...

Страница 93: ...k motoru 5 Sp na motora vypnut 5 Zapnite sp na motora Motor na tartuje t a ko alebo be slabo str ca v kon alebo zhas na 1 S ti v nespr vnej polohe 1 Pozri N vod k motoru 2 Zne isten alebo nespr vne p...

Страница 94: ...zariadeniu odmontovan m av ho premiest ovacieho kolesa a pripev ovacej konzoly E Oto te hnac valec ak kot F blokuje spoj a potom vlo te mazaciu pi to do otvoru a opatrne naneste mazivo 6 Pred mazan m...

Страница 95: ...4 L 6 L 6 L7 E L 3 L L5 2 L1 L L5 L5 2 L 2 L1 L1 L1 L1 L1 L1 Lo isko valca sekacej hlavy L2 Lo iskov puzdro motora sekacej hlavy L3 Prav lo iskov puzdro trak n ho bubna L4 av lo iskov puzdro trak n ho...

Страница 96: ...14 POZN MKY 48 14 POZN MKY...

Страница 97: ...i ly 3 Uve te slo v robku n zov a v robn slo ktor je vyrazen na typovom t tku alebo t tku s v robn m slom na va om v robku 4 Na objedn vke uve te po adovan mno stvo slo dielu a popis dielu pod a zozna...

Страница 98: ...hange from previous revision A A B B 1 1 2 2 3 4 5 5 6 6 7 8 35 9 10 11 12 13 14 15 16 17 19 20 21 18 40 26 27 27 28 29 30 31 32 22 23 24 25 36 37 38 39 33 34 ECLIPSE 1 1 Handle and Controls Serial No...

Страница 99: ...20 x 1 3 4 Socket Head 21 446130 4 Lockwasher 1 4 Heavy 22 402020 2 Screw 6 32 x 1 3 4 Slotted 23 453005 2 Flat Washer 6 24 446106 2 Lockwasher 6 25 444304 2 Nut 6 32 Hex 26 4128933 4 Screw 5 16 18 x...

Страница 100: ...5 8 Internal Tooth 3 443828 2 Nut 5 8 18 Hex Jam 4 4172521 1 Right Side Handle Stop 5 4172520 1 Left Side Handle Stop 6 2809900 1 Left Side Torsion Spring 7 2809901 1 Right Side Torsion Spring 8 4550...

Страница 101: ...Key 4 4165062 1 Switch Rocker REFERENCE SW2 See 22 1 5 4166901 1 LCD Display REFERENCE U2 See 22 1 6 402056 4 Screw 8 32 x 3 8 Slotted 7 4169341 1 25 Amp Circuit Breaker REFERENCE CB1 See 22 1 8 3647...

Страница 102: ...54 1 2 3 4 5 13 11 11 6 7 7 8 8 9 10 10 12 12 12 10 Floating Head Units 4172240 ECLIPSE 4 1 Power Module Mounting Plate Serial No All Fixed Head Frame Shown Floating Head Similar...

Страница 103: ...Fixed Head Power Module Used on 63300 63302 63304 63311 63313 63315 7 4164220 1 Mount Floating Head Power Module Used on 63301 63303 63312 63314 8 400228 4 Screw 5 16 24 x 1 1 4 Hex Head Used on 63300...

Страница 104: ...e following U S patents xxxxxxx xxxxxxx xxxxxxx xxxxxxx xxxxxxx xxxxxxx CHARLOTTE NC YEAR OF PRODUCTION MADE IN U S A A Textron Company 63302 101 6 Kg 63303 109 3 Kg 63311 113 0 Kg 63312 123 5 Kg ECLI...

Страница 105: ...r Crossbar Used on 63304 and 63315 5 400258 6 Screw 3 8 16 x 3 4 Hex Head 6 446142 10 Lockwasher 3 8 Heavy 7 366796 2 Kickstand Mounting Bracket 8 400262 2 Screw 3 8 16 x 1 Hex Head 9 400260 3 Screw 3...

Страница 106: ...following U S patents xxxxxxx xxxxxxx xxxxxxx xxxxxxx xxxxxxx xxxxxxx 18 21 21 19 20 21 23 22 22 24 24 63302 101 6 Kg 63303 109 3 Kg 63311 113 0 Kg 63312 123 5 Kg CHARLOTTE NC YEAR OF PRODUCTION MADE...

Страница 107: ...66796 2 Kickstand Mounting Bracket 8 400262 2 Screw 3 8 16 x 1 Hex Head 9 400260 3 Screw 3 8 16 x 7 8 Hex Head 10 400268 2 Screw 3 8 16 x 1 3 4 Hex Head 11 443810 4 Nut 3 8 16 Hex Jam 12 4127931 1 Dec...

Страница 108: ...per Tournament Standard Style Bedknives Secured with screws Part Number Description 5000098 18 Low Profile 5002888 18 Super Tournament 503478 22 Low Profile 503477 22 High Profile 5002887 22 Super Tou...

Страница 109: ...Screw 5 16 18 x 1 2 Socket Head 7 4105360 3 Screw 5 16 18 x 2 1 4 Socket Hd 8 400264 2 Screw 3 8 16 x 1 1 4 Hex Head 9 446142 8 Lockwasher 3 8 Heavy 10 443110 2 Nut 3 8 16 Hex 11 365501 2 Bolt Bedkni...

Страница 110: ...6 5 5 4 3 14 15 1 24 27 23 22 16 17 18 20 21 26 11 10 12 13 2 ECLIPSE 8 1 Reel Fixed Head Units Serial No 63300 All Serial No 63302 All Serial No 63304 All Serial No 63311 All Serial No 63313 All Ser...

Страница 111: ...45940 1 Bushing 9 500534 1 Bearing Cup and Cone 10 4128725 1 Grease Fitting 11 4105281 1 Bearing Housing 12 366650 1 Grease Seal 13 545940 1 Bushing 14 500534 1 Bearing Cup and Cone 15 446136 2 Lockwa...

Страница 112: ...2 13 14 14 14 15 16 16 16 17 17 19 19 18 18 4127335 ECLIPSE 9 1 Grass Shield and Roller Brackets Fixed Head Units Only Serial No 63300 All Serial No 63302 All Serial No 63304 All Serial No 63311 All S...

Страница 113: ...41827 1 Bracket Catcher Mounting L H 5 2000072 2 Bracket Roller Adjusting 6 343616 2 Stud Front Roller Adjusting 7 3005692 2 Adjusting Knob 8 441677 4 Carriage Bolt 5 16 18 x 1 1 2 9 444718 4 Locknut...

Страница 114: ...5 16 17 18 19 20 21 22 22 23 24 25 25 26 26 27 29 29 29 30 30 30 31 32 36 37 38 8 10 35 33 34 34 29 29 30 30 28 28 ECLIPSE 10 1 Floating Head Reel Connection Floating Head Units Only Serial No 63301 A...

Страница 115: ...140151 1 Mount Left Side Catcher 14 471221 1 Grease Fitting 1 4 28 90 15 460312 4 Hairpin 16 366317 1 Rod End 3 8 24 17 4104720 1 O Ring Motor 18 4160533 1 Motor Brushless Bi Directional Reference M2...

Страница 116: ...20 20 27 20 16 17 12 15 12 15 19 9 8 7 4 3 1 2 6 6 21 22 23 24 25 26 28 28 28 4127335 ECLIPSE 11 1 Outer Reel Assembly Floating Head Units Only Serial No 63301 All Serial No 63303 All Serial No 63312...

Страница 117: ...1 Shield Reel 18 Used on 63301 and 63314 10 4174640 1 Shield Reel 22 Used on 63303 and 63312 11 403782 2 Screw 1 4 20 x 3 4 Truss Head 12 443102 4 Nut 1 4 20 Hex 13 453023 2 Flat Washer 1 4 14 343616...

Страница 118: ...rofile 4131001 22 Low Profile 4131370 22 Tournament 4131003 22 Super Tournament Standard Style Bedknives Secured with screws Part Number Description 5000098 18 Low Profile 5002888 18 Super Tournament...

Страница 119: ...ase 8 471214 1 Grease Fitting 9 471242 1 Vent Fitting 10 445795 8 Nut 5 16 18 Spiralock Flange 11 304745 1 Washer 12 458013 1 Snap Ring 13 367164 1 Spacer 14 2811055 1 Backing 18 Bedknife 14 5000415 1...

Страница 120: ...72 24 22 21 23 26 27 29 19 17 31 25 25 28 30 2 5 4 6 7 8 1 12 12 13 13 14 10 16 14 3 1 15 15 11 9 18 28 20 19 24 32 ECLIPSE 13 1 Differential and Rollers Serial No All...

Страница 121: ...35 1 Differential 11 463017 1 Key 9 Woodruff 12 308030 2 Thrust Washer 13 202947 2 Pinion Gear 14 415563 2 Set Screw 7 16 20 x 3 8 15 463007 2 Key 7 Wooodruff 16 308028 1 Pinion Shaft 17 220318 1 Bear...

Страница 122: ...74 7 8 1 24 16 16 13 17 25 33 6 4 2 9 5 3 3 18 17 35 35 36 34 28 29 19 32 14 14 22 23 16 16 13 21 20 12 11 12 10 15 15 31 27 30 26 4 ECLIPSE 14 1 Parking Brake and Wheels Serial No All...

Страница 123: ...Collar 16 366697 4 Bushing 17 446136 4 Lockwasher 5 16 Heavy 18 400188 2 Screw 5 16 18 x 1 Hex Head 19 361451 1 Washer Left Side Only 20 415513 2 Set Screw 1 4 20 x 1 2 21 366742 2 Brake Band Pin 22 4...

Страница 124: ...6 7 8 9 10 12 11 14 16 18 21 40 40 22 23 24 25 26 27 31 13 29 Fixed Head 28 30 14 15 17 17 32 32 19 20 29 Floating Head 33 ECLIPSE 15 1 Belts and Drive Motors Serial No All Fixed Head Frame Shown Floa...

Страница 125: ...22 1 13 463029 1 Key Woodruff 14 367554 2 Bearing Needle 15 446130 3 Lockwasher 1 4 Heavy 16 444708 3 Locknut 1 4 20 Center 17 400190 2 Screw 5 16 18 x 1 1 4 Hex Head 18 452006 1 Flat Washer 5 16 19...

Страница 126: ...78 1 Light Kit Power Module Connector 2 3 4 5 6 7 8 9 11 J1 J2 J3 J4 J5 12 15 15 16 16 14 14 12 11 10 ECLIPSE 16 1 Clamps and Wire Harness Serial No All...

Страница 127: ...ay Reference U2 See 3 1 22 1 6 4146678 1 Harness LCD Module 7 REF 1 Bail Lever Potentiometer Reference R2 See 1 1 22 1 8 REF 1 Throttle Potentiometer Reference R1 See 1 1 22 1 9 REF 1 M806A Controller...

Страница 128: ...Controller Controller Engine Ground Reel Motor Ground Frame Ground Engine Shutdown Terminal Mow Backlap Switch LCD Module Keyswitch Reel Motor Reel Motor 1 2 3 4 4 4 4 4 5 6 7 7 8 8 9 10 11 12 13 14...

Страница 129: ...or 8 Wire Connector LCD Module Connector Gray 8 838771 2 Deustch W8S Wedge Lock 9 838777 7 Deustch Sealing Plug 10 839917 1 Deustch DT06 2S Connector Headlight Connector 11 839921 1 Deustch W2S Wedge...

Страница 130: ...82 Controller Traction Motor Bail Lever Throttle Paddle Traction Motor 4 4 5 6 7 8 9 10 1 2 3 LCD Module 14 14 12 13 11 15 16 17 ECLIPSE 18 1 Traction Motor Harness and LCD Harness...

Страница 131: ...Motor 8 Wire Connector 6 838771 1 Deustch W8S Wedge Lock 7 838777 6 Deustch Sealing Plug 8 1 Deustch DTP06 2S Traction Motor 2 Wire Connector 9 1 Deustch WP2S 10 2 12 Ga Socket Terminal 11 4146678 1 H...

Страница 132: ...4 320774 1 Key 3 16 x1 1 2 Square 5 446136 5 Lockwasher 5 16 Heavy 6 4165761 2 Plate Engine Mount 7 4166120 1 Generator 1kW 8 450504 8 Screw M3 5 x 6 mm Pan Head 9 434060 4 Screw 5 16 24 x 7 8 Socket...

Страница 133: ...l Numbers Notes 1 2809837 2 Spring Extension 2 444708 6 Locknut 1 4 20 Center 3 443102 8 Nut 1 4 20 Hex 4 446130 4 Lockwasher 1 4 Heavy 5 441604 4 Carriage Bolt 1 4 20 x 1 6 400108 2 Screw 1 4 20 x 3...

Страница 134: ...rminal Hardware 2 2 3 5 6 6 8 10 12 22 11 23 24 13 14 4 1 15 21 18 19 20 20 16 17 25 P N KEY Battery and Battery Monitor Connections 7 9 9 14 See Above 4170001 STOP ECLIPSE 21 1 Battery Case Serial No...

Страница 135: ...Nut 8 32 Hex 12 446112 8 Lockwasher 8 Heavy 13 4101600 2 Strap Battery Case 14 4171680 1 Gauge Battery Reference U4 See 22 1 15 2811221 1 Lid Battery Case Includes Decals 16 455058 2 Flat Washer 1 4...

Страница 136: ...Lo 48V 48V 48V 48V POT POT Ground Ground Mow 15 V Backlap Shield Gnd Wiper 5 V 5 V Wiper Gnd Shield 15 V Gnd Shield HI Lo J1 1 J1 2 J1 11 J1 12 J5 5 J5 6 J5 7 J5 8 J5 1 J5 2 J5 3 J5 4 J1 3 J1 10 J1 8...

Страница 137: ...p Circuit Breaker Included with Harness F1 See 21 1 4105800 50 Amp Fuse Main Battery Power Module Only M1 See 15 1 4160533 Traction Motor M2 See 7 1 or 10 1 4160533 Reel Motor Fixed Head Units R1 See...

Страница 138: ...tor A B RD RD RD OG YE OG YE BK PK BU C D E F BK BK BK BK BK OG YE Key Switch RD RD RD RD BK BK 1 2 YE OG YE OG BK BU 3 4 5 6 Reel Switch Power Module Connection 20A Circuit Breaker 2 BK BK RD RD RD 1...

Страница 139: ...98 Six 12 Ounce Orange Aerosol 2500789 Twelve 1 Quart Can Orange 546409 Two 1 Gallon Can Orange Lapping Compound 5002488 One 10 Pound Pail of 80 Grit 5002490 One 25 Pound Pail of 80 Grit 5002489 One 1...

Страница 140: ...75 366717 75 366718 75 366719 75 366726 61 366727 61 366737 75 366742 75 366796 57 59 366984 87 367029 63 73 367164 63 71 367512 61 367554 77 395367 73 395418 73 395419 73 4101600 87 4102241 77 410408...

Страница 141: ...74683 67 5000102 61 5000412 61 5000415 71 5000457 61 5001101 71 5002151 71 5002577 71 5002905 75 500534 63 71 503532 84 545940 63 554847 75 62293 75 63305 55 63306 55 68668 87 838769 81 83 838771 81 8...

Страница 142: ...o exacting standards ensured by ISO 9001 and ISO 14001 registration at all our manufacturing locations A worldwide dealer network and factory trained technicians backed by Jacobsen Parts Xpress provid...

Отзывы: