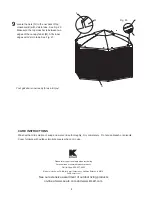
Fig. 8
Fig. 9
Fig. 11
6
Oe
Od
Of
Oe
Og
K
J
I
L
G
Ob
Oe
Oe
Oc
I
Fig. 12
Ob
Oe
J
Fig. 14
Oe
Of
I
J
Oc
Oe
H
Fig. 13
Ob
Oe
Of
Oe
I
J
C
H
Oa
Fig. 10
Oa
G
C
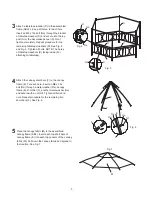
Place the completed canopy onto the top of
assembled leg posts. Line up the holes, for each
hole insert an M6 x 30L bolt (Od) through a metal
washer (Oe), a short bar (F), a bracket (Og), another
metal washer (Oe) and secure with a nut (Of). Don’t
tighten completely. Repeat procedure for the
remaining five short bars (F). Tighten all bolts and
nuts. See Fig. 8.
Pull down the edges of the canopy
fabric and insert each tip of the canopy short bar (F)
into the pocket of the canopy fabric
.
①
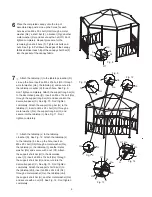
: Attach the tabletop (I) to the tabletop crossbar (D).
Line up the hole, insert an M6 x 20L bolt (Ob) through
a metal washer (Oe), the tabletop (I) and secure into
the tabletop crossbar (D) for each hole. See Fig. 9.
Don’t tighten completely. Attach the support long bar (G)
to the decorative panel (C), insert an M6 x 15L bolt (Oa)
through the support long bar (G) and secure into the
decorative panel (C). See Fig. 10. Don’t tighten
completely. Attach the support long bar (G) to the
tabletop (I), insert an M6 x 25L bolt (Oc) through a
metal washer (Oe), the support long bar (G) and
secure into the tabletop (I). See Fig. 11. Don’t
tighten completely.
②
: Attach the tabletop (J) to the tabletop
crossbar (D). See Fig. 12. Attach the tabletop (J)
to the tabletop (I). Line up the hole, insert an
M6 x 20L bolt (Ob) through a metal washer (Oe),
the tabletop (J), the tabletop (I), another metal
washer (Oe) and secure with a nut (Of). Attach
the support short bar (H) to the decorative
panel (C), insert an M6 x 15L bolt (Oa) through
the support short bar (H) and secure into the
decorative panel (C). See Fig. 13. Don’t tighten
completely. Attach the support short bar (H) to
the tabletop (J&I), insert an M6 x 25L bolt (Oc)
through a metal washer (Oe), the tabletop (J&I),
the support short bar (H), another metal washer (Oe)
and secure with a nut (Of). See Fig. 14. Don’t tighten
completely.
6
7
F


