background image

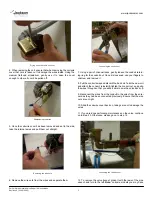
4. When replacing the coil, ensure that when removing the coil wire
cover that care is taken not to damage the wires inside. Using the
medium flathead screwdriver, gently use it to open the cover
enough to where it could be pulled off.

5. Once the coil wire cover has been removed and set to the side,
take the internal wires and pull them out straight.

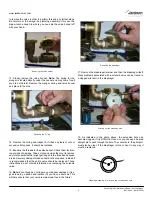
6. Remove the wire nuts from the wires and separate them.

7. Using a pair of channel locks, gently loosen the conduit retain-
ing ring for the conduit nut. Once it is loosened, use your fingers to
unscrew and remove it.

8. Pull the conduit away and discard the bad coil. Take the new coil
and attach the conduit, reinstall & tighten the conduit nut, and pullg
the wires through so that you will be able to wire the valve back up.

9. Reconnect the wires from the conduit to the wires from the sole-
noid as they had been connected previously. Ensure that the wire
nuts are on tight.

10. Slide the coil wire cover back on, taking care not to damage the
wires.

11. If you are done performing maintenance on the valve, continue
on to step 23. Otherwise, please go on to step 12.

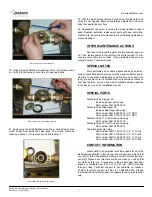
12. To remove the valve bonnet, grasp it with the jaws of the pipe
wrench and turn to the left. 

Note:

on some models you may have

www.jacksonmsc.com

Parker Style Solenoid Valve Repair Kit Instructions
Revision A  (04/15/2005)

3

Prying open the coil wire cover

Straightening the wires

Loosening the conduit nut

Removing the wire nuts

Loosening the valve bonnet

Содержание Dishmachine Component

Страница 1: ...Parker Style Solenoid Valve Repair Kits 07610 003 05 39 A April 15 2005 Dishmachine Component Maintenance Instructions ...

Страница 2: ...s indicated in the sec tion entitled PREPARATION IMPORTANT NOTES 1 Read these instructions thoroughly before attempting this maintenance evolution Become familiar with the parts and what actions need to be taken This will save time in the long run 2 The procedures demonstrated in this manual are shown being performed on an AJ 44 rack conveyor dishmachine The actual maintenance steps however apply ...

Страница 3: ...il and attach the conduit reinstall tighten the conduit nut and pullg the wires through so that you will be able to wire the valve back up 9 Reconnect the wires from the conduit to the wires from the sole noid as they had been connected previously Ensure that the wire nuts are on tight 10 Slide the coil wire cover back on taking care not to damage the wires 11 If you are done performing maintenanc...

Страница 4: ...that the entire valve should be replaced These instructions do not provide information on replacing the solenoid valve 16 Note Even though an O ring may not appear damaged it is a good idea to go ahead and replace it if you have a new one This will help ensure that your valve remains leak free in the future 17 Remove the diaphragm retainer and then the diaphragm itself Many problems associated wit...

Страница 5: ...of qualified service agencies in the back of you unit s installation manual SPECIAL PARTS Solenoid Valve Plunger Kit Includes plunger and spring Part number 04810 200 09 18 Solenoid Valve Diaphragm Kit Includes diaphragm and o ring Part number 04810 200 03 18 1 2 NPT Part number 04810 100 10 18 3 4 NPT Solenoid Valve 110 Volt Coil and Housing Part number 04810 200 01 18 Solenoid Valve 230 Volt Coi...

Отзывы: