background image

US

2.  Connect the other end of the USB cable to any free 

USB port on your computer.

step 7: enable your softphone interface

1.  Insert the CD-ROM included with your headset into 

your PC and install the Jabra PC Suite software. 

  The softphone part of the setup wizard will prompt 

you to do this.

  The installation includes the supported softphone 

drivers necessary to enable the softphone interface. 

  If you have any questions as you work through the 

setup wizard, or if you would like to learn more 
on how to use the many advanced features of 
your headset solution, please refer to the full user 
manual. This is included on the CD-ROM in PDF 
format. 

2.  Right-click on the Jabra icon in the Windows 

Notification Area and select 

open device service

.

  The Jabra Device Service window opens. This 

shows the list of softphone drivers installed on your 
PC. Use the online help available in this window to 
learn more.

3.  Select the softphone you want to use (target 

softphone) from those available in the 

select 

softphone for outgoing calls

 drop-down list.

4.  Run the Jabra Control Center — click on the 

Windows Start button and select All Programs > 
Jabra > Jabra PC Suite > Jabra Control Center.

5.  Select the Softphone tab for your Jabra PRO device.

6.  In 

target softphone for outgoing calls

, select 

either 

Microsoft office Communicator

 or 

softphones supported by Jabra PC suite

Configure other parameters, as required.

  This establishes the default softphone target type. 

Use the online help available in this window to 
learn more.

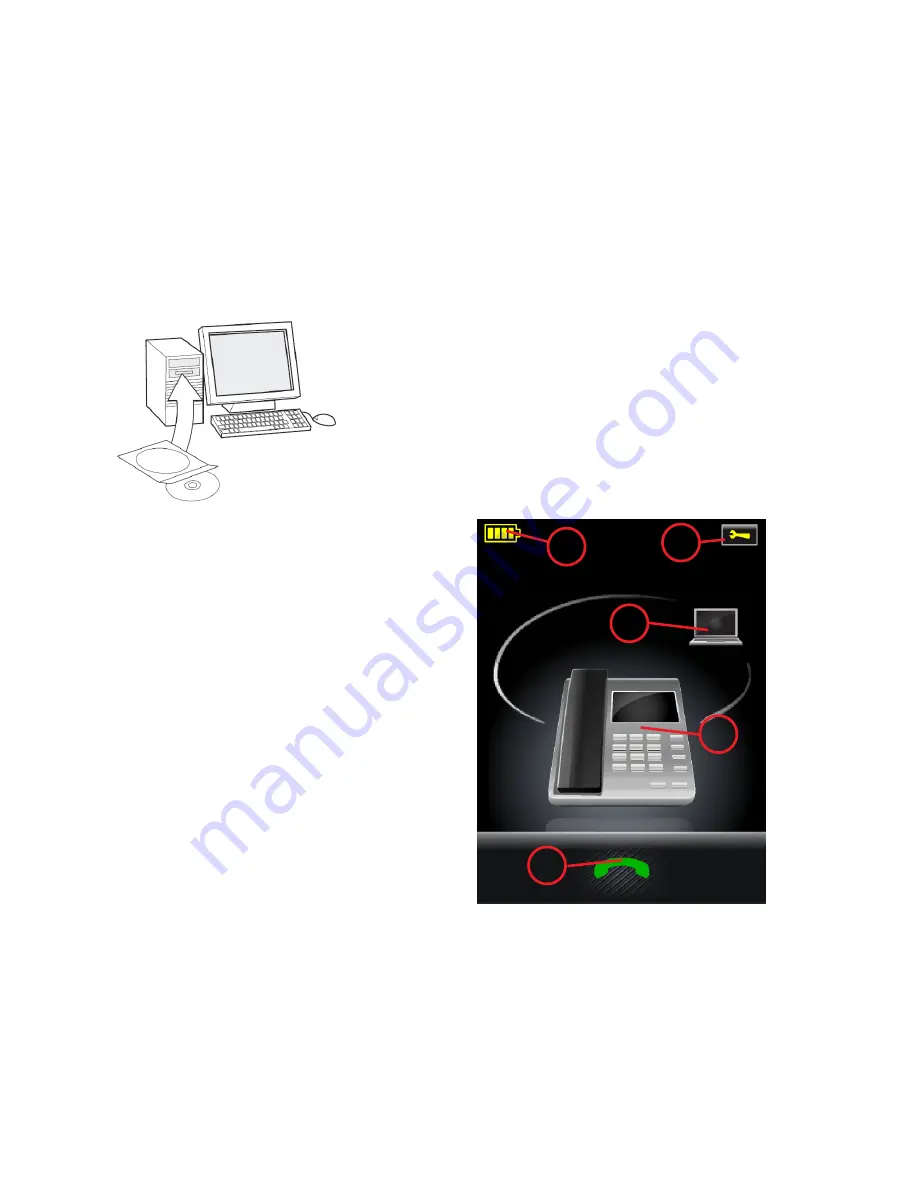
TOUCHSCREEN CONTROLS

During normal operation, the touchscreen displays 
information about your headset, shows the current 
target phone for outgoing calls and indicates its 
status. From here, you can answer an incoming call, 
end the current call, access your base settings, choose 
a target phone and open an audio link to the current 
target phone. 

1

3

2

4

5

Figure 5: Touchscreen controls for standard, everyday 
operation

Содержание PRO 9460 - PRO 9460-DUO

Страница 1: ...0 8031 2651 72 Espza a 34 916 398 064 France 33 0 130 589 075 Italia 39 02 5832 8253 Luxembourg 49 0 8031 2651 72 Nederland 49 0 8031 2651 72 Norge 47 32 22 74 70 sterreich 49 0 8031 2651 72 Poland 0...

Страница 2: ...y 39 199241498 Japan 81 345209655 Netherlands 31 858880322 New Zealand 64 99853540 Norway 47 85449926 Poland 48 223988168 Russia 7 812 3092605 Singapore 65 31031365 South Africa 27 114613389 Spain 34...

Страница 3: ...r port 12 Security slot 13 Speaker for ring tones and touchscreen audio feedback Figure 3 Jabra PRO 9460 base seen from the front and back respectively IMPORTANT This guide will help you connect and c...

Страница 4: ...d try again 3 Rotate the headset boom arm for left or right ear use as needed Always position the microphone so that it sits as close to the corner of your mouth as possible when you wear the headset...

Страница 5: ...need to be determined The wizard will prompt you to call your local Jabra setup server see the cover of this quick start guide for a list of numbers This enables the Jabra PRO base to test its clear d...

Страница 6: ...elp available in this window to learn more 3 Select the softphone you want to use target softphone from those available in the Select softphone for outgoing calls drop down list 4 Run the Jabra Contro...

Страница 7: ...ion button when no call is active Please see the user manual for complete details Daily Use Storing and charging the headset Whenever you are not using your headset keep it in its recharge cradle as s...

Страница 8: ...t next to the phone Note If your desk phone has an electronic hookswitch or GN1000 Remote Handset Lifter then the connection opens automatically If you are answering a call then begin talking If you a...

Страница 9: ...your headset automatically 3 When you are done talking do one of the following to hang up Press the end call button on your softphone Touch the end call icon on the touchscreen Tap the multifunction...

Страница 10: ...the headset and place it in its cradle on the base During a call To adjust the volume you hear slide your finger up or down the headset s touch sensitive panel To mute or un mute the microphone doubl...

Страница 11: ...urit 13 Haut parleur pour les sonneries et les r actions sonores de l cran tactile Figure 3 Socle Jabra PRO 9460 vues de face et arri re respectivement IMPORTANT Ce guide vous aidera connecter et conf...

Страница 12: ...as articul d environ 300 et r essayez 3 Faites pivoter le bras articul pour utiliser l oreille gauche ou droite selon le besoin Positionnez toujours le microphone pour qu il soit aussi proche que poss...

Страница 13: ...cle pour votre t l phone fixe Une fois la connexion tablie entre le socle et le t l phone fixe les r glages optimis s du commutateur de raccordement et du niveau du microphone doivent tre effectu s L...

Страница 14: ...s de votre micro casque veuillez consulter le manuel de l utilisateur Ce manuel est inclus sur le CD ROM en format PDF 2 Cliquez droit sur l ic ne Jabra dans la zone de notification de Windows et s le...

Страница 15: ...de la liaison audio 4 Autres t l phones touchez l ic ne appropri e ici pourchangerlet l phonecibleactuel ouappuyez sur le bouton multifonction du micro casque quand aucun appel n est en cours pour pa...

Страница 16: ...proc dant de l une des fa ons suivantes Touchez l ic ne d ouverture de connexion sur l cran tactile Appuyez sur le bouton multifonction l arri re de votre micro casque 3 Ouvrez la connexion entre vot...

Страница 17: ...e l une des fa ons suivantes Touchez l ic ne de fin d appel sur l cran tactile Appuyez sur le bouton multifonction l arri re de votre micro casque Retirez le micro casque et ins rez le dans son suppor...

Страница 18: ...ons suivantes pour raccrocher Appuyez sur le bouton de fin d appel sur votre logiciel t l phonique Touchez l ic ne de fin d appel sur l cran tactile Appuyez sur le bouton multifonction l arri re de v...

Страница 19: ...ckmeldung Abbildung 3 Jabra PRO 9460 Basisstation Vorder und R ckansicht WICHTIG Diese Kurzanleitung hilft Ihnen beim Verbinden und Konfigurieren Ihrer Headset L sung Es ist wichtig dass Sie die Anwei...

Страница 20: ...hten Ohr den Mikrofonarm des Headsets in die passende Stellung Achten Sie darauf das Headset beim Tragen immer so zu positionieren dass das Mikrofon m glichst nahe am Mund sitzt 4 Passen Sie die L nge...

Страница 21: ...mit dem Tischtelefon verbunden wurde m ssen die optimalen Einstellungen f r den Umschalter f r ein klares Freizeichen und f r die Mikrofonlautst rke ermittelt werden Der Assistent fordert Sie auf eine...

Страница 22: ...nsassistenten haben oder weitere Informationen zu den erweiterten Funktionen Ihrer Headset L sung w nschen konsultieren Sie bitte das Benutzerhandbuch das auf der CD ROM im PDF Format verf gbar ist 2...

Страница 23: ...adsets tippen bzw das Symbol zum Aktivieren der Audioverbindung ber hren 4 AndereTelefone Ber hren Sie das entsprechende Symbol um das aktuelle Zieltelefon zu ndern oder dr cken Sie die Mehrfunktionst...

Страница 24: ...auf dem Touchscreen Tippen Sie auf die Mehrfunktionstaste an der R ckseite des Headsets 3 ffnen Sie eine Verbindung von Ihrem Tischtelefon zum Telefonnetz mit einer der folgenden Aktionen Besitzt Ihr...

Страница 25: ...uf die Mehrfunktionstaste an der R ckseite des Headsets Nehmen Sie das Headset ab und platzieren Sie es im Ladeschacht der Basisstation Einen Anruf ber ein Softphone t tigen 1 Setzen Sie Ihr Headset a...

Страница 26: ...auf Ihrem Softphone die Taste zum Beenden von Anrufen Ber hren Sie das Symbol f r Verbindung beenden auf dem Touchscreen Tippen Sie auf die Mehrfunktionstaste an der R ckseite des Headsets Nehmen Sie...

Страница 27: ...ia 12 Ranura de seguridad 13 Altavoz para tonos de llamada e informaci n sonora de la pantalla t ctil Figura 3 Base Jabra PRO 9460 vistas frontal y posterior respectivamente IMPORTANTE Esta gu a le ay...

Страница 28: ...uricular seg n sea necesario para utilizarlo en la oreja izquierda o derecha Coloque el micr fono siempre de forma que ste permanezca lo m s cerca posible del extremo de su boca mientras utiliza el au...

Страница 29: ...nexi n con el tel fono de escritorio deben determinarse los ajustes ptimos del conmutador de tono de marcaci n y el nivel del micr fono El asistente le pedir que llame al servidor de configuraci n loc...

Страница 30: ...onsulte el manual de usuario completo Se incluye en formato PDF en el CD ROM 2 Haga clic con el bot n derecho en el icono de Jabra del rea de notificaci n de Windows y seleccione Abrir Device Service...

Страница 31: ...nectar sipulsabrevementeelbot nmultifunci ndel auricular o si toca el icono para activar la conexi n de audio 4 Otros tel fonos toque el icono apropiado para cambiar el tel fono designado actual o pul...

Страница 32: ...tel fono de escritorio haciendo lo siguiente Toque el icono Establecer conexi n en la pantalla t ctil Pulse el bot n multifunci n situado en la parte trasera de su auricular 3 Establezca la conexi n...

Страница 33: ...la pantalla t ctil Pulse el bot n multifunci n situado en la parte trasera de su auricular Qu tese el auricular y col quelo en el soporte de la base Para realizar una llamada desde un softphone 1 Col...

Страница 34: ...ra colgar Pulse el bot n Finalizar llamada en el softphone Toque el icono Finalizar llamada en la pantalla t ctil Pulse el bot n multifunci n situado en la parte trasera de su auricular Qu tese el aur...

Страница 35: ...CHT JABRA PRO 9460 1 2 3 led 4 5 6 7 8 1 Jabra PRO 9460 2 Jabra PRO 9460 Duo JABRA PRO 9460 1 2 3 4 5 6 7 8 auX 9 usB 10 11 12 13 3 Jabra PRO 9460 CD ROM Jabra PRO Frutiger Next Linotype GN Netcom...

Страница 36: ...CHT 1 JabraPRO9460 Duo CD ROM 1 2 30 3 4 2 Jabra PRO 90 45 90 45 3...

Страница 37: ...CHT jabra PRO 9400 3 4 GN1000 EHS GN1000 EHS Jabra 5 Jabra Jabra PRO 1 Jabra PRO 2 Jabra 3 A G 6 Jabra PRO Jabra PRO USB...

Страница 38: ...1 CD ROM Jabra PC Suite PDF CD ROM 2 Windows Jabra device service Jabra Device Service 3 4 Jabra Control Center Windows Jabra Jabra PC Suite Jabra Control Center 5 Jabra PRO 6 Microsoft office Commun...

Страница 39: ...CHT 4 2 5 1 2 LED 1 2 3...

Страница 40: ...CHT GN1000 4 GN1000 5 1 2...

Страница 41: ...CHT 3 1 2 2 x www jabra com weee...

Отзывы: