April 28th, 2016
24
Chimney Inspection
Wood moisture, wood species, the combustion quality, are
some factors that can influence creosote buildup speed into
chimney and chimney connector.
The chimney and the chimney connector must be inspected at
least one every two month during the warming season or more
depending of your installation. You can call a Chimney
sweeper to evaluate the creosote formation or you can do it
yourself by extinguish the wood stove, wait for cool down. Then
unscrew the chimney connector and inspect the chimney
connector and the factory build chimney with a spot light to see
if a creosote buildup as occurred. For a masonry chimney
insert a mirror in the cleanout opening at the bottom at the
bright day. For an outdoor factory build chimney open the cap
at the bottom of chimney.
A 1/8 inches (3 mm) or more creosote buildup, smaller
apparent diameter and if you cannot see the chimney cap. It’s
a sign that is time to sweep your chimney connector and your
chimney to remove creosote.
Chimney Sweeping
Chimney Sweeping need a special tool like some fiberglass rod
an adapted diameter brush and some rope
Sweeping chimney also requires to climb on the roof to remove
the chimney cap and sometime a too high chimney section too.
We recommend to call a Professional chimney Sweeper
certified by APC in Quebec, the WETT in the rest of Canada or
by NFI in United States.
Door care
The door is the mobile element that need a special attention.
Its tightness is primordial. One of the first signs of wear braided
fiberglass rope is the white soot seems to stick on the glass
located where the air leak.
Air Tighten Adjustment
If the braided fiberglass rope still seems good enough and little
flatten it need probably to be tighten
Door adjustment (right side)
This side adjustment is do with the screw under the door near
the hook hole..
1) Unlock and open the door.
2) With a screwdriver turn clockwise the adjustment
screw a quarter turn.
3) Put a piece of paper between the frontage of stove
and braided fiberglass rope and close and lock the
door.
4) If the paper easily slide when you pull it, do steps 1 to
3 another time.
5) If the door side touch the frontage of the stove and the
piece of paper slide easily. The braided fiberglass
rope must be changed.
On some version of stove two screw is for retain the door.
Cleaning up glass
To clean the glasses, J.A. Roby Inc. recommends using
products sold for this purpose or an oven cleaner avoiding
touching paint part.
•
Avoid cleaning with abrasives or when the glass is
hot. Cleaning glass when is hot can cause a thermal
shock and broken the glass.
Uninstalling and installing door
To uninstall keep the lower hinge tighten.
1) Keep the door lock.
2) Untighten the upper hinge without remove the nut.
3) Unlock the door and carry it while open.
4) Tilt the door off the upper hinge
5) Lift the door off the lower hinge..
Installing the door.
1) Insert the bottom hinge
2) Close the door align it and lock it.
3) Tighten the upper hinge then align the washer with
the hinge support.
4) Make the air tighten adjustment.
Broken glass replacement
WARNING: NEVER OPERATE STOVE WHEN THE GLASS
IS BROKEN OR CRACK
NEVER SLAP THE DOOR.
NEVER BUILD FIRE TOO NEAR THE GLASS
NEVER PUT WATER ONTO THE GLASS TO AVOID A
THERMAL SHOCK.
Replace only with a 4mm ceramic glass with the right shape.
DO NOT USE SUBTITUTE
Steps to replace glass.
1) Loosen partially the screws retaining the four glass
supports. And remove the support.
2) Remove the broken glass and all pieces of broken
glass. And clean the door.
3) Stick the flat fiberglass rope around the glass without
pulling it excessively. A sticking side is already on the
flat rope.
4) Install the new glasses and put the lower support first
and gently tighten screw. Tighten it too much can
make a pressure point and can break the glass when
it became hot. Especially when decorative plate are
installed.
5) Install the top support and gently tighten screw
6) Check the tightening Tighten it too much can make a
pressure point and can break the glass when it
became hot
If you cannot replace glass in place you may have to remove
the door to make it. Look in this manual to know how.
Содержание SIRIUS
Страница 4: ...April 28th 2016 4 Nameplate...
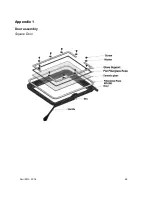
Страница 26: ...April 28th 2016 26 Appendix 1 Door assembly Square Door...
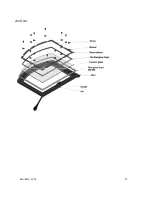
Страница 27: ...April 28th 2016 27 Arc Door...
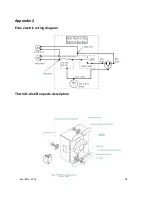
Страница 28: ...April 28th 2016 28 Appendix 2 Fans electric wiring diagram Therm O disk Box parts description...
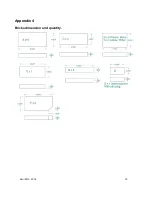
Страница 30: ...April 28th 2016 30 Appendix 4 Bricks dimension and quantity...

