iXsystems TrueNAS M Series Скачать руководство пользователя страница 7

1.4.4 Mount the Unit in the Rack

Caution: Two people are required to safely lift the chassis for rack installation or removal.

Do not install

drives until after the chassis has been installed in the rack, and remove all drives before removing the chassis

from the rack.
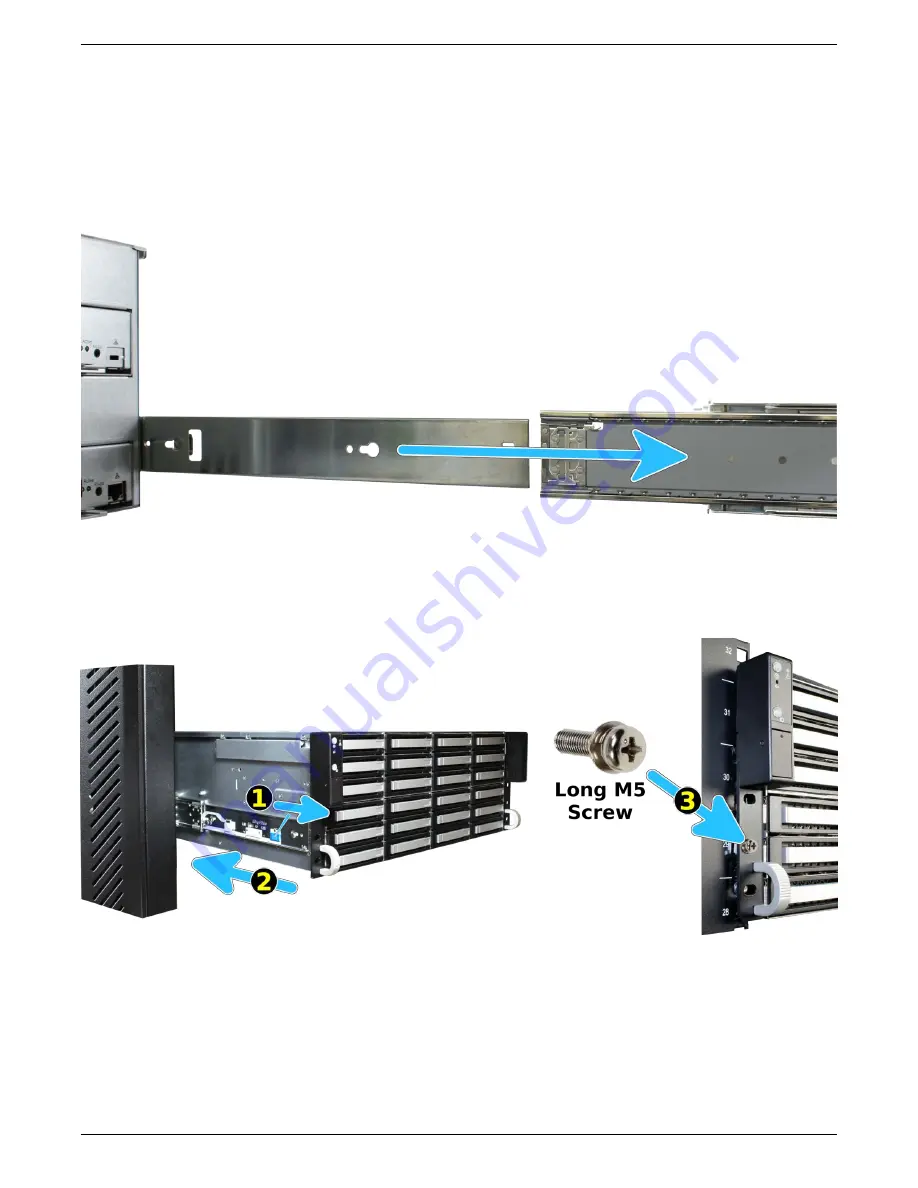
Extend both inner rack rails outward from the rack until they lock in place. Align the cabinet rails with the inner

rack rails and slide them into the rack rails until they are fully seated.

When both cabinet rails are secured in the rack rails, gently push the chassis until it stops halfway in. Slide the

blue release tabs on both cabinet rails toward the front of the system (1) while pushing the unit into the rack.

Push the chassis into the rack until it is flush with the front of the rack (2).

Anchor the unit in the rack on both sides with long M5 screws. On the M-Series, the screw hole is behind a small

door on each ear.

Support: 855-473-7449 or 408-943-4100

Page 6

Email

[email protected]

Содержание TrueNAS M Series

Страница 1: ...TrueNAS M Series Uni ed Storage Array Basic Setup Guide Version 1 4...

Страница 2: ...r any parts are missing please take photos and contact iXsystems support immediately at support iXsystems com or 855 GREP4 iX 855 473 7449 or 408 943 4100 Please locate and record the hardware serial...

Страница 3: ...s The M Series includes one or two TrueNAS controllers in an over and under con guration 1 2 M40 Back Panel Redundant power supplies 1 serial port 2 1Gb Ethernet Out of Band management port must be co...

Страница 4: ...B 3 0 ports 3 USB 2 0 ports 4 10GB Ethernet ports 5 VGA monitor port 6 ID indicator 7 HD Mini SAS3 connectors 8 networking ports 9 asterisk slot for Fi bre Channel or additional networking 10 TrueNAS...

Страница 5: ...Mount Cabinet Rails The cabinet rails are mounted on both sides of the system cabinet Align the cabinet rail keyholes with the three posts ES24 or four posts M Series on the side of the chassis and sl...

Страница 6: ...il it stops 2 Place the rail in the rack with the front end toward the front of the rack aligning the pins with the mounting holes in the front of the rack Push the pins into the holes until the latch...

Страница 7: ...ner rack rails and slide them into the rack rails until they are fully seated When both cabinet rails are secured in the rack rails gently push the chassis until it stops halfway in Slide the blue rel...

Страница 8: ...ive bays must be lled to maintain proper air ow for cooling If fewer than 24 drives are connected ller blanks must be placed in the empty bays 1 6 Connect Expansion Shelves Refer to the installation i...

Страница 9: ...to automatically power on when connected to a power outlet This design ensures that the M Series comes back on when power is restored after a power failure 1 9 Install Bezel Optional The included bez...

Страница 10: ...ginning work Observe proper antistatic procedures when working with TrueNAS controllers or other electronic components 1 10 1 Adding a Second TrueNAS Controller M Series systems with only one TrueNAS...

Страница 11: ...M Series chassis Replace the retention screw 1 Con rm there are no obstructions in the TrueNAS controller slot then continue with the TrueNAS controller instal lation in the next section Support 855...

Страница 12: ...AS controller into the chassis Press only on the bottom sides or handle of the TrueNAS con troller sliding it into the chassis until it stops 1 Lift the black release handle to lock the TrueNAS contro...

Страница 13: ...t pull or press on any portion of the TrueNAS controller except the black release handle Pull the black release handle down 2 to release the TrueNAS controller Use both hands to grasp the TrueNAS cont...

Страница 14: ...clicking Guide in the TrueNAS web interface or going directly to https www ixsystems com documentation truenas 2 Contacting iXsystems For assistance please contact iX Support Contact Method Contact O...

Отзывы: