


Users ManUal
MyInk / MyForm
Settings
Before the combination of both the TOP file and the MS Office document
(e.g. Word, Excel, PowerPoint), you should make the settings first.
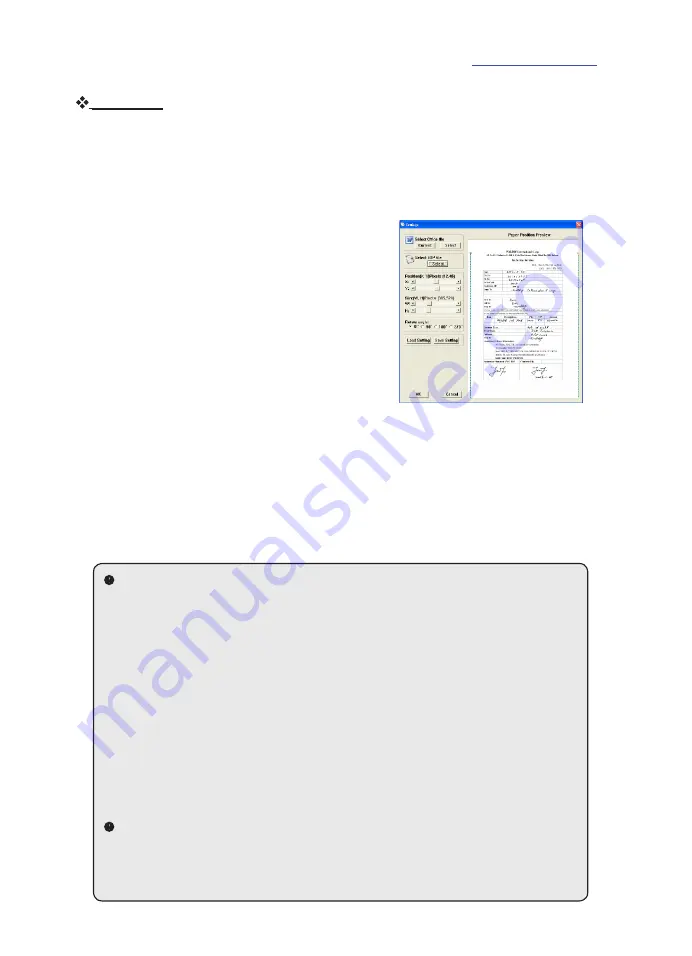
To make the settings, click on the
Setting
and perform the following:
1
Click on the first
“Select”
button to select
the background office document or the
“Current“
button to select the already
opened office document
(supports single
page only)
.
2
Click on the second “Select“ button to
select the TOP document.
You will see the background office document
and the TOP document appear as the screen
on the right.
3
Drag over the TOP document or use the
slide bar to adjust the position on the background document.
4
Drag the edges of the TOP document or use the slide bar to adjust
the Size.
5
Select a proper angle if necessary.
When the above setting is done, press the
Save Setting
(*.epst) button to
record the position, size and angle settings and then press
OK
to exit.
To open the setting file, press the
Load Setting
(*.epst) button to bring in
the setting.
TIP 1:
Imagine the TOP file and the office document are 2 image layers.
The first one (a handwritting TOP document) always keeps in front
and the later (a document with blank form on it) always stay in the
background. To merge both perfectly, you have to adjust the position,
size or angle so as the TOP contents stay in the correct place of the
blank form.
At last, all the above adjustments will be recorded and saved as
a setting file (*.epst) for future use. Next time when you want to
combine any TOP file with the same layout as the one you have
done before, just load the
Office Form Setting
(refer to page 10)
and the TOP contents will be combined with the form automatically
without further adjustments.
TIP 2:
For better file management, we recommend you to name the
setting file (*.epst) based on the filename of the background office
document.
Page 10 of 12
www.ivistatablet.com


