


Included:
Not Included:
PLEASE NOTE:
The screws provided with Iver
products are made from solid brass.
This allows finishes to be matched
as closely as possible and prevents
the possibility of screws rusting
in coastal areas. Please note that
screws require
pre-drilling
.
Please take extra care
when fitting.
8. Privacy Turn
Wood Screws
7. Install Levers (cont.)
7.3.
Affix wood screws at 3 fixing points, leaving the
3 or 9 o’clock holes for the privacy pin and
emergency release.
7.4
Replace outer roses, ensuring the privacy pin hole
lines up with the 3 or 9 o’clock bolt-through hole
on the inner rose (for pin) and outer rose
(for emergency release). (Figure 7)
Figure 7.
8.
8.1
Place privacy pin into hole in rose on inside of
door, align with female thread in latch and screw
to secure. (Figure 8)
8. Install Privacy Pin
Figure 8.
1.
2.
8.
7.
7.
6. (or 5.)
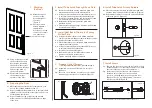
Rose Privacy Set Built-in
1. Rose Privacy Lever Set
2. Outer Rose Covers
3. Hex Key
4. Grub
Screws
5. Wood Screws
6. Cut-off Screws
7. Tube Latch
Privacy Spindle
IMPORTANT:
Please install this door
hardware in the following
order to ensure its warranty
is not voided.
1.
Install the door hardware
on raw / unfinished door
using the instructions
provided.
2.
Remove door hardware
and store safely. Do not
place painters tape or
masking tape over the
product. The tape will
damage the finish.
3.
Paint / finish door.
4.
Reinstall hardware.
Please recycle
me after use


