background image

Charging the Electronic Wine Opener

We recommend that you charge the set for at least 12 hours before using it for the first time. 
Follow these instructions to make sure your electronic wine opener charges correctly:
 

1.

    Connect the DC plug connection into the socket at the back of the charging base.


2.

   Place the electronic wine opener into its designated slot at the rear of the charging base, ensuring 

      that the metal connections on the base are making proper contact with the metal connections on 
      the bottom of the unit. 
 

3.

   Insert the plug end of the AC/DC adapter into a main power outlet.


4.

   The charging indicator at the top of the unit will be illuminated red for the duration of the charging 

       process. It takes 10-12 hours for the battery to fully charge. When the battery is fully charged, the 
       charging indicator will turn green.


5.

    To stop the charging process, disconnect the AC/DC adapter from the outlet, and disconnect the 

       DC plug connection from the charging base.

Using the Electronic Wine Opener

1.

    Before extracting the cork, use the included foil cutter as pictured to remove any foil seals from 

      the bottle. 
 

2.

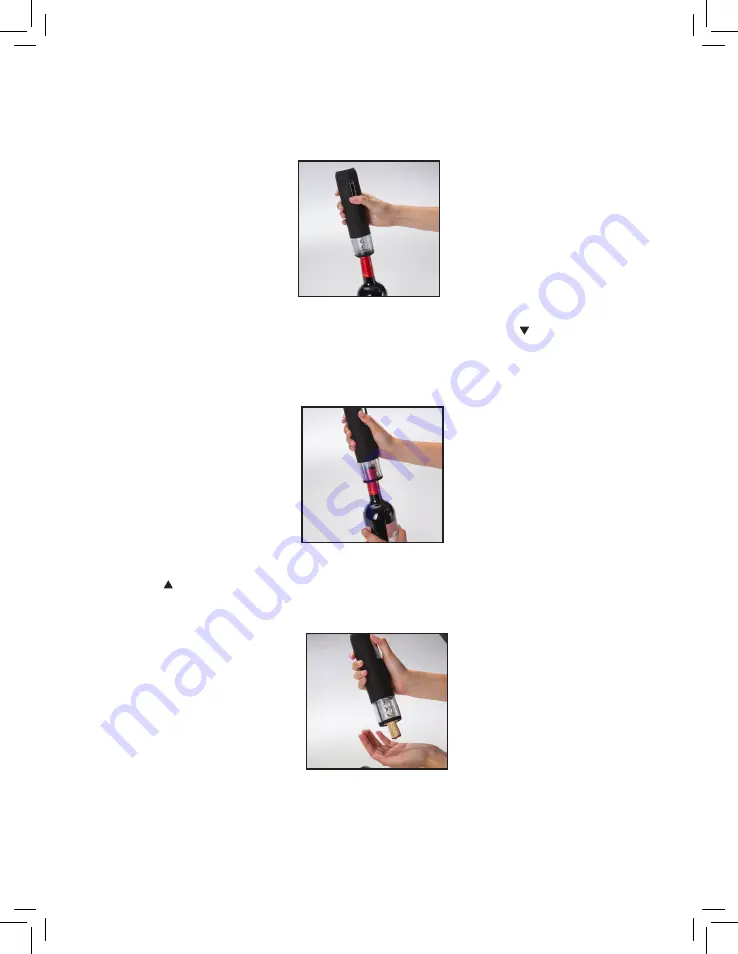
   Place the electronic wine opener on top of the wine bottle, making sure that both bottle and opener 

      remain as upright as possible at all times. If the wine opener is held at an angle to the bottle it will 
      not remove the cork properly. 


3.

   Hold the wine bottle and the electronic opener firmly. Press and hold the Pull (  ) button on the front 

      of the wine opener. The corkscrew spiral will turn in a clockwise direction, entering the cork and 
      gradually removing it from the bottle. When the mechanism stops, the cork will be visible through the 
      transparent window at the bottom of the opener, and the blue indicator light will turn off.


4.

   Lift the wine opener away from the bottle. To remove the cork, simply press and hold the 

      Release (  ) button on the front of the wine opener. The corkscrew will spin counterclockwise and 
      release the cork into your hand.

Содержание IVAWS20C

Страница 1: ...7 PIECE WINE GIFT SET USER GUIDE IVAWS20C ...

Страница 2: ...ace or store this appliance near an open flame cooking or heating appliances or any similarly hot surface This appliance is not intended for use in wet or damp conditions as this creates the risk of electric shock Always make sure that the power cord is positioned so that it will not get damaged or create a tripping hazard Use only the AC DC adapter and the charging base supplied with your unit do...

Страница 3: ...instruction and training on how to use this device by a person responsible for their safety CAUTION The corkscrew is sharp Keep fingers and other body parts appendages and or utensils away from the operating end of the wine opener Package Contents 1 1 x Electronic wine opener 2 1 x Vacuum preserver 3 2 x Vacuum compatible wine stoppers 4 1 x Aerator pourer 5 1 x Foil cutter 6 Charging base 7 AC DC...

Страница 4: ...act with the metal connections on the bottom of the unit 3 Insert the plug end of the AC DC adapter into a main power outlet 4 The charging indicator at the top of the unit will be illuminated red for the duration of the charging process It takes 10 12 hours for the battery to fully charge When the battery is fully charged the charging indicator will turn green 5 To stop the charging process disco...

Страница 5: ...tton on the front of the wine opener The corkscrew spiral will turn in a clockwise direction entering the cork and gradually removing it from the bottle When the mechanism stops the cork will be visible through the transparent window at the bottom of the opener and the blue indicator light will turn off 4 Lift the wine opener away from the bottle To remove the cork simply press and hold the Releas...

Страница 6: ...ld the cork Press and hold the Release button while holding the cork with the pliers and allow the cork to slowly be released Do not try to force the corkscrew or the cork as this could damage the mechanism Using the Aerator Pourer 1 Place the aerator pourer into the bottle neck snugly to allow the wine to pour out smoothly without splashing into a glass or other container 2 The pourer aerates as ...

Страница 7: ... handle stop and remove it from the wine stopper 4 If there is more than half a bottle of wine remaining the above three steps should sufficiently remove the air and seal the bottle For less than half a bottle of wine we recommend repeating steps 1 3 a second time to ensure all the air has been removed Using the Date Indicator on the Stoppers 1 On the stoppers you will find a printed symbol above ...

Страница 8: ...r hand 3 Rinse and store the wine stopper in a safe clean place until you need them next There are two handy compartments to store the wine stoppers in the charging base Care and Maintenance After usage return your electronic wine opener to the charging base so that it is fully charged and available to use when you need it next To clean wipe the outside of the charging base with a lightly dampened...

Страница 9: ...directive Waste Electrical and Electronic Equipment 2002 96 EC has been put in place to ensure that electronic and electrical equipment is recycled using the best available treatment recovery and recycling techniques to ensure human health and high level environment protection Your product is designed and manufactured with high quality materials and components which can be recycled and reused Do n...

Страница 10: ... Road Crusader Industrial Estate London N4 1LZ United Kingdom Made in China Ivation is a trademark of C A IP Holdings LLC in the U S 2018 All rights reserved All other products brand names company names and logos are trademarks of their respective owners used merely to identify their respective products and are not meant to connote any sponsorship endorsement or approval ...

Отзывы: