

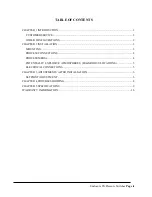


Enclosure 6N Pressure Switches
Page 6
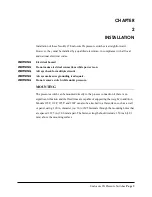
CHAPTER
3
ADJUSTMENTS AFTER INSTALLATION
The factory-set setpoint or adjustable setpoint range is marked on the nameplate of the
switch. This section describes the adjustments needed after an Adjustable Pressure
Switch has been properly installed. Models 125P, and 225P are not adjustable.
SETPOINT ADJUSTMENT
WARNING
Do not remove switch while under pressure.
1.
Disconnect the electrical power. Check for multiple circuits.
2.
On Model 130P, remove the pressure connection to allow access to the adjustment
nut inside the pressure port. On the other models, loosen the screws on the access
cover, and swing it to the side.
3.
To change the setpoint on Model 130P, use an Allen wrench to rotate the adjustment
nut counterclockwise to increase the setpoint, and clockwise to decrease it. It takes
approximately 3 to 5 turns to move from one end of the adjustable range to the other
(the higher range units require more turns than the lower range units). Check the
setpoints per paragraphs 5 and 0 below for precise adjustments.
4.
On the other models, the adjustment nut can be rotated by hand or with a small-
shafted screwdriver or similar tool inserted into a slot. The range scale is intended to
be used only as an approximate guide; it indicates the increasing setpoint on Models
122P, 123P, 132P, and 232P, and decreasing setpoint on Models 131P, 181P, and
231P.
5.
To check the increasing setpoint, connect a pressure source and a calibrated pressure
gauge or transducer to the pressure port and slowly apply increasing pressure (or
vacuum on Model 181P) until the switch actuates. Actuation can be noted by
listening to the audible snap of the Belleville spring, or with an ohmmeter across the
appropriate free leads.