background image

Liste 6120.1BA

Artikel Nr. 771070006
9/2009

ITT Austria GmbH

A-2000 Stockerau

Ernst Vogel-Straße 2
Telefon: 02266/604
Telefax: 02266/65 311
E-mail:

[email protected]

Verkaufsbüro und Kundendienststellen in Österreich

A-8054 Graz-Seiersberg

Kärntner Straße 518
Telefon: 0316/28 61 20
Telefax: 0316/28 70 42

A-9020 Klagenfurt

Schachterlweg 58
Telefon: 0463/31 93 20
Telefax: 0463/31 93 17

A-4600 Wels

Haidestraße 41
Telefon: 07242/66 8 51, 52, 53, 54
Telefax: 07242/66 8 51/12

A-4863 Seewalchen/Attersee

Seyrlstraße 2
Telefon: 07662/56 26-0
Telefax: 07662/56 26 20

A-6175 Kematen

Bahnhofstraße 31
Telefon: 05232/20 0 01
Telefax: 05232/20 0 03

www.ittaustria.com

Содержание HX 301

Страница 1: ...iebsanleitung Instructions d installationet d entretien Installation and Operating Instructions Heizungsumwälzpumpen Circulateurs de chauffage Heating circulators Baureihe Series Model LX LXD 321 322 323 HX HXD 301 302 ...

Страница 2: ...000 Stockerau Ernst Vogel Straße 2 Produits Pompes de la série LX HX LXD HXD Les produits énoncés sont conformes aux réglementations de la directive machines CE 98 37 CE Fabriqué de Biral AG Suisse Normes harmonisées appliquées notamment EN 809 EN ISO 12100 EN 60335 2 51 Normes techniques et spécifications nationales appliquées notamment EN 50081 1 EN 50082 1 Stockerau le 4 9 2009 Robert Salzbauer...

Страница 3: ...mensions Dimension Typenreihe Série Series HX 301 HX 301 1 HX 301 2 HX 302 HX 302 1 HX 302 2 mm PN 10 PN 10 PN 10 PN 10 PN 10 PN 10 3 4w 11 2w 3 4w 1w 3 4w 11 2w 3 4w 11 2w 3 4w 1w 3 4w 11 2w D 2w 11 2w 2w 2w 11 2w 2w H 255 235 245 255 235 245 L 190 180 180 190 180 180 kg 4 5 4 5 4 5 4 5 4 5 4 5 HX Abmessungen Dimensions Dimension Typenreihe Série Series mit Zwischenstück 10 mm avec entretoise 10 ...

Страница 4: ...D 2w 2w 2w 2w 2w H 255 255 255 245 255 245 255 L 190 190 190 180 190 180 190 L1 102 102 102 102 102 L2 95 95 95 95 95 kg 11 5 11 5 11 5 11 5 11 5 4 LXD HXD Abmessungen Dimensions Dimension Typenreihe Série Series mit Zwischenstück 10 mm avec entretoise 10 mm with intermediate piece 10 mm LX321_HX302 03 11 2006 10 15 Uhr Seite 4 ...

Страница 5: ...nd Ersatzteilherstellung 7 1 9 Unzulässige Betriebsweisen 7 2 Transport Lagerung 8 3 Verwendungszweck 8 3 1 Betriebstemperatur Betriebsdruck 8 4 Montage 8 4 1 Durchspülen der Heizungsanlage 8 4 2 Frostschutzmittel 8 4 3 Montageposition 9 4 4 Einbau 9 4 5 Durchflussrichtung 9 4 6 Mindestdruck 9 5 Elektrischer Anschluss 10 5 1 Anschlussklemmen 10 5 2 Leistungseinstellung 11 6 Inbetriebnahme Betriebs...

Страница 6: ...ren Abschnitten ein gefügten speziellen Sicherheitshinweise 1 2 Kennzeichnung von Hinweisen Dieses Symbol finden Sie bei Sicherheits hinweisen deren Nichtbeachtung Gefahren für die Maschine und deren Funktionen hervorrufen kann Achtung Direkt an der Anlage angebrachte Hinweise wie zum Beispiel Drehrichtungspfeil Kennzeichen für Fluidanschlüsse müssen unbedingt beachtet und in vollständig lesbarem ...

Страница 7: ... qualifiziertem Fachpersonal ausgeführt werden das sich durch eingehendes Studium der Montage und Betriebsanleitung aus reichend informiert hat Grundsätzlich sind arbeiten an der Anlage nur im Stillstand und spannungslosem Zustand durchzuführen Unmittelbar nach Abschluss der Arbeiten müssen alle Sicherheits und Schutzeinrichtungen wieder angebracht bzw in Funktion gesetzt werden Vor der Wiederinbe...

Страница 8: ...r Warmwasserversorgungen Heizungswasser gemäß VDI 2035 keine festen oder langfaserigen Zusätze Wasser Glykol Gemisch bis 50 Glykolanteil Die Pumpen dürfen nicht im Lebensmittelbereich und für Trinkwasser eingesetzt werden In Brauchwasseranlagen sollten Pumpen mit Bronzegehäuse eingesetzt werden wenn die Wasserhärte unter 20 fH 14 dH ist Bei grösserer Wasserhärte sollten Trockenläufer eingesetzt we...

Страница 9: ...en zeigen M N O P da sonst leicht Wasser eindringen kann Vor der Montage der Pumpe kann der Klemmenkasten um jeweils 90 gedreht werden Hierzu die 4 Schrauben des Gehäuses lösen und der Motorkopf in die gewünschte Klemmenkasten Position drehen Dichtung zwischen Motor und Pumpengehäuse nicht verschieben oder beschädigen Nach dem Einsetzen der Schrauben diese übers Kreuz anziehen 4 4 Einbau Einbau er...

Страница 10: ...uswechslung ist der elektrische Anschluss zu schlaufen Es sollte ein externer Netzschalter vorgesehen werden 5 Elektrischer Anschluss deutsch 10 Ein Fehlerstrom oder Fehlerspannungsschutzschalter kann als zusätzlicher Schutz verwendet werden Netzanschluss 1 230 V 50 Hz PE Schutzleiter PE L Leiter N Neutralleiter Bemerkung Vor jedem Eingriff in den Klemmenkasten der Pumpe muss die Versorgungsspannu...

Страница 11: ... II bzw I LX LXD 1 230 V LX LXD 3 400 V HX HXD 3 400 V deutsch 11 6 Inbetriebnahme Betriebskontrolle 6 1 Allgemeines Die Anlage sachgemäß füllen und entlüften Die Pumpe nur bei gefüllter Anlage und vorhandenem Mindestdruck in Betrieb nehmen Versorgungsspannung einschalten Bei noch vorhandener Luft kann die Pumpe evtl Geräusche verursachen Nach kurzer Betriebsdauer entweicht die Luft normalerweise ...

Страница 12: ... wieder erhöhen Pumpe einschalten 6 4 Deblockieren Pumpe ausschalten Absperrorgane vor und nach der Pumpe schließen Verbrennungsgefahr bei Berühren der Pumpe Pumpe und Motor können sehr heiß sein Je nach Betriebsdruck Dichtheit Schieber kann der Pumpenrotor blockieren Es besteht Verbrühungsgefahr Je nach Temperatur und Systemdruck kann heißes Fördermedium flüssig oder dampfförmig austreten Achtung...

Страница 13: ...ystemdruck erhöhen Temperatur vermindern Pumpe zu stark kleinere elektrische Stufe kleinere Pumpe Leistungseinstellung Leistungseinstellung der Pumpe überprüfen Heizkörper werden nicht warm Pumpe zu schwach stärkere Pumpe einbauen Luft in der Pumpe Entlüften von Anlage und Pumpe siehe Abschnitt 6 Technische Änderungen vorbehalten deutsch 13 Vor Beginn der Wartungsarbeiten die Pumpe unbedingt ausse...

Страница 14: ...14 LX321_HX302 03 11 2006 10 15 Uhr Seite 14 ...

Страница 15: ...1 8 Modifications et pièces de rechange 17 1 9 Conformité d utilisation 17 2 Transport et stockage 18 3 But d utilisation 18 3 1 Température et pression de service 18 4 Montage 18 4 1 Rinçage de l installation de chauffage 18 4 2 Produit antigel 18 4 3 Position de montage 19 4 4 Pose 19 4 5 Sens d écoulement 19 4 6 Pression minimale 19 5 Raccordement électrique 20 5 1 Bornes de raccordement 20 5 2...

Страница 16: ...lisibles 1 3 Qualification et formation du personnel Les personnes chargées d installer de faire fonctionner d entre tenir et de réviser l installation doivent justifier de la quali fication requise pour ces différentes tâches Domaines de responsabilité compétences et encadrement du personnel doivent être définis de manière claire et précise par l utilisateur 1 4 Risques et dangers en cas de non o...

Страница 17: ...l qualifié et autorisé et ayant lu attentivement les instructions données dans la présente notice D une manière générale les interventions sur l installation ne doivent être effectuées qu après avoir mis la dite installation à l arrêt et hors tension A la fin de chaque intervention réinstaller réactiver tous les organes de sécurité et toutes les protections Avant de remettre l installation en marc...

Страница 18: ...ls sont sans presse étoupes et ne conviennent pas pour les systèmes d alimentation en eau chaude sanitaire Eau de chauffage selon VDI 2035 sans additifs solides ni fibres longues Mélange eau glycol ne devant pas contenir plus de 50 de glycol Mélange eau glycol avec 50 de glycol max Ces circulateurs ne peuvent être utilisés ni dans le domaine alimentaire ni sur les installations d eau potable Dans ...

Страница 19: ...ne touche par mégarde des parties chaudes de la pompe 4 3 Position de montage L état de livraison est la position A La boîte à bornes ne doit pas être tourné vers le bas M N O P sinon de l eau pourrait facilement pénétrer à l intérieur Par conséquent avant de monter le circulateur orienter la boîte à 90 en dévissant les 4 vis du corps puis en plaçant la tête du moteur dans la bonne position Ne pas...

Страница 20: ...n retardée Section fil 1 5 mm2 max Le raccordement électrique doit être conforme à la plaque indiquant les caractéristiques Afin de faciliter un éventuel remplacement boucler le raccordement électrique Prévoir également un commutateur externe Raccordement secteur 1 230 V 50 Hz PE Terre L Phase N Neutre Remarque Avant toute intervention sur le coffret à bornes du circulateur toujours couper l alime...

Страница 21: ...es d une montre français 21 5 2 Réglage de la puissance Le moteur a deux vitesses Le passage d une vitesse à l autre s effectue en utilisant le sélecteur rotatif 1 230 V ou après avoir ouvert la boîte à bornes en positionnant le connecteur sur 3 400 V N actionner le connecteur qu après avoir coupé le courant de secteur alimentation électrique Lors du branchement au groupe convertisseur de fréquenc...

Страница 22: ...chapper brusquement Attention Après avoir dévissé le bouchon de l eau s échappe du fait du jeu au niveau des paliers débloquer le rotor arbre avec un tournevis Faire tourner le bout d arbre jusqu à ce que la résistance diminue Remettre le bouchon Rouvrir les vannes d arrêt en amont et en aval du circulateur Remettre le circulateur en marche français 22 Si la température et la pression système sont...

Страница 23: ... électrique plus bas utiliser un circulateur plus petit mauvais réglage vérifier le réglage de la puissance de la puissance du circulateur Les radiateurs ne chauffent pas circulateur pas assez puissant installer un circulateur plus puissant présence d air purger l installation et le circulateur dans le circulateur voir chapitre 6 Sous réserve de modifications techniques Toujours mettre le circulat...

Страница 24: ...24 LX321_HX302 03 11 2006 10 16 Uhr Seite 24 ...

Страница 25: ...ion of spares 27 1 9 Improper operating methods 27 2 Transport Storage 28 3 Intended application 28 3 1 Operating temperature Operating pressure 28 4 Assembly 28 4 1 Flushing the heating system out 28 4 2 Antifreezers 28 4 3 Position for assembling 29 4 4 Installation 29 4 5 Direction of flow 29 4 6 Minimum pressure 29 5 Electrical connection 30 5 1 Connecting terminals 30 5 2 Power setting 31 6 C...

Страница 26: ...raining The staff deployed for assembly operating maintenance and inspection tasks must show that they have the appropriate qua lifications for such work The field of responsibility competence and supervision of the staff must be stipulated exactly by the operator 1 4 Risks in the event of non compliance with the safety information Non compliance with the safety information can result in both dang...

Страница 27: ... informed themselves adequately about the requirements by a thorough study of the installation and operating instructions Basically any works on the plant should only be carried out when it is at a standstill and not carrying any electrical current Directly after completion of the works all safety and protective installations must be mounted or activated again Before re commissioning the points li...

Страница 28: ...able for secondary hot water services Heating water in accordance with VDI 2035 no solid or long fibrous additions Water glycol mixture with up to 50 glycol proportion The pumps may not be used in the food processing industry nor for drinking water Pumps with bronze housings should be used in industrial water installations if the water hardness is below 20 tH 14 dH A dry running meter should be us...

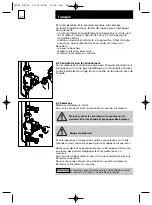
Страница 29: ...e to avoid any water dripping onto the pump motor and especially the terminal box The shaft must always be horizontal never vertical Install the pump casing stressfree in the system 4 5 Direction of flow The arrow on the pump casing indicates the direction of flow Security measures must be taken to see that persons do not inadvertently come into contact with the hot surface areas of the pump 4 6 M...

Страница 30: ...cal connection must be made in accordance with the data plate To simplify later replacement the electrical connection should be looped An external mains switch should be provided Mains connection 1 230 V 50 Hz PE Earth L Live N Neutral Note Before carrying out any operations in the terminal box the power supply to the pump must be switched off 5 1 Connecting terminals If the connection is made inc...

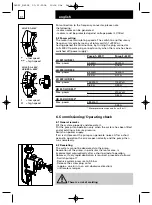
Страница 31: ...ate noises After a short period in operation the air escapes normally and the pump then runs noiselessly 6 2 Deaerating The system cannot be deaerated via the pump Deaeration of the pump in particular the motor area is implemented automatically after a short period of operation However if very rapid deaeration is required proceed as follows Switch pump off Reduce system pressure to 0 5 bar Release...

Страница 32: ... very hot Depending on the operating pressure sealing slide valve the pump rotor can become blocked There is a risk of scalding Depending on the temperatur and system pressure hot pump medium can escape in the form of liquid or steam Warning 6 3 Operating check The pump runs so quietly that a metal rod or a srewdriver has to be placed on the pump and held to you ear when making the acoustic operat...

Страница 33: ...Pump too powerful smaller electric setting smaller pump Power setting Check power setting of pump Radiators do not warm up Pump too weak install more powerful pump Air in the pump deaerate system and pump see section 6 Subject to technical alterations english 33 Before commencing maintenance works do not fail to put the pump out of action pull all pins out of the power supply and secure it against...

Страница 34: ...34 LX321_HX302 03 11 2006 10 16 Uhr Seite 34 ...

Страница 35: ...35 LX321_HX302 03 11 2006 10 16 Uhr Seite 35 ...

Страница 36: ...54 Graz Seiersberg Kärntner Straße 518 Telefon 0316 28 61 20 Telefax 0316 28 70 42 A 9020 Klagenfurt Schachterlweg 58 Telefon 0463 31 93 20 Telefax 0463 31 93 17 A 4600 Wels Haidestraße 41 Telefon 07242 66 8 51 52 53 54 Telefax 07242 66 8 51 12 A 4863 Seewalchen Attersee Seyrlstraße 2 Telefon 07662 56 26 0 Telefax 07662 56 26 20 A 6175 Kematen Bahnhofstraße 31 Telefon 05232 20 0 01 Telefax 05232 2...

Отзывы: