

Customizing your
Prep-Pal
®
Troubleshooting
1
TABLE
T
PRINTER
Copyright © 2021 | ITD Food Safety
Editing User Names
1. Click
General Settings
button and navigate to
Users
tab.
2. Tap field under
New User
name. A keyboard will pop up.
3. Enter the new user name and tap
Accept
.
4. Click
Add
button to add the new user to your user list
5. To delete a user, simply tap their name and tap remove button on right hand side of screen
6. For convenience user names can be sorted in A-Z or Z-A order.
Editing Categories
1. Tap
Edit Products
button on left hand side of screen
2. Select the category from list of
Product Categories
you want to edit.
3. Tap
Edit Category,
keyboard will pop up. Make changes needed and tap
Accept
to save
changes.
4. To add a new category, tap
Add Category
, to access keyboard. Type in name of new cate-
gory and tap
Accept
. The category will appear in category list at the bottom of the list.
5. To reorder product categories, select the category from the
Product Categories
list you
want to reorder. While holding, drag name up or down to change order. Press
Reorder
Category
button to complete the change.
Editing Products
1. Tap
Edit Product
tab to open product menu.
2. To view existing products in categories, tap
>
to open the list of products currently in
selected category.
3. To add a product, tap
Add Product
button and fill in information on
Label Setup Information
screen as requested. Tap
Save
and product will be placed in selected category.
4. To edit an existing product, tap category name where the product is located. Tap the prod-
uct you need to edit. Tap
Edit Product
button and make changes. Tap the
Save
button to
record your changes.
5. To remove a product, tap the product name and tap
Remove Product
button. The product
is now deleted.
Any line can be clicked on, edited and replaced at any time.
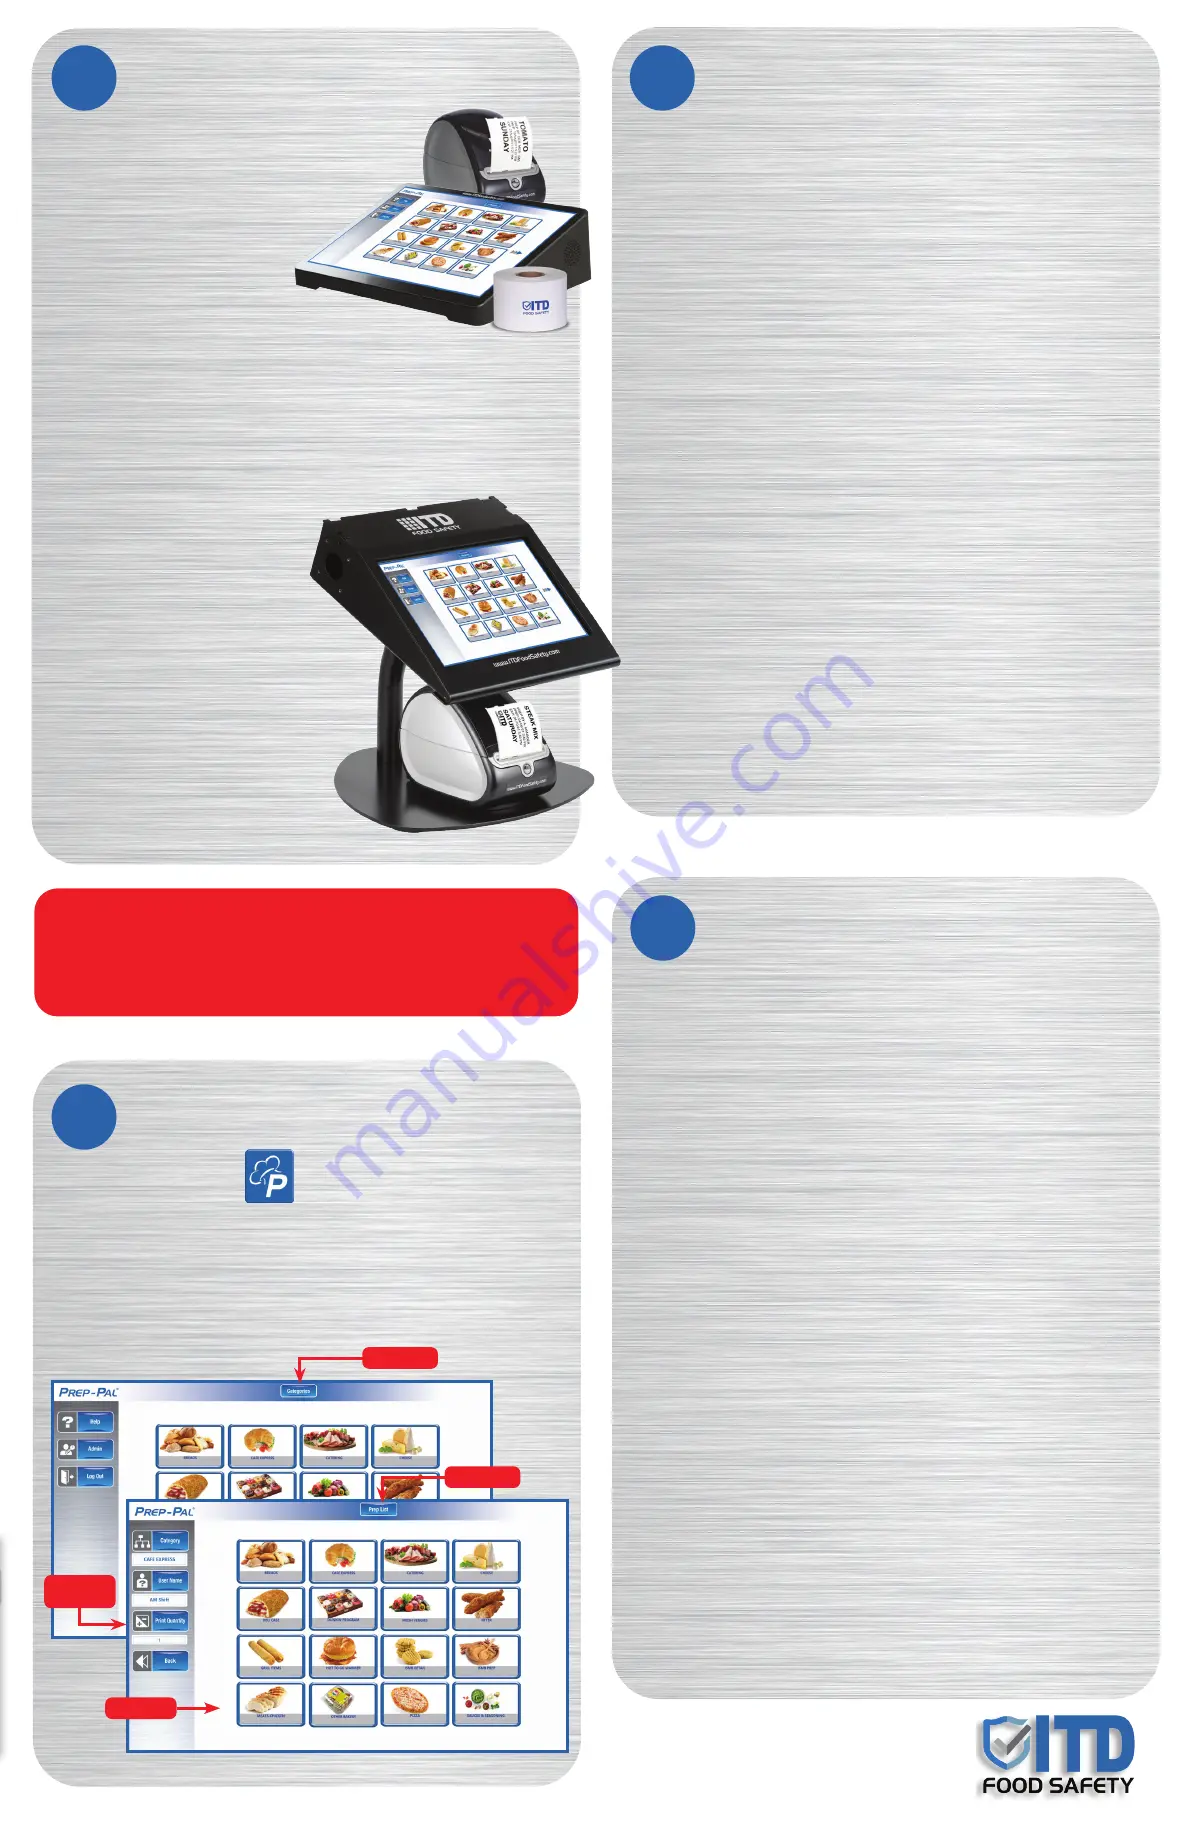
Getting Started
1
3
Printing a Label
IMPORTANT!
Keep your warranty and tech support with approved Prep-Pal
®
labels!
Use ONLY ITD Authorized label rolls available from
ITDfoodsafety.com.
Tablet is Not Charging
n
First, ensure that the power input is connected on the left hand side of the tablet.
n
Second, ensure that the station is indeed plugged into wall.
n
Third, is the device already at 100% (or close to) charge? If so, the battery is supposed to stop
accepting charge until it drops below 80 percent. This is to avoid battery degradation.
Tablet Will Not Power On
n
Please hold down power button for full 45 seconds.
n
After this period, please attempt to power the device back on with 6 second holding intervals.
(Press and hold button for 6 seconds, release and press again for 6 seconds. Repeat 4 times as
needed.)
Tablet Screen is Black
This could be due to the tablet not receiving power from the station.
n
First, check that the station is still receiving power from its outlet.
n
Second, press the power button once to wake the tablet up from sleep mode. (Sleep mode activate
automatically if the device is unplugged and left alone for more than 5 minutes.)
n
Third, if the device does not wake from the single short button press,
please press and hold the button until power has returned to the device.
n
If you are still having difficulty getting the tablet to power back on,
please reference the second item on this FAQ/Troubleshooting guide.
Printer not Responding to USB Connection
n
If Printer is not responding, contact Customer Support for further assistance.
Printer Keeps Printing Multiple Blank Labels
n
Refer to the first page for proper loading of labels within printer. If alignment is correct and you
are still printing multiple blanks, make sure your feeding area is clear of debris. Please unplug the
printer until blue light turns off after correcting alignment.
Flashing Blue Light On Printer
-
n
This indicates that the printer cannot sense labels in the feeding area. To fix please either enter new
labels into the machine, or correct the alignment of the labels.
Printer is not Printing
n
Ensure that the station is plugged into an outlet and the blue light on the front of the printer is on.
n
Open your control panel (Press windows symbol in bottom left of screen and search for control panel)
n
Access your Devices and Printers (Also shown as “View Devices and Printers)
n
Ensure that the DYMO Labelwriter 450 is not grayed out (Offline) if it is please ensure that the micro
usb (pictured in system overview) is connected properly
n
If the printer is being shown multiple times as copies, double tap each copy and verify that the
printers do not have items in the print queue. Then hold your finger on each and select “Remove
Device”.
n
Unplug the power cord from the back of the printer and wait until the blue light goes completely off.
Re-plug in the device. If you are still experiencing difficulty, contact Customer Support.
n
Prep-Pal
®
MPC Kit
1.
Your kit includes a Windows
®
based Mini PC and Prep-Pal
®
Printer. Your tablet is preloaded with Prep-Pal
®
software; no installation or activation needed.
2.
Select location near a wall outlet.
3.
Plug the tablet and printer into the wall
outlet. They should be plugged in at all times.
4.
Open the printer lid and insert labels into the feeder.
5.
Power on the tablet. Locate the power button on the lower right hand side of tablet.
Press and hold the power button for 3 seconds.
6.
When the background image is displayed, swipe up and select
Sign In
.
7.
Connect your unit to WiFi for remote support (optional). Locate and select the connection icon
from the bottom right corner of your tablet desktop and enter your network credentials.
n
Prep-Pal
®
MPC Station
1. Select location near a wall outlet.
2. Plug the station into the wall outlet.
It should be plugged in at all times.
3. Open the printer lid and insert labels into the feeder.
4. Power on the tablet. Locate the power button on the
lower right hand side of tablet. Press and hold the
power button for 3 seconds.
5. When the background image is displayed, swipe up
and select
Sign In
6. Connect your unit to WiFi for remote support
(optional). Locate and select the connection icon
from the bottom right corner of your tablet desktop
and enter your network credentials.
1. Click on Prep-Pal desktop icon
to open software.
2. Select category by tapping the button for your chosen category.
3. Select item to print from Prep List. Tap product image to print label.
4. Click on the button for that product to print a label.
5. To print multiple labels, input the label quantity you want to print under the
print quantity button on the left-hand side of screen.
2
4
Select a
catergory
Quantity
Product
Prep List
Category


