iTALK VoIP-1 User Manual
2
Setting up the VoIP-1 System
1.
Remove the VoIP-1 device, wall mount power
adapter, phone cord, and Ethernet cable from the
packaging.
2.
Connect one end of the blue Ethernet cable to your
available internet connection.
3.
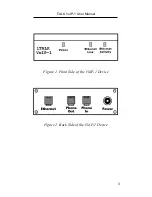
Insert the other end of the blue Ethernet cable into
the VoIP-1 device in the socket labeled “Ethernet”.
4.
Disconnect your telephone cord from the phone
jack.
5.
Connect one end of the black phone cord in the now
empty phone jack.
6.
Insert the other end of the black phone cord into the
VoIP-1 device in the socket labeled “Phone In”.
7.
Connect your telephone cord to the VoIP-1 device
in the socket labeled “Phone Out”.
8.
Insert the circular power plug coming from the wall
mount power adapter into the VoIP-1 device in the
socket labeled “Power”.
9.
Plug the wall mount power adapter into a 120V AC
outlet.
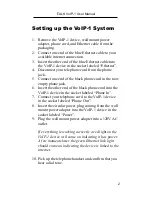
If everything is working correctly a red light on the
VoIP-1 device will come on indicating it has power.
A few moments later the green Ethernet link light
should come on indicating the device is linked to the
internet.
10.
Pick up the telephone handset and confirm that you
hear a dial tone.


