

1
2
3
4
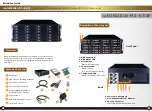
mAGE424U40-PCI-E-EXP
4U 24-bay PCI-e Rackmount RAID Chassis with PCI-E Slot Expander
Installation Guide
Hardware Configuration
Build up Procedures
mAGE424U40-PCI-E-EXP
Notice 1
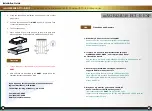
P2: 8-Lane PCI-e Slot
P3: 8-Lane PCI-e Slot
P4: 8-Lane PCI-e Slot
P5: 4-Lane PCI-e Slot
P6: 4-Lane PCI-e Slot
P7: 4-Lane PCI-e Slot
P8: 4-Lane PCI-e Slot
(Nearest backplane Connetion,
which is recommended for Raid Card)
There must be at least one PCI-e (PCI Express) x8 or
x16 “slot” in the HOST (Workstation or Computer). But
the slot could be PCI-e x4 even it is PCI-e x8 or PCI-e
x16 in appearance. Please check the User Manual of
the Motherboard or server to make the specification.
mAGE424U40-PCI-E-EXP could not work properly
under PCI-e x4.
P2 P5 P6 P7 P8 P4 P3
E
C
D
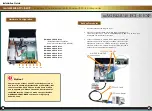
PCIe x8 Adapter
PCIe x8 Cable
miniSAS to miniSAS
connectivity
SAS/SATA Raid HBA
Open the chassis by removing the cover.
Place PCI-e x8 SAS or SATA control card (HBA) and other PCI-e
cards into proper PCI-e slots of mAGE424U40-PCI-E-EXP and fix them with
thumbscrews on the bracket of the cards.
Connect all miniSAS to miniSAS cables between the HBA and
backplane. Connect the first (top) of minSAS connector on the
backplane to Channel 1~4 miniSAS connector on the HBA, the
second to Channel 5~8 miniSAS connector of HBA, the third to
Channel 9~12 miniSAS connector of HBA etc...
1.
2.
3.


