


-9-
Diagram 4
②
Inlet water 3-way joint and inlet water ball valve installation method
Take out the inlet water ball valve from the water purifier accessory box. Wrap one end of the ball valve
with the appropriate Teflon tape (see diagram 5). Then screw the ball valve into the corresponding hole
of the inlet water 3-way joint (see diagram 6). Take the 6mm hose from the accessories box. Using
scissors cut a suitable length of hose. Connect one end of the hose with the inlet water ball valve (see
diagram 4). Then screw the metal nut in place. The other end of the hose should be connected to the
first filter inlet water connection on the water purifier. (Note: The pipe should be firmly in place, otherwise
leakage could occur).
Diagram 5 Diagram 6
③
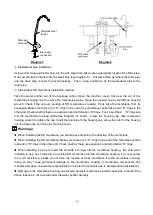
Gooseneck faucet installation
In the counter where the faucet is to be installed, drill a φ14mm hole in an appropriate position. Then take
out the faucet from the water purifier accessories box. Start the faucet installation: First put the stainless
steel neck on the faucet main body (see diagram 7), then lower the main part of the faucet into the already
drilled hole and screw the fixed nut into the bottom end of the faucet to fix the faucet to the counter. Finally,
put the appropriate length of 6mm pipe into the inlet water connection, put the 6mm pipe stopper into one end,
put on the 6mm nut, and screw to the bottom of the faucet (see diagram 7). If you want to fix the faucet to
the wall, please use the faucet hanging piece. (When installing, be sure to tighten the joints to prevent
leakage.)


