background image

4 OPERATION PROCEDURES

CCW-R-2**

 INSTRUCTION MANUAL

4-6

4.4.3

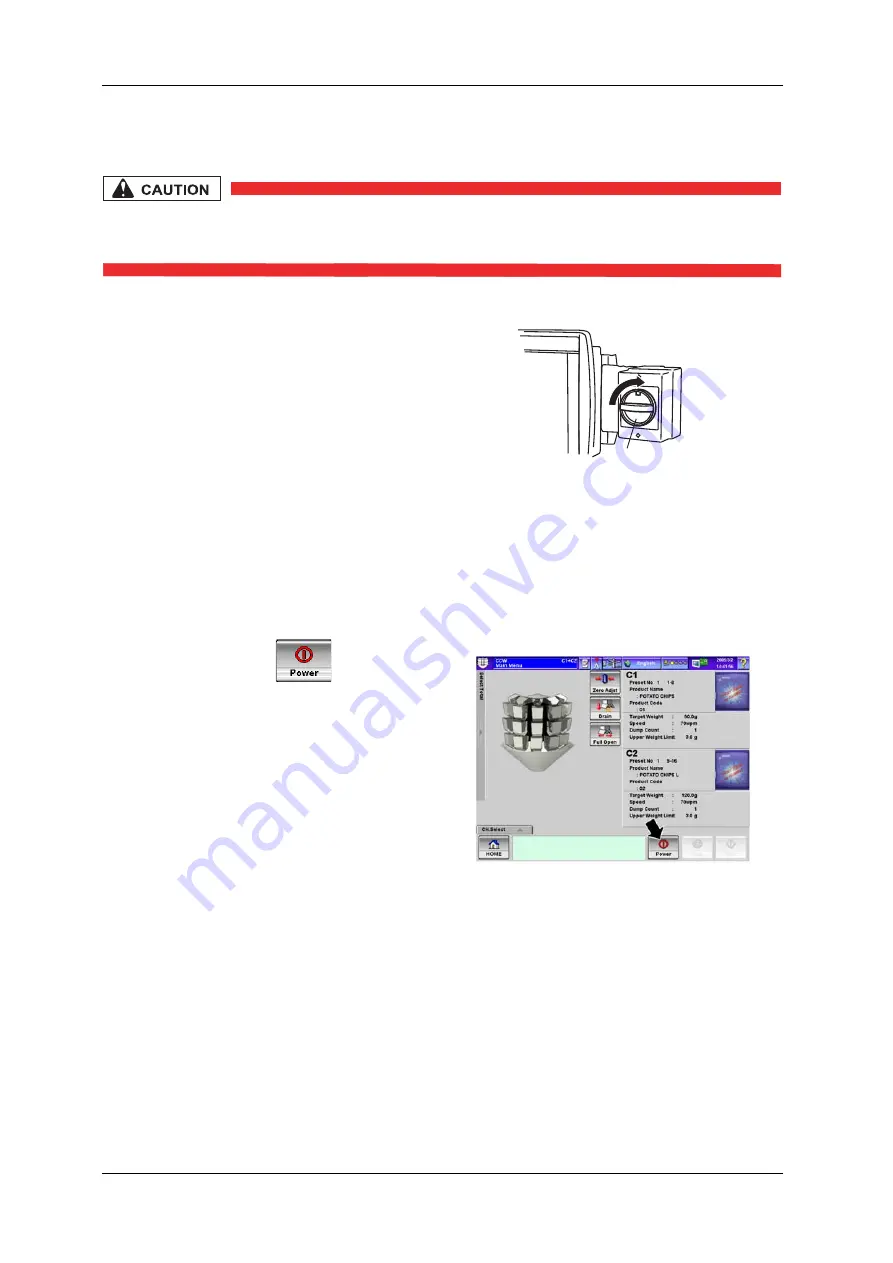
Turning the Device Power Switch ON

• Turn the main power switch ON at least 30 minutes before starting the 

production in order to get stable weighing results.

This section describes how to supply power to the device.

4.4.4

Turning the Control Unit Power Switch ON

This section describes how to supply power to the device control unit.

1. Turn the main power switch ON.

X

 The device is powered on.

2. Wait at least 30 minutes.

Fig.4-7 Main Power Switch

1. Press the [Power] key 

.

X

 The device control unit is powered on.

Fig.4-8 [Main Menu] Screen

MAIN POWER SWITCH

Содержание CCW-R-2 B Series

Страница 1: ...ANUAL Do not carry out installation operation service or maintenance until thoroughly understanding the contents of this manual Keep this manual available at all times for installation operation service and maintenance UK PN 281 5142 Issue 3 November 2008 ...

Страница 2: ...his reason a commonly used OS is effective and ISHIDA CO LTD use Windows XP Embedded The following points need to be noted 1 Do not copy or transfer use on other devices Windows XP Embedded 2 Do not perform reverse engineering reverse compiling reverse assembling or other translations on Windows XP Embedded 3 Windows XP Embedded is protected by copyright Users are licensed to use it which does not...

Страница 3: ...e copyright law protects all information contained herein Any disclosure to third parties or unauthorized copying of the information contained herein is not permitted without prior written approval from Ishida Co Ltd 3 Although this manual has been carefully edited if there are any mistakes or if you have any questions please check the machine type model and machine identification and contact your...

Страница 4: ... 2 ...

Страница 5: ... defects with uncertain cause shall be decided by mutual consultation between both parties For detailed warranty information refer to the warranty statement included with the device 2 Ishida assumes no responsibility for direct or indirect damage or lost income caused by unforeseeable operational procedures in any improper way or unauthorized modification to the device 3 The warranty period is sta...

Страница 6: ...cribed in the table below All personnel involved in operations with the equipment should select the required information to make effective use of this manual The definition for each intended reader described in the table below is as follows Operator Personnel who perform basic operations during daily production with the production line i e operator level operations Do not perform any work in this ...

Страница 7: ...perators System administrators 7 USEFUL FUNCTIONS Advanced operations To understand and master the functions of the advanced operations Operators System managers 8 OPTIONAL FUNCTIONS Count set weighing Parent and child weighing To understand and master the optional functions System administrators 9 CLEANUP PROCEDURES Cleaning procedures and cycle of the components To understand installation remova...

Страница 8: ...n this manual In this manual the following notations are used in order to make understanding of the information easier Notation Description Is used for imminent hazardous conditions that could cause death or serious injury if not prevented Is used for hazardous conditions that could cause death or serious injury if not prevented Is used for hazardous conditions that could cause light or moderate i...

Страница 9: ...n 1 7 2 INTRODUCTION 2 1 Summary 2 1 2 2 Intended Use of the Device 2 1 2 3 Features of the Device 2 2 2 4 Specifications of the Device 2 3 2 4 1 Standard Specifications 2 3 2 4 2 Outside Dimension 2 3 2 4 3 Operation Environment 2 3 2 5 Term Description 2 4 2 6 Components of the Device 2 6 2 7 Operation Outline 2 8 3 OPERATING PANELS 3 1 Summary 3 1 3 2 Items and Functions of Remote Control Unit ...

Страница 10: ... 4 4 6 Start up Assistant Function 4 9 4 4 7 Preset Selection 4 12 4 4 8 Zero Adjustment 4 16 4 4 9 Starting the Production 4 20 4 4 10 Stopping the Production 4 21 4 4 11 Discharging the Products 4 22 4 4 12 Turning the Device Power Switch OFF 4 23 4 5 Display During the Operation 4 24 4 5 1 Combination Screen 4 25 4 5 1 1 Select Display Pop up Menu in Combination Screen 4 27 4 6 Temporary Stop a...

Страница 11: ...Product 5 22 5 3 3 4 Setting the Weighed Product 5 25 5 3 3 5 Setting the Weight Value 5 28 5 3 3 6 Completing Preset Procedures 5 29 5 4 Preset Management 5 30 6 FUNCTIONS OF THE OPERATION SCREENS 6 1 Summary 6 1 6 2 Operation Keys and Operation Levels 6 2 6 3 Upper Setting Bar 6 9 6 3 1 Message Board 6 11 6 3 2 Start Up Assistant 6 15 6 3 3 Language Selection 6 16 6 3 4 Operation Level Selection...

Страница 12: ... 6 57 6 10 1 Photo Display 6 57 6 10 2 List Display 6 58 6 11 Preset Screen 6 60 6 11 1 Preset Basic Function 6 60 6 11 2 Finish Prdct Setting Index Screen 6 62 6 11 2 1 Product Tab Screen 6 63 6 11 2 1 1 Product Photo Taking Procedures 6 64 6 11 2 2 Machine Tab Screen 6 66 6 11 2 3 Item Tab Screen 6 68 6 11 2 4 Others Tab Screen 6 70 6 11 3 Product Setting Only When Selecting Section with Two or ...

Страница 13: ...put Signal Tab Screen 6 124 6 15 2 3 Network Analyze Tab Screen 6 126 6 15 2 4 Program Number Tab Screen 6 127 6 15 2 5 Test Drive Tab Screen 6 128 6 15 3 Display Data Manager Screen 6 131 6 15 3 1 Layout Setting Tab Screen 6 131 6 15 3 2 Preset Manager Tab Screen 6 132 6 15 3 2 1 Selecting and Copying Preset 6 133 6 15 3 2 2 Copying All Preset 6 135 6 15 3 2 3 Selecting and Initializing Preset 6 ...

Страница 14: ...ucing Product Change Time 7 7 7 3 1 Using Feeder Adjustment of Drain Function 7 7 7 3 2 Using Full Open Lock Function 7 8 7 4 Stopping Production of C1 Alone During C1 and C2 Production One side Production Stop 7 11 7 4 1 Stopping Production of C1 Alone 7 11 7 5 Comparing Values on Remote Control and Actual Values 7 13 7 5 1 Checking Each Section in Mix Weigher 7 13 8 OPTIONAL FUNCTIONS 8 1 Summar...

Страница 15: ...rge Chute 9 13 9 4 1 7 Timing Hopper 9 14 9 4 2 Cleaning the Unremovable Unit 9 15 9 4 2 1 Main Body Dispersion Portion and Drive Unit 9 16 9 4 2 2 Remote Control Unit 9 18 10 MAINTENANCE AND INSPECTION 10 1 Summary 10 1 10 2 Daily Inspection 10 2 10 2 1 Pre start Inspection 10 2 10 2 1 1 Dispersion table 10 3 10 2 1 2 Radial trough 10 3 10 2 1 3 Confirming the dew point checker of the air dryer W...

Страница 16: ...6 Pattern 6 11 14 11 2 7 Pattern 7 11 15 11 2 8 Pattern 8 11 15 11 2 9 Error Clear and Action 11 16 11 3 Failure and Malfunction of the Weighing Machine 11 17 11 4 Troubleshooting 11 21 12 INSTALLATION 12 1 Summary 12 1 12 2 Installation Condition 12 2 12 3 Transportation and Lifting 12 3 12 3 1 Precaution for Transporting 12 3 12 3 2 Precaution for Lifting 12 4 12 3 3 Weight of Device Center of G...

Страница 17: ...g the Power ON 12 20 12 5 3 Changing the Operation Level 12 21 12 5 4 Zero Adjustment 12 22 12 5 5 Span Adjustment 12 24 12 5 6 Check Items at Installation 12 26 13 APPENDIX 13 1 Summary 13 1 13 2 Electrical Unit Layout Drawing 13 2 13 2 1 Electrical Unit Layout Drawing CCW R 216B 13 2 13 2 2 Electrical Unit Layout Drawing CCW R 224B 13 3 13 3 Overall Block Diagram 13 4 13 4 Remote Control BOX Uni...

Страница 18: ...28 13 10 2 Relay Board P 5506 13 29 13 11 Additional Relay Unit CCW R 224B 13 30 13 11 1 EXC Board P 5426 13 31 13 11 2 Relay Board P 5506 13 32 13 12 PS 0 Unit 13 33 13 13 PS 0 Unit CCW R 224B 13 34 13 14 PS 2 Unit 13 36 13 15 PS 2 Unit CCW R 224B 13 37 13 16 Weigh Drive Unit 13 38 13 16 1 DUC Board P 5428 13 38 13 16 2 DDU Board P 5439 13 40 13 16 3 Cam Sensor Board P 5207 13 40 13 17 Booster Ho...

Страница 19: ...ard P 5581 13 54 13 21 PS FEEDER Unit CCW R 224B 13 55 13 21 1 PS FEEDER Unit 1 13 55 13 21 1 1 FPS Board P 5580 13 56 13 21 2 PS FEEDER Unit 2 13 57 13 21 2 1 FPS Board P 5580 13 58 13 22 Connection Diagram 13 59 13 22 1 TOTAL DIAGRAM 13 59 13 22 2 BLOCK DIAGRAM 13 59 13 23 Connection Diagram CCW R 224B 13 60 13 23 1 TOTAL DIAGRAM 13 60 13 23 2 BLOCK DIAGRAM 13 60 ...

Страница 20: ...CCW R 2 B INSTRUCTION MANUAL 12 ...

Страница 21: ...evice always follow the instructions and warnings found within this manual When there are any questions or when anything is unclear contact the distributor or Ishida customer support staff Do not proceed with any operations until the required instructions are given Contents Warning labels and their attached locations Precautions for the operation of the device Proper use of the warning terms Purpo...

Страница 22: ...erstand the meaning of the warning terms and follow the contents instructions of this manual Table 1 1 Warning Term Descriptions Warning Terms Description Used for imminent hazardous conditions that could cause death or serious injury if they are not avoided Used for hazardous conditions that could cause death or serious injury if they are not avoided Used for hazardous conditions that could cause...

Страница 23: ...sult in injuries caused by touching the moving parts during operations Operators must tie up long hair and wear a hat proper clothing and shoes before operation Failure to do so may result in injuries caused by being caught in the rolling portions of the device For maintenance and inspections unless instructed the operator must turn OFF and lock the main power switch and keep the key in his posses...

Страница 24: ...ct may damage the operation panel Use fingers to press the operation panel of the remote control unit When performing maintenance and inspections for the upper part of the device use a proper scaffold or stepladder in order to avoid a fall When operating the device make sure that tools or other objects are not on the device If the objects fall on the moving parts they may damage the device CAUTION...

Страница 25: ...ed portions including the device main body terminal boxes and motor boxes Doing so may cause malfunction or damage to the device Do not apply an excessive load to the weigh hopper Doing so may damage the weighing portion Route the wiring in the way that power voltage fluctuation due to load change does not exceed 10 Failure to do so may cause malfunction or damage to the device Depending on food m...

Страница 26: ...bels using a cloth water and neutral detergent Do not use organic solvents or gasoline If the warning labels are damaged lost or illegible replace the labels Check the machine type model and machine identification and contact the distributor or Ishida customer support 1 5 2 Attached Locations of Warning Labels The locations of attached warning labels are shown in Figure 1 1 Attached Locations of W...

Страница 27: ... in order to prevent other operators from turning on the power supply during the work Lock the power switch in the OFF position Create an accident prevention tag and place it at the power shut off location For the placement of a main power switch lock and accident prevention tag refer to the following A main power switch lock and accident prevention tag are to be prepared by customers Fig 1 2 Main...

Страница 28: ...1 SAFETY PRECAUTIONS CCW R 2 B INSTRUCTION MANUAL 1 8 ...

Страница 29: ...ations of the device Descriptions of the terms used in this manual Components of the device and operation outline Purpose To understand the basic components outline usage application range and application limit of the device Intended reader All users 2 2 Intended Use of the Device This device is intended to weigh and adjust product weight to a set value through computer controlled combinational we...

Страница 30: ... simultaneously Example Weigh 100g of potato chips on each weigher 3 The device can be divided into two weighers and weigh the same product with different weighed values simultaneously Example Weigh 90g of potato chips on one weigher and 150g on the other 4 The device can be divided into two weighers and operated separately as independent weighers Example One weigher is terminated for set up chang...

Страница 31: ... refer to the product catalogue 2 4 2 Outside Dimension For the outside dimensions of your own device refer to the separately attached drawing Design and outside dimensions are subject to change without notice 2 4 3 Operation Environment Use the device within the operation environment below in order to operate the device effectively and maintain precision as well as to perform weighing safely Indo...

Страница 32: ...nnel 2 and these are referred to as C1 and C2 Span To set the span adjustment weight as a standard weight after zero adjustment Drain To drain products remaining in the device without weighing Weighed value Weight that is combinationally weighed Target Weight The target weighed value set for each preset Upper Weight Limit An upper permissible limit which is relative to the target weight Lower Weig...

Страница 33: ...h this function even in a floor vibration environment the AFV cell detects vibrations and errors caused by the vibration can be canceled from the load cell output for weighing Range The maximum weight that can be weighed Auto zero adjustment To automatically adjust weight during operations after selecting a head with less operation frequency among the combinationally selected weigh hoppers so that...

Страница 34: ...orarily pools products supplied from the radial troughs It opens and closes in accordance with the weighing operation and supplies products into the weigh hoppers 7 Weigh hopper WH Weighs supplied products It opens and closes in accordance with the combinational weighing result and supplies products into the collection chutes or booster hoppers 8 Weigh drive unit WDU Activates open close of the po...

Страница 35: ...ker 13 Timing hopper drive unit Optional Activates open close of the timing hopper 14 Remote control unit RCU Performs operation and required setting of the device 15 Printer Prints out the total information including the weighing result 16 Main power switch Turns on off the power supply to the device 17 Air Dryer Supplies dry air to the inside of the main body Table 2 2 Descriptions of Components...

Страница 36: ...ied to the pool hopper 4 In accordance with the request from the weigh hopper the product is supplied to the weigh hopper 5 The product is weighed in the weigh hopper 6 The weighed product is temporarily pooled in the booster hopper 7 In order to maintain the closest value to the set weight while preventing underweight the calculation unit selects an optimized combination of the weigh hoppers or b...

Страница 37: ...nd display descriptions of the operation panel Thoroughly understand the contents of this chapter before operating the device Refer to 4 OPERATION PROCEDURES for the operation method Contents Description of the operation screen contents General operation instruction for the operation screen Purpose To understand and master the basic operation method and general operation of the operation screen In...

Страница 38: ...igure below Fig 3 1 Remote Control Unit Overview Table 3 1 Descriptions of Remote Control Unit Functions No Name Function 1 Operation Panel Used to perform setting and displaying of the menu 2 Printer Prints out the production summary and the setting details of individual products 3 Main power switch Turns the main power supply to the device ON OFF 4 Camera Takes photos of the products 3 1 4 2 ...

Страница 39: ... operation panel screens using the Main Menu screen that will be displayed when the power is turned on Fig 3 2 Operation Panel Table 3 2 Functions of the Operation Panel No Name Function 1 Upper Setting Bar Always displayed on the upper part of the screen It is used to set the operation environment of the panel 2 Menu key Displayed with a three dimensional frame Pressing this part allows for switc...

Страница 40: ... Use the keyboard or numeric keypad to input letters and figures for setting Refer to 3 3 2 Data Input The set letters and figures will be reflected on the key Drop down key Each time this key is pressed the selection item list will be displayed Press a key from the displayed list to select and the list will be closed The selected item will be reflected Pop up key Each time this key is pressed the...

Страница 41: ...ion Index Displayed on the right side of the screen for the items such as preset This is used when there are many screens When one of the keys is pressed the relevant screen will be displayed Tab Displayed on the bottom of the screen This is used when there are only a few screens When one of the keys is pressed the relevant screen will be displayed Table 3 5 Keys and Functions of the Scroll Displa...

Страница 42: ...erview 1 Key A belongs to the tab B screen Tab B as well as the other displayed tabs and key C belong to screen D Therefore the key C function applies to tab B and all other tab screens displayed Fig 3 5 Overview 2 When output key A is pressed data from tab B will be output When output key C is pressed data from tab B and all other tab screens displayed will be output ...

Страница 43: ...n and Keyboard screen are displayed when data input is required Use the Numeric Keypad screen to input figures and the Keyboard screen to input alphanumeric characters In this manual the term set is used to describe the operations from inputting figures letters and symbols using the Numeric Keypad screen and Keyboard screen to saving the data to the device by pressing the Return key ...

Страница 44: ...ad screen disappears and the display returns to the previous screen Table 3 6 Descriptions of Numeric Keypad Screen Functions No Name Function 1 Set item display area Displays the current input item 2 Input display area Displays the input figures 3 CANCEL key Cancels the input from the numeric keypad When pressed the display returns to the previous screen without any input 4 BS key Deletes a singl...

Страница 45: ...ays the input alphanumeric characters and symbols 3 CLR key Deletes the displayed alphanumeric characters and symbols all at once 4 BS key Deletes a single displayed alphanumeric character or symbol 5 Space key Inputs a single blank character 6 Return key Confirms the input alphanumeric characters and symbols and returns to the original screen 7 SHIFT key Switches two letters on the same key Alpha...

Страница 46: ...Press the Return key XThe input alphanumeric characters are confirmed XThe Keyboard screen disappears and the display returns to the previous screen 3 3 3 Correcting Confirmed Contents When the confirmed figures letters and symbols need to be corrected repeat the input using the Numeric Keypad screen and Keyboard screen 9 CANCEL key Cancels the input from the keyboard When pressed the display retu...

Страница 47: ... during production Thoroughly understand the contents of 3 OPERATING PANELS before operating the device Contents Outline of the production preparation work and actual procedures Basic adjustment procedures during production Purpose To understand and master the basic procedures for daily production and the basic adjustment procedures during production Intended reader Operators System administrators...

Страница 48: ... an emergency and then restarting it Emergency stop procedures Restart procedures 1 Eliminate the cause of the emergency stop 2 Restart the production using normal procedures 1 Turn OFF the main power switch on the side of the remote control unit XProduction is terminated XThe display of the control panel disappears Fig 4 1 Main Power Switch MAIN POWER SWITCH ...

Страница 49: ...2 Air Pressure Adjustment WP specification 4 4 3 Turning the Device Power Switch ON 4 4 4 Turning the Control Unit Power Switch ON 4 4 5 Selecting the Machine Mode Normal Operation 4 4 6 Start up Assistant Function 4 4 7 Preset Selection 4 4 7 Preset Selection 4 4 8 Zero Adjustment 4 4 8 Zero Adjustment 4 4 9 Starting the Production 4 4 9 Starting the Production 4 4 10 Stopping the Production 4 4 ...

Страница 50: ... the problem is solved Perform the following pre start inspection before starting the production to eliminate any cause of the trouble 1 Make sure that tools and any other irrelevant objects are not placed on top or in the vicinity of the device 2 Make sure that the dispersion table is securely installed with no play 3 Make sure that the dispersion table does not make contact with the radial troug...

Страница 51: ...0 01Mpa and 0 02Mpa XIf the gauge does not read between 0 01Mpa and 0 02Mpa adjust the gauge by turning the pressure adjustment knob to the right or left When the pressure gauge does not read 0 02Mpa or under even after manually adjusting check the pressure supply Do not set the air pressure is too high as this may prevent accurate weighing Fig 4 4 Air Pressure Adjustment 1 1 Fig 4 5 Air Pressure ...

Страница 52: ...ighing results This section describes how to supply power to the device 4 4 4 Turning the Control Unit Power Switch ON This section describes how to supply power to the device control unit 1 Turn the main power switch ON X The device is powered on 2 Wait at least 30 minutes Fig 4 7 Main Power Switch 1 Press the Power key X The device control unit is powered on Fig 4 8 Main Menu Screen MAIN POWER S...

Страница 53: ... key X The CH Select pop up menu appears Fig 4 9 Main Menu Screen 2 Select the appropriate mode from C1 C2 C1 C2 or MIX depending on the product and weighing method When using both channels for double weighing C1 C2 When using single channel for double weighing C1 or C2 When using as a mix weigher MIX X The Main Menu screen appears with the channel for the operation displayed Fig 4 10 CH Select Sc...

Страница 54: ... channel for the operation In this manual screenshots for double weighing are used for all descriptions When using the start up assistant function go to 4 4 6 Start up Assistant Function Otherwise skip to 4 4 7 Preset Selection Fig 4 11 Main Menu Screen Double Weigher Fig 4 12 Main Menu Screen Mix Weigher ...

Страница 55: ...on and return to the Main Menu screen press the Cancel key Press the Next key to continue XThe C1 Preset Slct screen of the start up assistant menu appears The key for the next operation is blinking The outline of the operation performed via the start up assistant function is displayed on the left side of the screen Fig 4 14 Start up Assistant Screen Start Up Assistant Screen 3 Scroll the screen b...

Страница 56: ...ower on or when the zero adjustment is not performed for 30 minutes or more When the weigh hoppers are displayed in red it is not possible to proceed to the next step until the zero adjustment is performed 9 Press the Start key Fig 4 17 WH Zero Adjustment Screen Start up Assistant Function XZero adjustment operation for the weigh hopper starts The progress bar is displayed during zero adjustment W...

Страница 57: ... Function X Zero adjustment operation for the dispersion table starts X When the zero adjustment operation for the dispersion table finishes without error the Production Standby screen appears The progress bar is displayed during zero adjustment When an error occurs during zero adjustment the dispersion table is displayed in red In this case press the Start key again and perform zero adjustment Fi...

Страница 58: ...pending on the machine condition just before activating the function When starting the start up assistant function without selecting the machine mode the machine mode just before activating the function is applied 4 4 7 Preset Selection Select and use the preset item to which setting information of the product is registered in advance This function makes it easy to set the product information 1 On...

Страница 59: ... or the scroll bar and press the desired Preset Item When using both C1 and C2 in the double weighing select the preset item for each channel 3 Press the Exit key X The display returns to the Main Menu screen with the selected preset information set Fig 4 23 Select Preset Screen ...

Страница 60: ...Slct Dsply key on the Select Preset screen X The display switches to the list mode Fig 4 24 Select Preset Screen Photo Mode Pressing the title of each column PresetNo PdctClas Product Name Target Wt Speed Dump Cnt and Record Time will sort the preset data by the selected column For example when the Target Wt key is pressed the preset data is displayed in ascending order by target weight Fig 4 25 S...

Страница 61: ...unction is useful when the preset number is already identified and the number is too large to find by scrolling through the screen 1 Press the Preset No key on the Select Preset screen X The Numeric Keypad screen appears 2 Input the desired preset number X The Numeric Keypad screen disappears and the entered preset number is selected Fig 4 27 Select Preset Screen Photo Mode ...

Страница 62: ... weigh hopper 1 Press the Zero Adjst key X The Zero Adjustment screen appears X All hoppers are selected and displayed in blue Fig 4 28 Main Menu Screen 2 Press the Start key The Start key cannot be pressed when the control unit power switch is OFF Fig 4 29 Zero Adjustment Screen X The message Please wait a moment appears on the screen and zero adjustment starts Fig 4 30 Zero Adjustment Screen In ...

Страница 63: ...ight display of the WH key is within 0 0 0 1g If the weight display reading exceeds 0 1g or falls below 0 1g perform the zero adjustment again Zero adjustment may not be performed accurately within 30 minutes after turning the power on or when there is air movement around the machine Pressing each Weigh Hopper key on the screen can switch the hopper status to selected or unselected Fig 4 31 Zero A...

Страница 64: ...les are displayed in blue 2 Make sure that there is no product on the dispersion table Fig 4 32 Zero Adjustment Screen 3 Press the Start key The Start key cannot be pressed when the control unit power switch is OFF Fig 4 33 Zero Adjustment Screen X The message Please wait a moment appears on the screen and zero adjustment starts Fig 4 34 Zero Adjustment Screen In Adjustment ...

Страница 65: ... each DF key displays the respective weight 4 Make sure that each weight display of the DF key is 0g When the weight display reading exceeds 0g or falls below 0g perform the zero adjustment again 5 Press the Exit key X The Main Menu screen appears Fig 4 35 Zero Adjustment Screen Adjustment Complete ...

Страница 66: ...al power failure follow the procedures described in 4 9 Handling Drive Unit for the corrective action 1 Press the Start key X The production starts and the Production screen appears When the feeder is interlocked with this device to automatically supply the product pressing the Infeed Control key to ON will start the product supply Refer to 6 FUNCTIONS OF THE OPERATION SCREENS for each symbol disp...

Страница 67: ... and the product supply to the device is terminated Fig 4 37 Production screen 2 Press the Stop key X The production is terminated Fig 4 38 Production screen 3 Press the Exit key XThe display returns to the Main Menu screen To discharge the product or change the preset item after stopping the production press the Exit key to return to the Main Menu screen before performing any operation Fig 4 39 P...

Страница 68: ...ice Discharging the products 1 Press the Drain key X The Drain screen appears X Discharging of the product starts Fig 4 40 Main Menu Screen 2 After discharging all products press the Drain STOP key X Discharging is terminated Fig 4 41 Drain screen 3 Press the Exit key X The display returns to the Main Menu screen Fig 4 42 Drain screen ...

Страница 69: ...ied to the device Cleaning Clean the device after shutdown 1 Press the Power key X The control system power supply is turned OFF Fig 4 43 Main Menu Screen 2 Turn the main power switch OFF X The display of the control panel disappears X The power supplied to the device is shut off Fig 4 44 Main Power Switch MAIN POWER SWITCH ...

Страница 70: ...lect Display pop up key 4 5 1 1 Select Display Pop up Menu in Combination Screen In the combination display each head weight head status and preset information in addition to the combination weight value are displayed In the expansion display only the combination weight value is displayed Combination weighing 4 5 1 Combination Screen For a detailed description of the following functions refer to t...

Страница 71: ...ROCEDURES 4 25 4 5 1 Combination Screen To display the Combination screen press the Combination tab on the Production screen Fig 4 45 Combination Screen Production Screen Double Weigher Fig 4 46 Combination Screen Production Screen Mix Weigher ...

Страница 72: ...vels green most stable white more stable and yellow stable Empty head Blank Unstable head Head under the auto zero adjustment Head with error of overload or jam Head that is set to be deactivated 3 Head display guide Displays the scrolling messages for the descriptions of head symbols 4 Preset selection display Displays the selected preset 5 C1 C2 switching tab Double weigher only Selects the chan...

Страница 73: ...y mode can be selected Press the Select Display pop up key on the Combination screen and select the desired display mode Fig 4 47 Select Display Pop up Menu Combination Screen Table 4 2 Select Display Pop up Menu and Functions of the Combination Screen No Name Function 1 Combination Display key Selects the Combination Result Display screen Fig 4 48 Combination Result Display screen ...

Страница 74: ...TION MANUAL 4 28 2 Expansion Display key Selects the Expansion Display screen for the combination weight Fig 4 49 Expansion Display Screen Table 4 2 Select Display Pop up Menu and Functions of the Combination Screen Continued No Name Function ...

Страница 75: ...ry Stopping Stop the production temporarily 4 6 2 Restarting Restart the production 1 Press the Stop key X The Stop key is greyed out and the Start key appears X The production is temporarily terminated Fig 4 50 Production screen 1 Press the Start key to restart the production X The Start key is greyed out and the Stop key appears X The production restarts Fig 4 51 Production screen ...

Страница 76: ...t can be set by the site engineer or higher level personnel This setting outputs the combination weight value during the production To perform every combination output follow the procedures below Operation procedure 1 In the Production screen press the Total Data tab X The Total Data screen appears Fig 4 52 Production Screen 2 2 Press the Select Total pop up key X The Select Total pop up menu appe...

Страница 77: ... key X The Total Setting screen appears Fig 4 54 Select Total Pop up Menu Production Screen 4 Select C1 or C2 for the Every Combination Output option With this setting the results are output in every two weighings of the selected channel To cancel this setting select Off for the Every Combination Output option Fig 4 55 Total Setting Screen Production Screen ...

Страница 78: ...g or file output can be set by the Installation or higher level personnel via the Destination ID Tab Screen of the Control Panel screen 6 3 5 3 Destination ID Tab Screen The file is output in the text file format and can be opened with the text editor etc Operation procedure 1 In the Production screen press the Total Data tab X The Total Data screen appears Fig 4 56 Production Screen 2 Press the O...

Страница 79: ...Weight range Maximum value Minimum value 11 Quantity per mark Weighing results are displayed in order of weight value histogram and number of weighing times from the left The number displayed in the histogram indicates a percentage of e g number 10 If a value of 18 when the number of weighing times is 45 it will be displayed as 5 18 18 18 50 616 6 24 5 6 07 4 6 24 56 46 6 5612 6 616 241 1 241 0 21...

Страница 80: ...f the screen follow the procedures below to load the printer paper 1 Slide the printer cover retainer to open the cover Fig 4 59 Printer Overview 2 Pull the printer unit fixed lever to lower the printer unit Fig 4 60 Fixed Lever Fig 4 61 Printer Unit 3 Push up the printer head lever X The printer head uprears Fig 4 62 Printer Internal View LEVER ...

Страница 81: ...3 Roll Paper Installation 6 Insert the end of the roll paper into the printer 7 Advance the paper until the end of the paper comes out about 1cm from the printer head Fig 4 64 Paper Inserting 8 Pull down the printer head lever X The printer head lowers 9 Push up the printer unit 10 Close the printer cover X Loading of paper to the printer is completed Fig 4 65 Printer Internal View CLIPS ...

Страница 82: ...e This figure is only for explanation Your hopper may look different from the above figure If the main power switch is turned OFF while the hoppers are open or the hopper remains open due to an electrical power failure follow the procedures described below to restore 1 Turn on the main power switch 2 Display the Full Open Lock screen 6 9 Full Open Lock Screen 3 Select the relevant weigh hopper and...

Страница 83: ...s the outline and procedures for registering a new product Read and thoroughly understand Chapter 1 through to Chapter 4 before registering the product Contents Setting screens by product Purpose To understand and master the procedures to set product data for weighing a new product Intended reader System administrators ...

Страница 84: ...tem Setting Detail Initial Value Setting Example CH Select Selects either double weighing or mix weighing for the production type Double C1 C2 Product name Sets the product name C1 Potato chips C2 Potato chips large Product code Sets the product code 01 Product Category Sets the desired product category A100 Photo Selection Selects the photo When there is no photo data is displayed Camera Takes ph...

Страница 85: ...ng Selects parameters to set the open close operation condition for each hopper including the pool hopper and weigh hopper 0 0 Photo SW Selects On for models with a photo eye sensor and Off for models without a photo eye sensor Off Off Shutter Drive Selects On for models with a shutter drive and Off for models without a shutter drive Off Off Feeder Adjustment Sets operating intensity of the radial...

Страница 86: ...ight Limit Sets the upper limit of the proper weight 0 3 Lower Weight Limit Sets the lower limit of the proper weight in grams when the average control function is utilized 0 0 Table 5 1 Preset Details Continued Setting Item Setting Detail Initial Value Setting Example ...

Страница 87: ... product 5 2 3 2 Setting the Product Product name product code product category selecting photos and taking photos Setting the machine 5 2 3 3 Setting the Speed Speed dump count average control interlock parameter number and section parameter number Setting the item Auto feed target disch priority count AFD auto adjustment limit amp AFD auto adjustment limit time feed multiplier hopper action para...

Страница 88: ...for the operation level definitions Setting procedures for the initial values are not described in this section Refer to 6 FUNCTIONS OF THE OPERATION SCREENS for the setting procedures of all values 5 2 3 1 Selecting the Machine Switch to the desired machine to preset the double weigher 1 On the Main Menu screen press the CH Select pop up key X The CH Select pop up menu appears Fig 5 1 Main Menu S...

Страница 89: ...The Product screen of the Preset screen for C1 appears Fig 5 3 Main Menu Screen 2 Press the Product Name key X The Keyboard screen appears Fig 5 4 Product Tab Screen Preset Screen 3 Set the product name POTATO CHIPS X The Keyboard screen disappears After changing the settings the Cancel key becomes operable To cancel the settings press the Cancel key To accept the settings press the Exit key Fig 5...

Страница 90: ...Code key X The Keyboard screen appears Fig 5 6 Product Tab Screen Preset Screen 5 Set the product code 01 X The Keyboard screen disappears Fig 5 7 Keyboard Screen Preset Screen 6 Press the Product Category key X The Keyboard screen appears Fig 5 8 Product Tab Screen Preset Screen ...

Страница 91: ...election drop down list appears Fig 5 10 Product Tab Screen Preset Screen 2 Select the desired photo X The selected photo is displayed on the screen The selected photo will be reflected to the Main Menu screen Production screen photo display of the Select Preset screen and the Preset screen Refer to Product Photo Taking Procedures in 6 11 Preset Screen to take photos of the product Fig 5 11 Photo ...

Страница 92: ... control interlock parameter number and sectioning set can be specified when necessary 1 Press the Machine tab X The Machine screen appears Fig 5 12 Product Tab Screen Preset Screen 2 Press the Speed key X The Numeric Keypad screen appears Fig 5 13 Machine Screen Preset Screen 3 Set the speed 70 X The displayed numerical values are overwritten Fig 5 14 Numeric Keypad Screen Preset Screen ...

Страница 93: ...ith this device 1 Press the Weight Setting key in the index X The Weight Setting screen appears Fig 5 15 Machine Tab Screen Preset Screen 2 Press the Target Weight key X The Numeric Keypad screen appears Fig 5 16 Weight Setting Index Screen Preset Screen 3 Set the target weight 90 X The Numeric Keypad screen disappears Fig 5 17 Numeric Keypad Screen Preset Screen ...

Страница 94: ... MANUAL 5 12 4 Press the Upper Weight Limit key X The Numeric Keypad screen appears Fig 5 18 Weight Setting Index Screen Preset Screen 5 Set the upper weight limit 3 X The Numeric Keypad screen disappears Fig 5 19 Numeric Keypad Screen Preset Screen ...

Страница 95: ...n press the Exit key to show the confirmation screen To accept the settings for the selected preset number press the Yes key Fig 5 21 Confirmation Screen Preset Screen 2 Press the Preset key for C2 XThe Preset screen for C2 appears 3 Perform the preset operations for C2 by following the procedures described in 5 2 3 2 Setting the Product 4 After the preset operations for C1 and C2 are completed pr...

Страница 96: ...ils Setting Item Setting Detail Initial Value Setting Example CH Select Selects either double weighing or mix weighing for the production type Mix Product name Sets the product name Mix candy Product code Sets the product code 03 Product Category Sets the desired product category C200 Photo Selection Selects the photo When there is no photo data is displayed When the preset number has been changed...

Страница 97: ...selected section S1 3 8 S2 3 8 S1 3 8 S2 3 8 Disch Priority Count Sets the number of times to give priority in participating in the combination to heads in the selected section that have not discharged the product S1 30 S2 30 S1 30 S2 30 Good Efficiency Judgement Value Sets the efficiency rate judged as good condition 99 0 99 0 Feed Multiplier Sets the multiplying factor of feeder operating time s...

Страница 98: ... S2 60 Extended Upper Limit Sets the tolerance so that products can be discharged as proper weight even if the upper limit is exceeded once in a specified number of proper weight dumps of the selected section Constant cycle means the extended upper limit dump cycle 0 0 Upper Weight Limit Sets the upper limit of the proper weight for the selected section S1 0 S2 0 S1 5 S2 5 Lower Weight Limit Sets ...

Страница 99: ...achine Selecting the section 5 3 3 2 Selecting the Section Setting the product 5 3 3 3 Setting the Product Product name product code product category selecting photos and taking photos Setting the machine Speed dump count average control interlock parameter number and section parameter number Setting the item Auto feed target disch priority count good efficiency judgement value feed multiplier hop...

Страница 100: ...rsonnel Setting procedures for the initial values are not described in this section Refer to 6 11 Preset Screen for the setting procedures of all values 5 3 3 1 Selecting the Machine Switch to the desired machine to preset the mix weigher 1 On the Main Menu screen press the CH Select pop up key X The CH Select pop up menu appears Fig 5 23 Main Menu Screen 2 Press the MIX key X The Main Menu screen...

Страница 101: ...s required Procedures for selecting the section parameter number 1 Press the Preset key X The Preset screen appears Fig 5 25 Main Menu Screen 2 Press the Machine tab X The Machine screen appears Fig 5 26 Product Tab Screen Preset Screen 3 Press the Section Parameter Number key X The Section Parameter Number screen appears Fig 5 27 Machine Tab Screen Preset Screen ...

Страница 102: ... 20 4 Select the section parameter number according to the product Select a valid number from 1 to 8 as the section parameter number 5 Press the Exit key X The Section Parameter Number screen disappears Fig 5 28 Section Parameter Number Screen Preset Screen ...

Страница 103: ...list appears Fig 5 29 Product Setting Index Screen Preset Screen 2 Press the key of the desired section X The Preset screen for the selected section appears Fig 5 30 Section Select Drop down List Preset Screen 3 Perform the settings by pressing the keys for the desired items tabs or indices Setting examples are shown in the following section To return to the Main Menu screen press the Exit key Fig...

Страница 104: ...uct category of the product to be weighed with this device The term product here refers to products made by mixing the weighed goods according to the section setting 1 Press the Preset key X The Preset screen appears Fig 5 32 Main Menu Screen 2 Press the Product Name key X The Keyboard screen appears Fig 5 33 Product Tab Screen Preset Screen ...

Страница 105: ...he Cancel key becomes operable To cancel the settings press the Cancel key To accept the settings press the Exit key Fig 5 34 Keyboard Screen Preset Screen 4 Press the Product Code key XThe Keyboard screen appears Fig 5 35 Product Tab Screen Preset Screen 5 Set the product code 03 XThe Keyboard screen disappears Fig 5 36 Keyboard Screen Preset Screen ...

Страница 106: ...those described in Selecting the photo of 5 2 3 2 Setting the Product under 5 2 Presetting the Double Weigher 6 Press the Product Category key X The Keyboard screen appears Fig 5 37 Product Tab Screen Preset Screen 7 Set the product category C200 X The Keyboard screen disappears Fig 5 38 Keyboard Screen Preset Screen ...

Страница 107: ...rop down key and the Product Setting index are not displayed on the screen Select the section parameter number with the Section Parameter Number drop down key in the Machine tab 5 3 3 2 Selecting the Section 1 Press the Product Setting key in the index X The Product Setting screen appears Fig 5 39 Product Tab Screen Preset Screen 2 Press the Product Name key X The Keyboard screen appears Fig 5 40 ...

Страница 108: ...settings for the other section by selecting the section from the Section Select drop down key Fig 5 41 Keyboard Screen Preset Screen 4 Press the Product Code key XThe Keyboard screen appears Fig 5 42 Product Setting Index Screen Preset Screen 5 Set the product code S1 03A S2 03B X The Keyboard screen disappears Fig 5 43 Keyboard Screen Preset Screen ...

Страница 109: ...CCW R 2 B INSTRUCTION MANUAL 5 REGISTERING OF PRODUCTS 5 27 6 Select CNSC TPG or Off for the Mix Topping Method option S1 CNSC TPG S2 Off Fig 5 44 Product Setting Index Screen Preset Screen ...

Страница 110: ...r each section 1 Press the Weight Setting key in the index X The Weight Setting screen appears Fig 5 45 Product Setting Index Screen Preset Screen 2 Press the Target Weight key X The Numeric Keypad screen appears Fig 5 46 Weight Setting Index Screen Preset Screen 3 Set the target weight S1 60 S2 60 X The Numeric Keypad screen disappears Fig 5 47 Numeric Keypad Screen Preset Screen ...

Страница 111: ... Limit key X The Numeric Keypad screen appears Fig 5 48 Weight Setting Index Screen Preset Screen 5 Set the upper weight limit S1 5 S2 5 X The Numeric Keypad screen disappears Fig 5 49 Numeric Keypad Screen Preset Screen 1 After the preset operations for all sections are completed press the Exit key X The Main Menu screen appears Fig 5 50 Preset screen ...

Страница 112: ... for record purpose Refer to the following items for the preset management Selecting and copying the preset 6 15 3 2 1 Selecting and Copying Preset Copying all preset data From memory to card or from card to memory 6 15 3 2 2 Copying All Preset Resetting unnecessary preset data to the initial state 6 15 3 2 3 Selecting and Initializing Preset Resetting all preset data to the initial state 6 15 3 2...

Страница 113: ... the keys to switch screens or display modes In this chapter the functions of the keys displayed on the screen are shown in a list and for the keys with switching and operating functions the operating procedures are explained in detail Thoroughly understand the contents of 3 OPERATING PANELS before operating the device For operation of the remote control unit and production follow the instructions...

Страница 114: ...CW R 2 B INSTRUCTION MANUAL 6 2 6 2 Operation Keys and Operation Levels The operable levels for each operation key are as follows Some of the keys in the list may not appear depending on the machine status or specifications set by the user ...

Страница 115: ...CCW R 2 B INSTRUCTION MANUAL 6 FUNCTIONS OF THE OPERATION SCREENS 6 3 ...

Страница 116: ...6 FUNCTIONS OF THE OPERATION SCREENS CCW R 2 B INSTRUCTION MANUAL 6 4 ...

Страница 117: ...CCW R 2 B INSTRUCTION MANUAL 6 FUNCTIONS OF THE OPERATION SCREENS 6 5 ...

Страница 118: ...6 FUNCTIONS OF THE OPERATION SCREENS CCW R 2 B INSTRUCTION MANUAL 6 6 ...

Страница 119: ...CCW R 2 B INSTRUCTION MANUAL 6 FUNCTIONS OF THE OPERATION SCREENS 6 7 ...

Страница 120: ...6 FUNCTIONS OF THE OPERATION SCREENS CCW R 2 B INSTRUCTION MANUAL 6 8 ...

Страница 121: ...ge Board 2 Information Display key Displays the operation manual and other information for this device 3 Start up Assistant key Displays the Start Up Assistant screen The start up assistant function is available only in the main menu 6 3 2 Start Up Assistant 4 Language Selection key Selects the language 6 3 3 Language Selection 5 Operation Level Selection key Switches the Operation level 6 3 4 Ope...

Страница 122: ...each key The Help key blinks when pressed If a desired key is pressed after that the function details of the pressed key appear If you touch the screen while the Help window is displayed the Help function terminates 6 3 7 Help Function Table 6 1 Items and Functions of Upper Setting Bar Continued No Name Function ...

Страница 123: ...eps blinking even while another screen is displayed which makes it possible for users to recognize the presence of memo data at a glance Use fingertips only for input control Using a pen or other pointed objects may damage the operation panel Display may vary depending on the operation speed or the writing pressure Letters that are too small may not be displayed clearly Fig 6 2 Message Board Scree...

Страница 124: ...ge board by e mail 6 Exit key Returns to the previous screen 1 Press the Message Board key XThe Message Board screen appears Fig 6 3 Main Menu Screen 2 Select the line thickness and line color with each selection key 3 Enter letters or drawings with your fingertip XThe letters and drawings as entered with your fingertip are displayed XThe Message Board key blinks Fig 6 4 Message Board Screen Table...

Страница 125: ...l key is used the entire memo data is deleted and the Message Board key blinking is canceled See the following Fig 6 5 Message Board Screen To delete all memo data 6 Press the Delete All key X The confirmation message screen appears Fig 6 6 Message Board Screen 7 When not deleting the message board data press the No key X Deleting of the entire message board is canceled When deleting the message b...

Страница 126: ...l personnel and therefore are not covered in this manual Refer to the service manual 8 To close the Message Board screen press the Exit key X The screen previously displayed appears Fig 6 8 Message Board Screen 1 In the Message Board screen press the Transmit key X The confirmation message screen appears Fig 6 9 Message Board Screen 2 When not sending the message board data press the No key When s...

Страница 127: ...urn to the Main Menu to start operations Refer to 4 4 6 Start up Assistant Function for start up assistant operations 1 In the Main Menu screen press the Start up Assistant key X The Start Up Assistant screen appears Fig 6 11 Main Menu Screen 2 Until production starts appropriate messages are displayed as required and the corresponding keys to be operated blink Follow the guidance for operations d...

Страница 128: ... a language to be used on the operation panel 1 Press the Language Selection drop down key X The Language Selection drop down list is displayed Fig 6 13 Main Menu Screen 2 Select the language X The selected language lights up X The operation language is switched Fig 6 14 Language Selection Drop down List ...

Страница 129: ... in the Control Panel screen When switching from higher operation levels to a lower level no password is required Passwords for the Site Engineer and higher operation levels are set in order to limit operations to authorized users for each operation Passwords need to be managed to avoid operation by unauthorized users Refer to the following sections for changing the operation level Table 6 3 Opera...

Страница 130: ...reen for higher levels is displayed If the operation level is switched to the Operator level while a screen other than the Main Menu screen for higher levels is displayed the Main Menu screen for the Operator level appears 1 In the Main Menu screen press the Operation Level Selection drop down key X The Operation Level Selection drop down list appears Fig 6 15 Main Menu Screen 2 Press Operator X S...

Страница 131: ...to the Site Engineer level follow the procedures below 1 In the Main Menu screen press the Operation Level Selection drop down key X The Operation Level Selection drop down list appears Fig 6 17 Main Menu Screen 2 Press Site Engineer X The Password Input Keyboard screen appears 3 Enter the password for the Site Engineer level X The Main Menu screen for the Site Engineer level appears Fig 6 18 Oper...

Страница 132: ...For switching to the Installation level follow the procedures below 1 In the Main Menu screen press the Operation Level Selection drop down key X The Operation Level Selection drop down list appears Fig 6 19 Main Menu Screen 2 Press Installation X The Password Input Keyboard screen appears 3 Enter the password for the Installation level X The Main Menu screen for the Installation level appears Fig...

Страница 133: ...screen is used to set up the Screen Control Password Set LangSlct Set and Destination ID All functions displayed in the Control Panel screen are available to Installation or higher level personnel Fig 6 22 Control Panel Screen 1 Press the Control Panel key X The Control Panel screen appears Fig 6 21 Main Menu Screen ...

Страница 134: ...es the password for the operation level Selects the language to be displayed in the Language Selection drop down list 6 3 5 2 Password Set LangSlct Set Tab Screen 3 Destination ID tab Sets the destination ID and browser settings 6 3 5 3 Destination ID Tab Screen 4 Exit key Closes the Control Panel screen and returns to the previous screen 1 In the Control Panel screen select the Screen Control tab...

Страница 135: ... On Time has passed after the last screen operation the screen brightness changes to half brightness Full Brightness Always displayed in full brightness Half Brightness Always displayed in half brightness 2 BL Saver On Time display Sets the time from the last screen operation to the backlight brightness changing to half brightness when the backlight saver mode is set to Saver On Can be set within ...

Страница 136: ...creen cannot be used by Installation or lower level personnel 1 In the Control Panel screen press the Password Set LangSlct Set tab X The Password Set LangSlct Set tab screen appears Fig 6 25 Control Panel Screen 2 Select the operation level X The Keyboard screen appears 3 Enter the password and press the Return key 4 To finish the setting operations select another setting screen or press the Exit...

Страница 137: ... ID Tab Screen Control Panel Screen E mail settings are performed by Maintenance or higher level personnel Table 6 7 Items and Functions of Destination ID Tab Screen No Name Function 1 Destination ID drop down key Selects Printer Card or E mail as the data output destination or selects not to output data When the Output key is pressed in other screens the data is output according to the selected o...

Страница 138: ... Control Panel Screen 2 Press the Destination ID drop down key and select Printer Card or E mail as the data output destination When not outputting the data press Off 3 To finish the setting operations press the Exit key Fig 6 29 Destination ID Tab Screen Control Panel Screen 1 In the Destination ID screen press the Access Address key X The Keyboard screen appears 2 Enter the Internet address Fig ...

Страница 139: ...ther cards cannot be used This device is equipped with a memory card slot for saving preset data and outputting data such as logs 1 When saving the output data to a memory card or when reading preset data from the memory card writing data to the memory card or copying data between the card and the main unit insert the memory card into the card slot X If the destination ID is set to Card in the Con...

Страница 140: ...time settings for the operation panel The date and time setting is performed by Installation or higher level personnel 1 Press the Date Time Setting key X The Date Time Setting screen appears Fig 6 32 Main Menu Screen 2 Enter the year month and day using the Up Down keys It is also possible to select the date directly from the calendar Fig 6 33 Date Time Setting Screen ...

Страница 141: ...be entered directly from the clock image Fig 6 34 Date Time Setting Screen 4 Press the Date Format drop down key to select the order of year month and day 5 Press the Setting key X The clock starts with the set date and time Second is set to 0 when time is set 6 To close the Date Time Setting screen press the Exit key Fig 6 35 Date Time Setting Screen ...

Страница 142: ...The Help key blinks Fig 6 36 Main Menu Screen 2 Press the key you want to know about In the example the Full Open key is pressed Fig 6 37 Main Menu Screen Help Key Blinking X The function description for the pressed key is displayed 3 The help display disappears by touching any point on the screen X The Help key stops blinking and returns to normal status Fig 6 38 Help Display ...

Страница 143: ...arts up on the Operator level setting Fig 6 39 Main Menu Screen Double Weigher C1 C2 Different channels are displayed depending on the weigher selection status When only C1 is operating or the device is operated as a mix weigher the preset for C2 is not displayed When only C2 is operating the preset for C1 is not displayed Table 6 8 Items and Functions of Main Menu Screen No Name Function 1 Zero A...

Страница 144: ...xample 5 Preset key Displays the Preset screen 6 11 Preset Screen 6 Change Preset Item button Changes preset settings easily 6 11 7 Preset Change Operation 7 Select Total pop up key Displays the Select Total pop up menu 6 12 Select Total Pop up Menu 8 Machine Set pop up key Displays the Machine Set pop up menu 6 15 Machine Set Pop up Menu 9 Stop key Stops production 10 Start key Starts production ...

Страница 145: ...screen The CH Select pop up menu is used to select the mode to be used for production between double weighing C1 C2 C1 C2 and mix weighing Fig 6 40 CH Select Pop up Menu Table 6 9 Items and Functions of CH Select Pop up Menu No Name Function 1 C1 key Selects the channel C1 2 C2 key Selects the channel C2 3 C1 C2 key Selects the double weigher C1 C2 4 MIX key Selects the mix weigher ...

Страница 146: ...en press the CH Select pop up key X The CH Select pop up menu appears Fig 6 41 Main Menu Screen 2 Press the key for the machine to be selected X The selected key lights up If the MIX key is pressed C1 is automatically selected and the display returns to the Main Menu screen Fig 6 42 CH Select Pop up Menu 3 Check that the selected machine mode is displayed on the top of the screen Fig 6 43 Selected...

Страница 147: ...nt before starting production To display the Zero Adjustment screen press the Zero Adjust key on the Main Menu screen Fig 6 44 Zero Adjustment Screen Table 6 10 Items and Functions of Zero Adjustment Screen No Name Function 1 Each WH key Selects the hopper to be adjusted 2 Each DF key Selects the dispersion table 3 Slct All DF key Selects or deselects the dispersion table 4 Slct All WH key Selects...

Страница 148: ...SCREENS CCW R 2 B INSTRUCTION MANUAL 6 36 Refer to 4 4 8 Zero Adjustment for zero adjustment procedures 6 Exit key Returns to the Main Menu screen Table 6 10 Items and Functions of Zero Adjustment Screen Continued No Name Function ...

Страница 149: ...sed when the control power is off Press the Power key to turn on the control power The Start key cannot be pressed while presetting After setting is completed press the Exit key to accept the preset DO NOT UNDER ANY CIRCUMSTANCES CLOSE THE HOPPERS WITH HANDS OR TOOLS Doing so may damage the drive unit When the main power switch is turned OFF while the hoppers are open or when the hoppers remain op...

Страница 150: ...Mix Weigher Table 6 11 Items and Functions of Production Screen No Name Function 1 Combination tab Displays the Combination screen 2 Feeder Adjust tab Displays the Feeder Adjust screen 3 Timing Adjust tab Displays the Timing Adjust screen 4 Total Data tab Displays the Total Data screen 5 Weight Display tab Displays the Weight Display screen ...

Страница 151: ...er to stop or to automatically control product infeed to the device Each time the key is pressed the lamp turns on and off in turn When the lamp is on automatic product infeed to the device is performed When the lamp is off automatic product infeed to the device is stopped 9 Exit key Returns to the Main Menu screen Cannot be used while the weigher is in operation 10 Sample Discharge pop up key Sel...

Страница 152: ...N MANUAL 6 40 6 7 1 Combination Tab Screen To display the Combination tab screen press the Combination tab on the Production screen Fig 6 47 Combination Tab Screen Production Screen Double Weigher Fig 6 48 Combination Tab Screen Production Screen Mix Weigher ...

Страница 153: ...nstable head Head under the auto zero adjustment Head with error of overload or jam Head that is set to be deactivated 3 Head display guide Displays the scrolling messages for the descriptions of head symbols 4 Preset selection display Displays the selected preset If the square on the left of each item Change Preset Item button is pressed the displayed setting values can be temporarily changed 6 1...

Страница 154: ...ansion Display mode can be selected Press the Select Display pop up key on the Combination screen and select the desired display mode Fig 6 49 Select Display Pop up Menu Production Screen Table 6 13 Keys and Functions of Select Display Pop up Menu No Name Function 1 Combination Display key Selects the Combination Result Display screen Fig 6 50 Combination Result Display screen ...

Страница 155: ...S OF THE OPERATION SCREENS 6 43 2 Expansion Display key Selects the Expansion Display screen for the combination weight Fig 6 51 Expansion Display Screen Table 6 13 Keys and Functions of Select Display Pop up Menu Continued No Name Function ...

Страница 156: ...creen Refer to 6 13 Feeder Adjustment Screen for feeder adjustment Feeder values changed during production are reflected in the preset 6 7 3 Timing Adjustment Tab Screen To display the Timing Adjust tab screen press the Timing Adjust tab on the Production screen Refer to 6 14 Timing Adjustment Screen for timing adjustment Timing values changed during production are reflected in the preset ...

Страница 157: ... of Total Data Screen No Name Function 1 C1 C2 switching drop down key Double weigher only Selects the channel for which total data is to be displayed 2 Total Log drop down key Selects the total log to be displayed Displayed when a total log exists 3 Output key Outputs total data to a printer or as a file 4 Select Total pop up key Displays the Select Total pop up menu 5 Total data Total data is di...

Страница 158: ... CCW R 2 B INSTRUCTION MANUAL 6 46 Total data contents are the same as in the Select Total pop up menu in the Main Menu screen Refer to 6 12 Select Total Pop up Menu for details on total data Total data cannot be cleared during production ...

Страница 159: ... Display tab on the Production screen Fig 6 53 Weight Display Tab Screen Production Screen Meaning of each head status display is identical to those displayed in the Combination tab Table 6 15 Items and Functions of Weight Display Tab Screen No Name Function 1 Head Displays the weight of each head 2 Dispersion table Displays the weight of each dispersion table ...

Страница 160: ...he Timing Adjust tab screen 6 14 Timing Adjustment Screen 4 Auto Zero lamp key Selects whether or not to perform auto zero adjustment Each time the key is pressed the lamp turns on and off in turn ON Auto zero adjustment is performed OFF Auto zero adjustment is not performed 5 Infeed Control lamp key Selects whether to stop or to automatically control product infeed to the device Each time the key...

Страница 161: ...res Refer to 6 13 Feeder Adjustment Screen and 6 14 Timing Adjustment Screen for feeder adjustment and timing adjustment Feeder values and timing values changed during drain are not reflected in the preset 8 Exit key Stops drain and displays the Main Menu screen Table 6 16 Items and Functions of Drain Screen Continued No Name Function ...

Страница 162: ...pop up menu Do not use the Power key during full open lock Doing so may damage the device DO NOT UNDER ANY CIRCUMSTANCES CLOSE THE HOPPERS WITH HANDS OR TOOLS Doing so may damage the drive unit When the main power switch is turned off while the hoppers are open or when the hoppers remain open due to an electrical power failure follow the procedures described in 4 9 Handling Drive Unit for the corr...

Страница 163: ...der Adjust tab screen 6 13 Feeder Adjustment Screen 3 DF lamp key Selects whether or not to perform dispersion feeder operation 4 RF lamp key Selects whether or not to perform radial feeder operation 5 BH lamp key Selects whether or not to fully open the booster hoppers 6 WH lamp key Selects whether or not to fully open the weigh hoppers 7 PH lamp key Selects whether or not to fully open the pool ...

Страница 164: ...an option the RS DTH or TH key is added respectively 10 Section Select pop up key Mix weigher only Selects the section to be opened closed 11 Section selection status display Mix weigher only The selected section lights up 12 Exit key Closes the Full Open Lock screen Table 6 17 Items and Functions of Full Open Lock Screen Continued No Name Function ...

Страница 165: ...ns are used hoppers can be fully opened for each section Mix weigher only Operation procedure 1 In the Full Open Lock screen press the lamp key of the hopper to be fully opened or the lamp key of the feeder to be operated X The pressed lamp key of the hopper or feeder lights up in green Fig 6 57 Unit Select Tab Screen Full Open Lock Screen 2 Mix weigher only Press the Section Select pop up key X T...

Страница 166: ...Select Pop up Menu Full Open Lock Screen Mix Weigher 4 Mix weigher only Press the Section Select pop up key X The Section Select pop up menu closes Fig 6 60 Section Select Pop up Menu Full Open Lock Screen Mix Weigher 5 Press the Open key X The specified hoppers are held open Or the specified feeder starts to operate Feeder amplitude conforms to the settings in the feeder adjustment 6 13 Feeder Ad...

Страница 167: ...S 6 55 6 Press the Close key X The hoppers close Or the feeder operation stops Fig 6 62 Full Open Lock Screen During Operation 7 Press the Exit key X The Main Menu screen appears The menu cannot be closed unless all hoppers are closed Fig 6 63 Full Open Lock Screen ...

Страница 168: ...6 6 9 2 Feeder Adjustment Tab Screen To display the Feeder Adjust tab screen press the Feeder Adjust tab on the Full Open Lock screen Refer to 6 13 Feeder Adjustment Screen for feeder adjustment Feeder values changed during full open lock are not reflected in the preset ...

Страница 169: ... Photo Mode Table 6 18 Items and Functions of Select Preset Screen No Name Function 1 Preset No display Displays the selected preset number product name and target weight 2 Select Preset key Calls the preset The key displays the preset number product name target weight or target count upper weight limit or upper count limit and speed It also displays a photo when it has photo data 3 Slct Dsply key...

Страница 170: ...et No display Displays the selected preset number product name and target weight 2 Preset selection area Each row can be used as a key to call the preset Displays the PdctClas PresetNo Product Name Target Wt or Target Cnt Speed Dump Cnt and Record Time 3 Slct Dsply key Switches the display mode to the photo display 4 Preset No key Selects the preset number directly using the Numeric Keypad screen ...

Страница 171: ...L 6 FUNCTIONS OF THE OPERATION SCREENS 6 59 List items can be rearranged If each row header e g Product Name is pressed the items will be rearranged in ascending order on the basis of the pressed row Fig 6 66 Select Preset Screen ...

Страница 172: ...Preset screen you can change the preset number and output the preset contents to a printer or as a file Fig 6 67 Preset screen Table 6 20 Items and Functions of Preset Screen No Name Function 1 Change Preset No key Selects the desired preset number If the preset contents have been changed the confirmation message Do you wish to save current data with the current preset number appears 2 Preset No D...

Страница 173: ... down within 1 second due to an electrical power failure after the settings are changed the changes may not be stored 5 Timing Adjustment index Performs timing adjustment 6 Weight Setting index Configures the settings for weight 7 Exit key Returns to the Main Menu screen 8 Output key Outputs the preset information to a printer or as a file 9 Cancel key Cancels the preset changes This key becomes a...

Страница 174: ...rdct Setting Index Screen Preset Screen Table 6 21 Items and Functions of the Finish Prdct Setting Index Screen No Name Function 1 Product tab Configures the settings for the product to be preset 6 11 2 1 Product Tab Screen 2 Machine tab Configures the settings for the weigher in accordance with the product to be preset 6 11 2 2 Machine Tab Screen 3 Item tab Configures the advanced settings for th...

Страница 175: ...unction 1 Product Name key Sets the product name by inputting it from the Keyboard screen The set product name is displayed on the key Up to 24 characters can be specified 2 Product Code key Sets the product code by inputting it from the Keyboard screen The set product code is displayed on the key Up to 12 characters can be specified 3 Product Category key Sets the product category by inputting it...

Страница 176: ... 1 1 Product Photo Taking Procedures 1 Press the Camera key X The photograph confirmation message screen appears Fig 6 70 Product Tab Screen Preset Screen 2 Press the Yes key XThe Photograph screen appears The image being taken by the camera is displayed on the left and the image previously taken is displayed on the right Fig 6 71 Photograph Confirmation Message Screen Preset Screen ...

Страница 177: ...e previous screen without taking a photo When the Photograph key is pressed the photo is taken and the photographed image is displayed on the right Fig 6 72 Photograph Screen Preset Screen 4 To retake the photo press the Cancel key To save the photo press the Save key X The photographed image is saved Fig 6 73 Photograph Screen Preset Screen 5 Press the Exit key X Returns to the previous screen X ...

Страница 178: ...Machine Tab Screen Preset Screen Table 6 23 Items and Functions of Machine Tab Screen No Name Function 1 Speed key Sets the speed from the Numeric Keypad screen The set value is displayed on the key This sets the number of packs to be discharged from the device per minute The setting value for speed is determined by factors such as product characteristics target weight and capacity of the packer 2...

Страница 179: ...acker interlock method Table 6 25 Packer Interlock Setting Example 5 Section Parameter Number key Selects the section parameter number from the list This selects the section division pattern when dividing weigh heads into sections and weighing different products in each section There are eight different division patterns 1 8 The section division patterns are set at the Installation level in advanc...

Страница 180: ...eed set the auto feed target and then set the feeder control to a mode other than manual 6 13 Feeder Adjustment Screen 2 Disch Priority Count key Sets the discharge priority count from the Numeric Keypad screen This is the function to give priority in participating in combination to the heads having no discharge The priority is given to the heads that have not discharged products even after weighi...

Страница 181: ...itions for each hopper including the pool hopper and weigh hopper These parameter conditions are set at the factory 6 Photo SW radio button Selects On Off for the photo SW On Select it when using the photo eye sensor Off Select it when not using the photo eye sensor 7 Shutter Drive radio button Selects On Off for the shutter drive On Select it when using the shutter drive Off Select it when not us...

Страница 182: ...ime key Sets the time up to judgment on whether weighing has been stabilized from the Numeric Keypad screen Weighing for a period of time less than the time set with this key is not regarded as stable 2 BH Non Sync Feeding radio button Selects whether or not to perform non synchronous feed of products to BH booster hopper from WH weigh hopper when the BH booster hopper has no products On Performs ...

Страница 183: ...ctions are set a drop down key to select the desired section appears Fig 6 78 Product Setting Index Screen Preset Screen Table 6 28 Item and Functions of the Product Setting Index Screen No Name Function 1 Product Setting index Displays the Product Setting screen in the preset Mix weigher only 2 Product Name key Sets the product name for the selected section Up to 24 characters can be specified 3 ...

Страница 184: ... R 2 B INSTRUCTION MANUAL 6 72 5 Section Select drop down key Selects the section to set the product Available only when two or more sections are set Table 6 28 Item and Functions of the Product Setting Index Screen Continued No Name Function ...

Страница 185: ...creen Fig 6 79 Feeder Adjustment Index Screen Preset Screen Table 6 29 Items and Functions of Feeder Adjustment Index Screen No Name Function 1 Time key ON Enables adjustment of radial feeder operation time 2 AMP key ON Enables adjustment of radial feeder amplitude 3 Target Wt key Appears if DF is selected Sets the optimum weight for the dispersion table 4 Read Default key Calls the feeder default...

Страница 186: ...d it is selected and released in turn 8 Each DF key Selects the dispersion table If selected the key is displayed in blue Each time the key is pressed it is selected and released in turn 9 Increase key Increases the feeder value RF time or RF amplitude of the selected head 10 Decrease key Decreases the feeder value RF time or RF amplitude of the selected head 11 Feeder pop up key Displays the Feed...

Страница 187: ...dex Screen Preset Screen Table 6 30 Items and Functions of the Timing Adjustment Index Screen No Name Function 1 Individual timing adjustment items Selects the item for which timing is to be adjusted 2 Adjustment direction Indicates the direction of adjustment between the units displayed in blue 3 Increase Decrease key 10ms Increases decreases a value in units of 10ms 4 Increase Decrease key 100ms...

Страница 188: ... so that products can be discharged as proper weight even if the upper limit is exceeded once in a specified number of proper weight dumps The key is unavailable when the upper weight limit is 0 0g 2 Upper Weight Limit key Sets the upper limit of proper weight from the Numeric Keypad screen 3 Target Weight key Sets the target weight from the Numeric Keypad screen 4 Lower Weight Limit key Sets the ...

Страница 189: ...g If 0 0g is set the upper weight limit is infinite The maximum setting value and the minimum setting unit for upper weight limit are as shown below e g If the target weight is set to 100 0g and the upper weight limit to 5 0g discharge is performed with the proper weight at 100 0g 105 0g Table 6 32 Target Weight Setting Range Head Weighing Capacity Standard 400g 800g Medium 800g 1600g Maximum sett...

Страница 190: ... setting value and the minimum setting unit for lower weight limit are as shown below e g If the target weight is set to 100 0g and the upper and lower weight limit to 5 0g discharge is performed with the proper weight at 95 0g 105 0g Table 6 34 Lower Weight Limit Setting Range Head Weighing Capacity Standard 400g 800g Medium 800g 1600g Maximum setting value 999 0g 999 0g Setting unit 0 1 0 2g 0 2...

Страница 191: ...higher level personnel The setting values changed in the Production screen which is only a temporary change of preset data during production are not reflected to the preset data If preset selection is performed or power is turned off after a setting change in the Production screen the changed data will be invalid Fig 6 82 Main Menu Screen Table 6 36 Keys and Functions Used for Preset Change Operat...

Страница 192: ...utput The preset contents can be output to a printer or as a file Outputting the preset contents can facilitate preset management For outputting the preset contents follow the procedures below Set the output method from the Destination ID screen 6 3 5 3 Destination ID Tab Screen Tab Screen in the Control Panel screen 1 In the Preset screen press the Output key X The preset contents are output to a...

Страница 193: ...CCW R 2 B INSTRUCTION MANUAL 6 FUNCTIONS OF THE OPERATION SCREENS 6 81 Fig 6 84 Preset Output Example ...

Страница 194: ...p Menu Table 6 37 Keys and Functions of Select Total Pop up Menu No Name Function 1 Current Total key Displays the total and histogram for the period from all total clear to the present 2 X bar Chart key Displays the X bar chart 3 Weigher s Transitional Data key Displays the operational transition data of the weigher 4 Per Head Cmb Participation Data key Displays the status of each head 5 Total Se...

Страница 195: ...CCW R 2 B INSTRUCTION MANUAL 6 FUNCTIONS OF THE OPERATION SCREENS 6 83 The Total Setting key is available to Site Engineer or higher level personnel ...

Страница 196: ...for the period from the start time of total up to the present 2 Select Total pop up key Displays the Select Total pop up menu 3 Effcncy display Displays the efficiency for the period from the start time of total up to the present 4 C1 C2 switching drop down key Selects the channel for which total data is to be displayed 5 Total Log drop down key Displayed when a total log exists Selects the total ...

Страница 197: ...S D Weight The standard deviation weight of proper dumps that occur between the start time and stop time Unit g oz is used in case of ounce supported Displays the standard deviation weight for the channel during channel total display Displays the standard deviation weight for the section during section total display MAX Weight The maximum weight of proper dumps that occur between the start time an...

Страница 198: ...unt set weighing only The mean piece weight of proper dumps that occur between the start time and stop time Unit g oz is used in case of ounce supported This is not displayed in case of mix weighing during channel total display The mean piece weight is displayed during single weighing or section total display This is not displayed while section switching is available during channel total display S...

Страница 199: ...e total weight of parent head dumps is displayed during single weighing or section total display This is not displayed while section switching is available Under The number of underweight cases that occur between the start time and stop time Displays the number of underweight cases for the channel during channel total display Displays the number of underweight cases for the section during section ...

Страница 200: ...tal display Displays the total weight of overweight dumps for the section during section total display Metal Detect The number of times metal is detected between the start time and stop time Unit times When no metal is detected this item is not displayed Product On Time The accumulated time of production between the start time and stop time Display hour minute Product Off Time The accumulated time...

Страница 201: ...6 40 Items and Functions of X bar Chart Screen No Name Function 1 Upper limit Set as 3 standard deviation 2 Mean value Displays the average of the sum of every weighing result from the total start per 250 cycles 3 Lower limit Set as 3 standard deviation 4 C1 C2 switching drop down key Selects the channel for which total data is to be displayed 5 Total Log drop down key Displayed when a total log e...

Страница 202: ... 88 Weigher s Transitional Data Screen Total Display Screen Table 6 41 Items and Functions of Weigher s Transitional Data Screen No Name Function 1 SelectItem drop down key Selects the items to be displayed from the following Up to 4 items can be selected Average Head s Selected Average Stable Heads Average Empty Heads Proper Over Wt Under Over Scale Efficiency Mean Standard Deviation Speed Averag...

Страница 203: ...ipation Data Screen Total Display Screen Table 6 42 Items and Functions of Per Head Cmb Participation Data Screen No Name Function 1 SelectItem drop down key Selects the items to be displayed from the following Up to 4 items can be selected Selected Ratio Stable Ratio Empty Ratio Auto Zero Ratio Error Ratio Over Scale Ratio Plus Full Scale Ratio Minus Full Scale Ratio 3rd filter Selected Ratio 4th...

Страница 204: ...tion log On Outputs the operation log Off Does not output the operation log 3 Operation Log Output Contents Selects the contents to be logged such as the log of commands executed by the device and the errors that occurred during production 4 Action for Statistical Mem Full radio button Selects the action to be taken when the memory of total data is full Stop Stops production Continue Deletes old d...

Страница 205: ...ta to a printer or as a file 9 C1 C2 switching drop down key Selects the channel for which total data is to be displayed 10 Total Log drop down key Displayed when a total log exists Selects the total log to be displayed Table 6 43 Items and Functions of Total Setting Screen Continued No Name Function ...

Страница 206: ...2 Warning Log key Displays the log of warnings issued by the device 3 Machine Operation Log key Displays the operation log of the device 4 Key Operation Log key Displays the log of key operations performed for the device 5 Operation log display area Displays the contents of the specified log item 6 C1 C2 switching drop down key Selects the channel for which total data is to be displayed 7 Total Lo...

Страница 207: ...itude operation time and dispersion weight of dispersion feeder The feeder adjustment values depend on the product shape and the target weight Feeder adjustment is required when the amount of product delivered from the dispersion table to the pool hoppers is too large or too small The Feeder Adjustment screen appears when the Feeder Adjust tab or the Feeder Adjustment index is pressed in the follo...

Страница 208: ...6 FUNCTIONS OF THE OPERATION SCREENS CCW R 2 B INSTRUCTION MANUAL 6 96 Fig 6 93 Feeder Adjust Tab Screen Drain Screen Fig 6 94 Feeder Adjust Tab Screen Full Open Lock Screen ...

Страница 209: ...e radar chart operates in conjunction with each other The feeder adjustment radar chart appears 3 Live C G switching tab Switches the display between the head illustration and the photo taken by the camera 4 RF Time key ON Enables adjustment of radial feeder operation time After turning the key ON press the Increase or Decrease key to change the operation time 5 RF AMP key ON Enables adjustment of...

Страница 210: ... The values are indicated by a circle 8 Increase key Increases the feeder value RF time or RF amplitude of the selected head 9 Decrease key Decreases the feeder value RF time or RF amplitude of the selected head 10 Feeder pop up key Changes display of the Feeder Adjustment screen Displays the AFD setting menu in pop up 6 13 1 Switching Display in Feeder Adjust Screen 11 Optimum feeder value range ...

Страница 211: ... Tab Screen Production Screen 2 To adjust the feeder driving time press the RF Time key To adjust the amplitude press the RF AMP key Both can be selected X The lamp of the pressed key lights up Fig 6 97 Feeder Adjust Tab Screen Production Screen 3 Press the Increase key and Decrease key to adjust the time or amplitude X The feeder time or amplitude is changed X The radar chart changes according to...

Страница 212: ... the weighing accuracy Set both of the feeder amplitude and operation time to values about 5 points lower than normal and wait for 1 2 minutes to check the condition When feeder control is automatic the feeder amplitude and feeder operation time settings are used only temporarily and automatic control will be prioritized as time passes ...

Страница 213: ... Adjust tab screen From the Feeder pop up menu the screen can be switched to any of the following displays production status information feeder circle graph feeder bar graph and AFD setting 1 Press the Feeder pop up key X The Feeder pop up menu appears Fig 6 99 Feeder Adjust Tab Screen Production Screen 2 Select the item to be displayed from the list below Fig 6 100 Feeder Pop up Menu Production S...

Страница 214: ...o Name Function 1 Production status information key Displays the AFD status and production status Fig 6 101 Production Status Information 2 Circle graph display key Displays the feeder value in a circle graph Fig 6 102 Circle Graph 3 Bar graph display key Displays the feeder value in a bar graph Fig 6 103 Bar Graph ...

Страница 215: ...TION MANUAL 6 FUNCTIONS OF THE OPERATION SCREENS 6 103 4 AFD setting key Displays the AFD Setting screen 6 13 2 AFD Ctroll Mode Fig 6 104 AFD Setting Table 6 46 Displays of Feeder Pop up Menu Continued No Name Function ...

Страница 216: ...nfeed status is required In particular when infeed amount changes drastically using the auto control may lower the efficiency in some cases In this case select the manual mode Dispersion of products It is important that products are delivered as evenly as possible with no omissions from the dispersion feeder to each radial feeder Adjust the position of the infeeder feed speed position of inlet chu...

Страница 217: ...judgement value is achieved However the control automatically resumes if efficiency lowers due to external condition changes Adjusts feeding capacity of the dispersion feeder to reduce flow increase when the weight of products on the dispersion feeder is larger than the value set for the dispersion weight if the DF adjust for overfeed is selected Note the following points in setting up this contro...

Страница 218: ...lower limit Upper limit 99 Lower limit 0 DF time upper limit Use the figure set for the DF time as an index DF time lower limit Valid only when the DF adjust for overfeed is selected Input a value slightly smaller than the value set for the DF time This mode is effective for maintaining flow volume from DF to RF using products with good dispersion performance because the DF adjust for overfeed fun...

Страница 219: ...ed In this case select other mode 4 Auto Single Control Auto Time Single Control Auto AMP Single Control Unlike other auto control modes these modes control the whole RF When 2 Efficiency Ref Control or 3 Auto Multi Control is selected extremely uneven infeed may occur or frequent empty head may occur at a specific head In such cases selecting these modes will enable response only to overall statu...

Страница 220: ...Feeder pop up menu appears Fig 6 105 Feeder Adjust Tab Screen Production Screen 2 Press the AFD Setting key X The AFD Setting screen appears Fig 6 106 Feeder Pop up Menu Production Screen 3 Select the AFD control mode and press the button X The selected AFD control mode is confirmed Fig 6 107 AFD Setting Screen Production Screen ...

Страница 221: ...f the DF time is set to a value over the valid time below Valid DF time 3600 Weigher speed Table 6 50 AFD Range Setting List RF Item Name Function AMP upper limit AMP lower limit RF amplitude is operated within the range between the set upper and lower limits during auto control Time upper limit Time lower limit RF time is operated within the range between the set upper and lower limits during aut...

Страница 222: ...n the setting range X The Numeric Keypad screen disappears and the entered figures are displayed in the list Fig 6 108 Feeder Adjust Tab Screen Production Screen 1 In the Feeder Adjust screen press any DF as the head to be adjusted 2 Press the Feeder pop up key X The Feeder pop up menu appears 3 Press the number for the item to be set from the AFD range setting list X The Numeric Keypad screen app...

Страница 223: ...e following screens Production screen Drain screen Preset screen The following is explained taking the Timing Adjust tab screen of the Drain screen as an example Fig 6 110 Timing Adjust Tab Screen Drain Screen Table 6 52 Items and Functions of Each Timing Adjustment Item No Name Function 1 Each timing adjustment item Each item can be used as a key to select the item for which timing is to be adjus...

Страница 224: ...ming auto calculation 7 C1 C2 switching radio button Selects the channel to be adjusted This is displayed only when weigher setting is C1 C2 Table 6 53 Timing Adjustment Items No Item Name Function 1 WH DS Sets the time from the discharge request signal input from the packer up to the discharge completion signal output 2 IS WH Sets the time from the discharge request signal input from the packer u...

Страница 225: ...s changed during drain are not reflected in the preset Set these parameters with careful attention as they are important parameters 8 WH ON Sets the operation time of WH weigh hopper 9 BH ON Sets the operation time of BH booster hopper 10 PH ON Sets the operation time of PH pool hopper Table 6 53 Timing Adjustment Items Continued No Item Name Function ...

Страница 226: ...lf diagnosis 6 15 2 Self diagnosis Screen Display Data Manager 6 15 3 Display Data Manager Screen Various Parameter Setting 6 15 4 Various Parameter Setting Screen Weigher Setting 6 15 5 Weigher Setting Screen Peripheral Equipment Setting 6 15 6 Peripheral Equipment Setting Screen The Machine Set pop up key is available to Site Engineer or higher level personnel After completing the setting press ...

Страница 227: ... 15 1 1 Weighing Adjst Tab Screen The Weighing Adjst tab screen is used for WH manual zero adjustment and span adjustment The Weighing Adjst tab screen is available to Installation or higher level personnel Fig 6 113 Weighing Adjst Tab Screen Manual Adjustment Screen Table 6 54 Items and Functions of Weighing Adjst Tab Screen No Name Function 1 Head key Selects or deselects the head to be adjusted...

Страница 228: ...ease wait a moment the zero adjustment starts Fig 6 115 Weighing Adjst Tab Screen Manual Adjustment Screen 3 After the zero adjustment is completed check that the weight display of each weigh head is within 0 0g 0 1g If the weight display of each head exceeds 0 1g or falls below 0 1g repeat the procedure from step 3 The operation details of the zero adjustment procedures 6 6 Zero Adjustment Screen...

Страница 229: ...his case interlock the device with the packer Before starting zero adjustment for the weigh unit products in the weigh hopper are automatically discharged In addition check the span See the following Span adjustment procedure 1 Place the span adjustment weight on the weigh hopper for which span is to be adjusted Normally the span adjustment weight is 200g However it may vary depending on the speci...

Страница 230: ...ead is 200 0 0 1g If the weight display reading exceeds 200 1g or falls below 199 9g repeat the procedure from step 2 Fig 6 120 Weighing Adjst Tab Screen Manual Adjustment Screen 5 Remove the span adjustment weight from the weigh hopper X Make sure that the weight display of the selected head is in the proximity of 0 0 0 1g If the weight display of the selected head exceeds 0 1g or falls below 0 1...

Страница 231: ...the Display Cal Select pop up menu 1 Press the Display Cal Select pop up key XThe Display Cal Select pop up menu appears Fig 6 122 Combi Calcltn Tab Screen Manual Adjustment Screen Table 6 55 Items and Functions of Combi Calcltn Tab Screen No Name Function 1 Combination Result Display key Displays the combination result weight 2 Combination Status Display with Scale key Displayed in the Weight Dis...

Страница 232: ...sult of the AFV cell by opening closing the hoppers or by shaking the weigher The AFV Monitor tab screen is available to Installation or higher level personnel Fig 6 123 AFV Monitor Tab Screen Manual Adjustment Screen Table 6 56 Items and Functions of AFV Monitor Tab Screen No Name Function 1 AFV monitor graph Displays the AFV monitor graph Display range default value 160 counts to 160 counts 2 Zo...

Страница 233: ...CCW R 2 B INSTRUCTION MANUAL 6 FUNCTIONS OF THE OPERATION SCREENS 6 121 6 Exit key Returns to the Main Menu screen Table 6 56 Items and Functions of AFV Monitor Tab Screen Continued No Name Function ...

Страница 234: ...ed in the Self diagnosis screen are as follows Fig 6 124 Self diagnosis Screen Table 6 57 Items and Functions of Self diagnosis Screen No Name Function 1 Device Check tab Displays the Device Check tab screen 6 15 2 1 Device Check Tab Screen 2 In Output Signal tab Displays the In Output Signal tab screen 6 15 2 2 In Output Signal Tab Screen 3 Network Analyze tab Displays the Network Analyze tab scr...

Страница 235: ...e Please initialize memory and the problem details are displayed Communication Check This is the system in which a network map request is made to WCU and WCU returns network map to DMU If normal the message No Problem is displayed If not normal the message Some part of Network is disconnected is displayed LCD Dot Failure Check All light up in white for 3 seconds then all turn off for 2 seconds Rep...

Страница 236: ...splays the relay unit selected in the previous item On the output side the output name and the output signal to be tested are selected with the lamp key and the test result is displayed with the lamp On the input side the input name and lamp are displayed 3 Discharge Completion Signal 1 lamp key Selects ON OFF of Discharge Completion Signal 1 4 Discharge Completion Signal 2 lamp key Selects ON OFF...

Страница 237: ...HE OPERATION SCREENS 6 125 9 Control Signal 1 lamp key Selects ON OFF of Control Signal 1 10 Control Signal 2 lamp key Selects ON OFF of Control Signal 2 Table 6 59 Items and Functions of the In Output Signal Tab Screen Continued No Name Function ...

Страница 238: ...rk status is displayed in the following line colors and line types Blue line Normal Red line Abnormal Connected Red broken line Abnormal Disconnected 2 WCU key Creates the network map around WCU This includes WCU ICU FRDV FDC DUC and ADC 3 ICU key Creates the network map around ICU This includes ICU DMU WCU and EXC 4 DMU key Creates the network map around DMU This includes DMU ICU and MHIC 5 Recon...

Страница 239: ...s the unit names of the node numbers listed in the network map table 2 Node No display Displays the node numbers The numbers are hexadecimal numbers that are identical to the numbers indicated in the network map For instance 5 in 5a corresponds to the vertical axis of the network map and a to the horizontal axis 3 Program Number display Displays the program numbers When a program has been upgraded...

Страница 240: ...pper opening closing operations The test drive should be started after selecting the heads and parts to be used for test drive Fig 6 129 Test Drive Tab Screen Self diagnosis Screen Table 6 62 Items and Functions of the Test Drive Tab Screen No Name Function 1 Head key Selects the weigh head 2 Slct All WH key Selects or deselects all the weigh heads 3 Drive Unit key Selects the hopper or feeder to ...

Страница 241: ... or TH key is added respectively Test drive procedure 1 In the Test Drive tab screen select the hopper or feeder to be driven by pushing the corresponding key X The selected hopper or feeder is displayed in blue Fig 6 130 Test Drive Tab Screen Self diagnosis Screen 2 Press the Drive Start key X The test drive starts Fig 6 131 Test Drive Tab Screen Self diagnosis Screen ...

Страница 242: ... OF THE OPERATION SCREENS CCW R 2 B INSTRUCTION MANUAL 6 130 3 To stop the test drive press the Drive Stop key X The hopper or feeder drive stops Fig 6 132 Test Drive Tab Screen Self diagnosis Screen During Drive ...

Страница 243: ...sed to set the display method in accordance with the location of the remote control unit Fig 6 133 Layout Setting Tab Screen Display Data Manager Screen Table 6 63 Items and Functions of the Layout Setting Tab Screen No Name Function 1 Head No 1 Location Setting key Sets the head to be displayed as head 1 seen from the remote control unit position Each hopper illustration can be used as a key and ...

Страница 244: ...ents of the selected preset number 2 Source drop down key Selects Memory or Card as the copy source For double weighers selects from the following C1 Memory C2 Memory C1 Card or C2 Card 3 Destination drop down key Selects Memory or Card as the copy destination For double weighers selects from the following C1 Memory C2 Memory C1 Card or C2 Card 4 Copy source preset list Selects the preset number o...

Страница 245: ...the copied data if Copy is executed 1 Press the Source drop down key and select the copy source from the following C1 Memory C2 Memory C1 Card or C2 Card Fig 6 135 Preset Manager Tab Screen Display Data Manager Screen 2 From the copy source preset list press the preset number to be used as the copy source X The selected copy source preset item is displayed in blue X On the left of the Copy key the...

Страница 246: ...t list press the preset number to be used as the copy destination X The selected copy destination preset item is displayed in blue X On the right of the Copy key the selected copy destination preset number is displayed Fig 6 138 Preset Manager Tab Screen Display Data Manager Screen 5 Press the Copy key X The confirmation message screen appears 6 Press the Yes key X The message Please wait a moment...

Страница 247: ...m card to memory If all the preset data is copied original data is overwritten by the copied data and is lost X The copied preset is displayed in the selected copy destination X The selected preset copy is completed Fig 6 140 Preset Manager Tab Screen Display Data Manager Screen 1 Press the Source drop down key and select the copy source from the following C1 Memory C2 Memory C1 Card or C2 Card Fi...

Страница 248: ... Press the Destination drop down key and select the copy destination from the following C1 Memory C2 Memory C1 Card or C2 Card Fig 6 143 Preset Manager Tab Screen Display Data Manager Screen 4 Press the Copy key X The confirmation message screen appears 5 Press the Yes key X The message Please wait a moment appears and then copy is performed Fig 6 144 Preset Manager Tab Screen Display Data Manager...

Страница 249: ... is completed Fig 6 145 Preset Manager Tab Screen Display Data Manager Screen 1 Press the Source drop down key and select the media to be initialized from the following C1 Memory C2 Memory C1 Card or C2 Card Fig 6 146 Preset Manager Tab Screen Display Data Manager Screen 2 From the copy source preset list press the preset number to be initialized X The selected copy source preset item is displayed...

Страница 250: ... screen appears 4 Press the Yes key X The message Please wait a moment appears and then initialization is performed Fig 6 148 Preset Manager Tab Screen Display Data Manager Screen 1 Press the Source drop down key and select the copy source from the following C1 Memory C2 Memory C1 Card or C2 Card Fig 6 149 Preset Manager Tab Screen Display Data Manager Screen 2 Press the All Select key X All prese...

Страница 251: ...onfirmation message screen appears 4 Press the Yes key X The message Please wait a moment appears and then initialization is performed Fig 6 151 Preset Manager Tab Screen Display Data Manager Screen X The all preset initialization is completed Fig 6 152 Preset Manager Tab Screen Display Data Manager Screen ...

Страница 252: ...reen No Name Function 1 Initialize key Initializes the selected machine configuration 2 Source drop down key Selects Memory or Card as the copy source 3 Copy key Copies the machine setting items from the source to the destination 4 Destination drop down key Selects Memory or Card as the copy destination 5 Copy source machine setting item list Selects the machine setting item of the copy source The...

Страница 253: ...y the user are initialized by accident please contact Ishida service center Table 6 66 Machine Set Manager Items No Machine Selection Item 1 Weigh Spec Setting 2 Combination Set 3 Section Set 4 Infeed Control Setting 5 Packer Interlock Setting 6 H DRV Spec Setting 7 FD Spec Setting 8 Not used 9 AFV Setting 10 Not used 11 Network setting 12 Input Output setting 13 Auto timing setting 14 Drive Count...

Страница 254: ... overwritten by the copied item 1 Press the Source drop down key and select the copy source between Memory and Card It is also possible to press the Destination drop down key and select the copy destination between Memory and Card Fig 6 154 Machine Set Mngr Tab Screen Display Data Manager Screen 2 Select the machine setting item to be copied X The selected items in both copy source and copy destin...

Страница 255: ...s copied original data is overwritten by the copied data and is lost 3 Press the Copy key X The confirmation message screen appears 4 Press the Yes key X The selected machine setting item is copied Fig 6 156 Machine Set Mngr Tab Screen Display Data Manager Screen 1 Press the Source drop down key and select the copy source between Memory and Card It is also possible to press the Destination drop do...

Страница 256: ...splayed in blue X In the displays on both sides of the Copy key All is displayed Fig 6 158 Machine Set Mngr Tab Screen Display Data Manager Screen 3 Press the Copy key X The confirmation message screen appears 4 Press the Yes key X All the machine setting items are copied Fig 6 159 Machine Set Mngr Tab Screen Display Data Manager Screen ...

Страница 257: ...tion make sure that it will cause no problems 1 Press the Source drop down key and select the media to be initialized between Memory and Card If copy destination media is changed copy source media is also changed If not noticing this media that is not to be initialized may be initialized To prevent accidental deletion of data do not use the Destination drop down key Fig 6 160 Machine Set Mngr Tab ...

Страница 258: ...no problems 3 Press the Initialize key X The confirmation message screen appears 4 Press the Yes key X The selected machine setting item is initialized Fig 6 162 Machine Set Mngr Tab Screen Display Data Manager Screen 1 Press the Source drop down key and select the media to be initialized between Memory and Card If copy destination media is changed copy source media is also changed If not noticing...

Страница 259: ...achine setting items are displayed in blue Fig 6 164 Machine Set Mngr Tab Screen Display Data Manager Screen 3 Press the Initialize key X The confirmation message screen appears 4 Press the Yes key X All the machine setting items are initialized Fig 6 165 Machine Set Mngr Tab Screen Display Data Manager Screen ...

Страница 260: ...ctioning Set 6 15 4 3 Sectioning Set Tab Screen 6 15 4 1 Weigh Spec Set Tab Screen To display the Weigh Spec Set screen press the Weigh Spec Set tab in the Various Parameter Setting menu Fig 6 166 Weigh Spec Set Tab Screen Various Parameter Setting Screen Table 6 67 Items and Functions of Weigh Spec Set Tab Screen No Name Function 1 Range radio button Selects the weighing capacity Selects 400g or ...

Страница 261: ...val key Sets the interval of auto zero correction from the Numeric Keypad screen The auto zero interval is set to 5 in normal operation If the auto zero interval is set to 0 no auto zero correction is performed 7 Filter No drop down key Sets the digital filter number In selecting the filter consider the cut off frequency and the weighing time If a lower cut off frequency value is set influence of ...

Страница 262: ... unit of 0 1g The compensation value is set to 0 3g in normal operation 2 Auto Compensation Revision radio button Selects whether or not to perform auto compensation revision The auto compensation revision is the function to minimize reduction in efficiency caused by external vibration as well as to find the optimum compensation value for yield rate and to automatically update it On Performs auto ...

Страница 263: ...formed 9 Overweight Error Stop Count key Sets the action for overweight error i e when there are only combination weighing results exceeding the upper limit If 0 is set overweight combination discharge is performed regardless of the upper limit If 1 15 is set production stops when overweight occurs the specified number of times or more consecutively This is set to 4 in normal operation Table 6 70 ...

Страница 264: ...6 168 Sectioning Set Tab Screen Various Parameter Setting Screen Table 6 71 Items and Functions of Sectioning Set Tab Screen No Name Function 1 Parameter Select key Selects the section of the desired parameter number 2 Output key Outputs the set information to a printer or as a file 3 Smallest Head No in section key Sets the smallest head number of the heads to be operated in the section from the ...

Страница 265: ...ve head Tab Screen This screen is used to select the hoppers to participate in weighing This function is used to exclude specific hoppers from participation due to failures or other reasons Fig 6 169 Active head Tab Screen Weigher Setting Screen Table 6 72 Items and Functions of the Active head Tab Screen No Name Function 1 Head key The head of the number pressed participates in weighing The parti...

Страница 266: ...Function 1 AFD Stop for Fewer Available Head key Sets the number of heads to stop the feeder auto control The feeder auto control is stopped if the number of heads participating in weighing lowers to the set value or less as a result of non participation due to a failure etc or because weigh hoppers are removed 2 Cleaning Request radio button If empty head frequently occurs at a certain head it is...

Страница 267: ...lck Set Tab Screen This screen is used to set the configurations for interlocking this device and the packer Fig 6 171 Pckr Intrlck Set Tab Screen Peripheral Equipment Setting Screen Table 6 74 Items and Functions of the Pckr Intrlck Set Tab Screen No Name Function 1 Parameter No Select drop down key Selects the parameter number of the packer interlock setting to be set or referred to 2 Pckr Intrl...

Страница 268: ... of discharge completion signals from the Numeric Keypad screen Can be set in increments of 10 msec 2 Multi Dump Initiate radio button Selects the interlock operation signal to use when the dump count is 2 or more multiple dump weighing from Self or Sync Self Performs only the first discharge based on the interlock signal from the packer and the later discharges based on the self driven timer on t...

Страница 269: ...harge automatically without input of the interlock signal Sync Performs discharge based on the interlock signal from the packer 6 Manual Dmp Confirm radio button Selects whether or not to output the discharge completion signal during drain zero adjustment and error discharge Off Does not output the discharge completion signal during drain zero adjustment and error discharge On Outputs the discharg...

Страница 270: ...ax head count 5 Maximum Weight Head Number key Sets the maximum weight head number from the Numeric Keypad screen Setting range 1 to max head count 6 Pool in Multi Dump radio button Selects whether or not to pool products of amount for one weighing before dump when the dump count is set in the Preset screen Off Does not pool before dump On Pools products of amount for one weighing before dump 7 Cy...

Страница 271: ...fers to a series of process from weighing to dump For example when the dump count is set to 3 for multiple dump weighing 3 cycles make 1 weighing corresponding to the target weight When the dump count is 1 1 cycle makes 1 weighing 10 Discharge Direction radio button Selects the discharge direction between Prper Side1 and Error Side2 11 Product Hold step key Sets the number of steps seen from WH us...

Страница 272: ...rations when using the diverting timing hopper Fig 6 174 DivertingTimingHppr Index Screen Peripheral Equipment Setting Screen To configure settings use the ring shutter setting procedure 6 15 6 1 4 TimingHopper Index Screen Fig 6 175 TimingHopper Index Screen Peripheral Equipment Setting Screen To configure settings use the ring shutter setting procedure ...

Страница 273: ...count 4 Largest Head number key Sets the largest head number of the heads in the section to which infeeder 1 or 2 supplies products from the Numeric Keypad screen Setting range 1 to max head count 5 Infeed Detector radio button Selects whether to control the products delivered to the Dispersion Table based on weight or volume Weight Controls the products delivered to the Dispersion Table based on ...

Страница 274: ...the device is interrupted If product shortage is detected even after the set time has passed it is judged as interrupted product infeed and the device stops production displaying the message Low Product When not performing automatic stop set 0 Setting range 0 255 sec Table 6 78 Items and Functions of Infeedr Cntl Set Tab Screen Continued No Name Function ...

Страница 275: ...IONS 7 1 Summary This chapter describes the useful functions available for this device Use the functions as required Contents Advanced operations Purpose To understand and master the functions of the advanced operations Intended reader Operators System administrators ...

Страница 276: ...sing this device in the double mode the product data registered in C1 can be copied to C2 for use To copy product data follow the procedures below 1 On the Main Menu screen press the Machine Set pop up key X The Machine Set pop up menu appears Fig 7 1 Main Menu Screen 2 Press Display Data Manager X The Display Data Manager screen appears 3 Press the Preset Manager tab X The Preset Manager tab scre...

Страница 277: ...reset list press the preset number to be used as the copy source X The selected copy source preset item is displayed in blue X On the left of the Copy key the selected copy source preset number is displayed Fig 7 4 Preset Manager Tab Screen Display Data Manager Screen 6 Press the Destination drop down key and select C2 Memory Fig 7 5 Preset Manager Tab Screen Display Data Manager Screen ...

Страница 278: ...Preset Manager Tab Screen Display Data Manager Screen 8 Press the Copy key X When the message Performs copying of preset contents from copy source to copy destination is displayed press the Yes key to start copying X The message Please wait a moment appears and then copy is performed Fig 7 7 Preset Manager Tab Screen Display Data Manager Screen X The copied preset is displayed in the selected copy...

Страница 279: ...After creating copy data following the procedure described in 6 15 3 2 1 Selecting and Copying Preset press the Exit key X The Main Menu screen appears Fig 7 9 Preset Manager Tab Screen Display Data Manager Screen 2 Press the Select Preset key X The Select Preset screen appears Fig 7 10 Main Menu Screen 3 Select the preset number copied in step 1 No 3 X The Main Menu screen appears with the select...

Страница 280: ... FUNCTIONS CCW R 2 B INSTRUCTION MANUAL 7 6 4 Press the Preset key X The Preset screen appears Fig 7 12 Main Menu Screen 5 Change the desired preset item setting e g Target weight 90 100 Fig 7 13 Preset Screen ...

Страница 281: ...ter weighing is completed 7 3 1 Using Feeder Adjustment of Drain Function Remaining products can be discharged using the drain function For the drain function setting follow the procedures below 1 On the Main Menu screen press the Drain key X The Drain screen appears X The drain starts Fig 7 14 Main Menu Screen 2 Press the Feeder Adjust tab X The Feeder Adjust tab screen appears Fig 7 15 Drain Scr...

Страница 282: ...d the RF AMP lamp key to select the operation time and operation amplitude and press the Increase key to set a larger value for each setting Setting a larger value can discharge products faster Set the maximum value so that no product jam will occur in the collection chute or packer Feeder values changed during drain are not reflected in the preset Fig 7 16 Feeder Adjust Tab Screen Drain Screen 1 ...

Страница 283: ...Select all feeders and hoppers Fig 7 18 Unit Select Tab Screen Full Open Lock Screen 3 Press the Open key X All hoppers open Fig 7 19 Full Open Lock Screen 4 Press the Feeder Adjust tab X The Feeder Adjust tab screen appears Fig 7 20 Full Open Lock Screen ...

Страница 284: ...y to select the operation time and operation amplitude and press the Increase key to set a larger value for each setting Setting a larger value can discharge products faster Feeder values changed during full open lock are not reflected in the preset Fig 7 21 Feeder Adjust Tab Screen Full Open Lock Screen ...

Страница 285: ...his section describes the procedure to stop production on the C1 side alone when both C1 and C2 are in production and to continue production on the C2 side The C2 side alone can be stopped by executing the similar procedure 7 4 1 Stopping Production of C1 Alone 1 On the Production screen press the CH Select pop up key X The CH Select pop up menu appears Fig 7 22 Production Screen 2 Select the chan...

Страница 286: ...s the Stop key X Only C1 stops production Fig 7 24 Production Screen 1 On the Main Menu screen press the CH Select pop up key X The CH Select pop up menu appears Fig 7 25 Main Menu Screen 2 Check that C1 operation has stopped and that C2 is still in operation Fig 7 26 CH Select Pop up Menu ...

Страница 287: ...ch Section in Mix Weigher 1 On the Production screen press the Sample Discharge pop up key X The Sample Discharge pop up menu appears Fig 7 27 Production Screen Mix Weigher 2 Select the section to discharge samples ALL X The selected item is displayed in blue X Samples are discharged from the device If weighing for sample discharge is performed the weight values for each section are displayed in t...

Страница 288: ...7 USEFUL FUNCTIONS CCW R 2 B INSTRUCTION MANUAL 7 14 ...

Страница 289: ... 8 1 8 OPTIONAL FUNCTIONS 8 1 Summary This chapter describes the optional functions set for this device Contents Count set weighing Parent and child weighing Purpose To understand and master the optional functions Intended reader System administrators ...

Страница 290: ...ng Parent and child mix weighing and Bonus adding 8 2 1 1 Parent and Child Mix Weighing Parent and child mix weighing is a weighing method in which the parent head weight is included into the target weight the parent head participates in the combination weighing The device first weighs the product in the parent head The target weight for child heads is calculated based on the parent head weight Ta...

Страница 291: ...ed product weight will be 200 5 30 5 231 0 g 8 2 2 Setting Items of Parent and Child Weighing The Preset screen is used to configure the parent and child weighing settings Setting items for the parent and child weighing are added to the Preset screen Refer to the following figure and table for setting items Fig 8 1 Prnt Child Setting Index Screen Preset Screen Table 8 1 Items and Functions of Prnt...

Страница 292: ...set to 2 selects discharging mode from Alternate or Simul Alternate Products are discharged first from P1 parent head and then from P2 parent head Simul Each parent head discharges products simultaneously 6 Action Over Upper Limit radio button Selects the action when the parent head weight exceeds the upper weight limit that is described later in this section PrntDump Discharges products from the ...

Страница 293: ...t limit for the parent head Products are discharged when the parent head weight is within the specified range If the specified value is smaller than the value set for the parent lower weight limit both the parent upper weight key and the parent lower weight key blink to prompt you to modify the setting 3 Parent Lower Weight key Sets the lower weight limit for the parent head Products are discharge...

Страница 294: ...er Off Does not activate the parent head radial feeder The parent head radial feeder is not automatically controlled 5 Parent Infeed Delay key Specifies the time from when the parent head pool hopper opens until when the feed signal is output to the external device Setting range 0 to 2550 msec in 10 msecs Table 8 2 Items and Functions of Parent Head Setting Screen Continued No Name Function ...

Страница 295: ...On the Main Menu screen press the Preset key X The Preset screen appears Fig 8 3 Main Menu Screen 2 Press the Prnt Child Setting key in the index X The Prnt Child Setting screen appears Delay amount of the parent head can be specified via the Timing Adjustment screen in the index WH DELAY amount can be specified via the Timing Adjustment screen in the index Fig 8 4 Preset Screen ...

Страница 296: ...ed on the screen 7 Press the Parent Dump Mode radio button and select Alternate or Simul 8 Press the Action Over Upper Limit radio button and select PrntDump or P C Dump 9 Press the Action Under Lower Limit radio button and select PrntDump or Add nl Feed Fig 8 5 Prnt Child Setting Index Screen Preset Screen 10 Press the Parent Head Setting key in the index X The Parent Head Setting screen appears ...

Страница 297: ...d screen displayed on the screen 13 Press the Parent Lower Weight key and input the numerical value with the Numeric Keypad screen displayed on the screen 14 Press the Parent RF Drive radio button and select On or Off 15 Press the Parent Infeed Delay key and input the numerical value with the Numeric Keypad screen displayed on the screen 16 Press the Exit key X The display returns to the Main Menu...

Страница 298: ...the parent head weight is displayed on the Combination tab screen as shown in the figure Production screen when only the C1 side for which the parent and child weighing is set performs production Fig 8 8 Parent and Child Combination Tab Screen Production Screen C1 Table 8 3 Parent and Child Combination Screen C1 List No Name 1 Parent head number 2 Parent head weight ...

Страница 299: ... C2 perform production with the parent and child weighing Fig 8 9 Parent and Child Combination Tab Screen Production Screen C1 C2 Table 8 4 Parent and Child Combination Screen C1 C2 List No Name 1 C1 parent head number 2 C1 parent head weight 3 C2 parent head number 4 C2 parent head weight ...

Страница 300: ...ng items for the count set weighing are added to the Preset screen Fig 8 10 Count Setting Index Screen Preset Screen Table 8 5 Items and Functions of Count Setting Index Screen No Name Function 1 Target Count key Sets the target number of pieces When not performing the count set weighing set to 0 2 Upper Count Limit key Sets the upper count limit which is the number of permissible pieces exceeding...

Страница 301: ...pper is calculated based on the specified piece weight value When the piece weight varies set this field to perform update so that the piece weight is automatically updated and the number of pieces supplied to each weigh hopper is calculated based on the updated piece weight value Furthermore there are three options for the update setting 1 1 1 2 and 1 4 depending on the range to which the updated...

Страница 302: ...vision is set to Off Upper weight limit and lower weight limit values set by the auto calculation are not rechecked when the piece weight varies within the range where conversion to the number of pieces is performed without error 8 3 2 Piece Weight Revision When this function is activated the piece weight is updated within the range where the device can recognize the number of pieces of product su...

Страница 303: ...n be identified maximum target count value When set to 1 4 the piece weight revision range broadens but the amount of products supplied into each hopper and identified by the device is more restricted Table 8 6 Piece Weight Revision Range List Setting Value for Piece Weight Revision Piece Weight Revision Range Target count 20 piece weight 5g Recognition Range 1 1 4 875g Piece weight revision range...

Страница 304: ...unt Set Weighing For setting the count set weighing follow the procedures below 1 On the Main Menu screen press the Preset key X The Preset screen appears Fig 8 11 Main Menu Screen 2 Press the Count Setting key in the index X The Count Setting index screen appears Fig 8 12 Preset Screen ...

Страница 305: ...e screen 5 Press the Lower Count Limit key and input the numerical value with the Numeric Keypad screen displayed on the screen 6 Press the Piece Weight key and input the numerical value with the Numeric Keypad screen displayed on the screen 7 Press the Piece Weight Revision radio button and select Off 1 1 1 2 or 1 4 X Set this option to 1 1 in normal operation 8 Press the Exit key X The display r...

Страница 306: ...splay screen are added to the Combination tab screen for the count set weighing Fig 8 14 Select Display Pop up Menu Production Screen Table 8 7 Select Display Pop up Menu in Count Setting Combination Screen No Name Function 1 Combination Display key Weight display Selects the weight display of the Combination Result Display screen Fig 8 15 Combination Result Display Screen Weight Display ...

Страница 307: ... screen Fig 8 16 Combination Result Display Screen Count Disypaly 3 Piece Weight key Selects the Piece Weight screen Fig 8 17 Piece Weight Screen 4 Expansion Display key Selects Expansion Display of the Combination screen Fig 8 18 Expansion Display Screen Table 8 7 Select Display Pop up Menu in Count Setting Combination Screen Continued No Name Function ...

Страница 308: ...ation TOTAL DATA 6 PRESET NUMBER 6 DATE 2006 AUG 16 START TIME 17 36 STOP TIME 17 42 C1 TOTAL PROD CODE 0002 PROD NAME CANDY PROPER 107 TARGET CNT 50 pcs TOTAL 5386 pcs MEAN 50 3 pcs STANDARD D 0 548 pcs MAX 55 pcs MIN 50 pcs RANGE 5 pcs PW MEAN 5 00 g STANDARD D 0 00 g PW MAX 5 07 g PW MIN 4 91 g 78 0 0 77 0 0 76 0 0 75 0 0 74 0 0 73 0 0 72 0 0 71 0 0 70 0 0 69 0 0 68 0 0 67 0 0 66 0 0 65 0 0 64 ...

Страница 309: ...ht 13 Minimum piece weight 14 Quantity per mark Weighing results are displayed in order of weight value histogram and number of weighing times from the left The number displayed in the histogram indicates a percentage of e g number 10 If a value of 18 when the number of weighing times is 45 it will be displayed as 5 18 18 18 50 Table 8 8 Output Details Continued No Name Remarks ...

Страница 310: ...8 OPTIONAL FUNCTIONS CCW R 2 B INSTRUCTION MANUAL 8 22 ...

Страница 311: ...cts remaining in the device 6 8 Drain Screen When cleaning each component the operator must turn OFF and lock the main power switch and keep the key in his possession during the work Contents Cleaning procedures and cycle of the components Purpose To understand installation removal and cleaning procedures of the components in order to prevent foreign matter from entering the product and to maintai...

Страница 312: ...method described in 9 4 1 Washing Removable Unit For the unremovable unit wash and dry by following the relevant washing method described in 9 4 2 Cleaning the Unremovable Unit and in accordance with the items below Fig 9 1 Washing of Main Body 1 Use a soft cloth to remove the residue from each component surface 2 Washing method a Wipe the surface first with a soft cloth soaked with the specified ...

Страница 313: ...use tools such as a brush or any tools with sharp parts Washing and drying methods in the vicinity of the weigh drive unit The previous section described the washing and drying methods for the unremovable units As for the weigh drive unit especially because precision parts are installed around the unit wash and dry following the precautions below in addition to the washing and drying methods for c...

Страница 314: ...oroughly Washing and sterilizing methods differ depending on product types processing methods and bacterial conditions Create a washing and sterilization manual and perform washing and sterilization work daily For creating a manual refer to Table 9 1 For details contact the distributor or Ishida customer support For the unremovable units and parts washing and sterilization methods differ depending...

Страница 315: ...t WP specification IP66 Brushing wash or wipe wash 1 Brushing wash Using a brush with the specified detergent neutral detergent brush the surface and then wipe with a damp cloth in water 2 Wiping wash Wipe with a cloth with the specified detergent neutral detergent and then wipe with a damp cloth in water Use a soft brush For the remote control unit wipe wash only Do not use a brush to the rubber ...

Страница 316: ...d overload to the dispersion feeder and the weigh hopper hanger portion of the weigh drive unit These components are interlocked to the weight sensor Wipe sterilization 1 Wiping sterilization Wipe with a cloth with disinfectant Disinfectant Alcohol 80v v Avoid overload to the dispersion feeder and the weigh hopper hanger portion of the weigh drive unit These components are interlocked to the weigh...

Страница 317: ...bes how to wash and sterilize components 9 4 1 Washing Removable Unit Fig 9 3 Removable Unit and Parts Table 9 2 Removable Unit and Parts List No Name 1 Inlet Chute 2 Dispersion table 3 Radial trough 4 Pool hopper 5 Weigh hopper 6 Booster hopper 7 Collection chute 8 Discharge chute 9 Timing hopper 1 2 3 4 5 6 9 8 7 ...

Страница 318: ...d Sterilization Methods of Inlet Chute 3 Reinstall in the reverse order of the removal 4 Make sure the inlet chute is installed securely Fig 9 4 Inlet Chute Table 9 3 Washing and Sterilization Methods of Inlet Chute Washing method Immersion cleaning Neutral detergent Sterilization method Immersion sterilization Warm water 80 to 90 deg C 30 minutes Or sodium hypochlorite available chlorine concentr...

Страница 319: ...sterilizing rinse with water and dry For the washing and sterilization methods refer to Table 9 4 Washing and Sterilization Methods of Dispersion Table 3 Reinstall in the reverse order of the removal 4 Make sure the dispersion table is installed securely Perform the installation of the dispersion table after installing the radial troughs Fig 9 5 Separate Type Dispersion Table Fig 9 6 Non separate ...

Страница 320: ...erilization Methods of Radial Trough Fig 9 7 Radial Trough Removal 3 Reinstall in the reverse order of the removal 4 Make sure the radial troughs are not touching each other 5 If there is any contact repeat reinstallation so that they do not touch each other Fig 9 8 Radial Trough Installation Table 9 5 Washing and Sterilization Methods of Radial Trough Washing method Immersion cleaning Neutral det...

Страница 321: ...ng and removing the hoppers securely support the side of the hoppers with both hands 1 Pull the pool hopper forward to remove Fig 9 9 Pool Hopper Removal 2 Pull the weigh hopper forward to remove Fig 9 10 Weigh Hopper Removal Remove the booster hopper before removing the collection chute 3 Hold the side of the booster hopper and slightly lift and pull the hopper to remove Fig 9 11 Booster Hopper R...

Страница 322: ... Immersion cleaning Neutral detergent Sterilization method Immersion sterilization Warm water 80 to 90 deg C 30 minutes Or sodium hypochlorite available chlorine concentration 250 ppm 20 minutes 1 Pull up the collection chute upper portion and lift up to remove 2 After washing and sterilizing rinse with water and dry For the washing and sterilization methods refer to Table 9 7 Washing and Steriliz...

Страница 323: ...from underneath 9 4 1 7 Timing Hopper 2 After washing and sterilizing rinse with water and dry For the washing and sterilization methods refer to Table 9 8 Washing and Sterilization Methods of Discharge Chute 3 Reinstall in the reverse order of the removal 4 Make sure the discharge chute is installed securely Fig 9 13 Discharge Chute Removal Table 9 8 Washing and Sterilization Methods of Discharge...

Страница 324: ... with water and dry For the washing and sterilization methods refer to Table 9 9 Washing and Sterilization Methods of Timing Hopper 4 Reinstall in the reverse order of the removal 5 Make sure the timing hopper is installed securely Fig 9 15 Timing Hopper Removal Table 9 9 Washing and Sterilization Methods of Timing Hopper Washing method Immersion cleaning Neutral detergent Sterilization method Imm...

Страница 325: ...Reference 1 Rubber cover of the dispersion feeder 9 4 2 1 Main Body Dispersion Portion and Drive Unit 2 Rubber cover of the radial feeder 9 4 2 1 Main Body Dispersion Portion and Drive Unit 3 Drive unit 9 4 2 1 Main Body Dispersion Portion and Drive Unit 4 Main body 9 4 2 1 Main Body Dispersion Portion and Drive Unit 5 Remote control unit 9 4 2 2 Remote Control Unit 1 2 2 3 4 5 ...

Страница 326: ...on washing of the main body and drive portion are shown in 9 2 Washing and Sterilization Wash and dry following the instructions Do not use a brush to wash the rubber covers of the dispersion feeder and radial feeder Avoid overload to the dispersion feeder and WH hanger These components are interlocked to the weight sensor ...

Страница 327: ...e washing and sterilization methods refer to Table 9 11 Washing and Sterilization Methods of Main Body Dispersion Portion and Drive Portion WP Specification and Table 9 12 Washing and Sterilization Methods of Main Body Dispersion Portion and Drive Portion PB SS Specification 3 Reinstall in the reverse order of the removal 4 Make sure that each part is installed securely Fig 9 17 Main Body Dispersi...

Страница 328: ...lization or wipe sterilization Alcohol 80v v Or sodium hypochlorite available chlorine concentration 250 ppm Table 9 12 Washing and Sterilization Methods of Main Body Dispersion Portion and Drive Portion PB SS Specification Washing method Wipe wash Neutral detergent Sterilization method Wipe sterilization Alcohol 80v v 1 After washing and sterilizing wipe with a damp cloth in water and dry For the...

Страница 329: ...ance and inspections unless instructed the operator must turn OFF and lock the main power switch and keep the key in his possession during the work Contents Daily inspection and periodical inspection Adjustment of components Purpose To understand the inspection and adjustment procedures for the components in order to maintain the weighing machine in good condition and prevent loss of production In...

Страница 330: ...ng dispersion table Make sure that the dispersion table is securely installed with no play Interference between dispersion table and radial trough Make sure that the dispersion table does not make contact with the radial troughs 10 2 1 1 Dispersion table Interference between radial troughs Make sure the radial troughs are not touching each other 10 2 1 2 Radial trough Installing hoppers Make sure ...

Страница 331: ...rtion shown in the figure below Fig 10 1 Dispersion Table Partial View 10 2 1 2 Radial trough For interference between the radial troughs check the circled portion shown in figure below Fig 10 2 Radial Trough Partial View Table 10 2 Names of Dispersion Table Parts No Name 1 Radial trough 2 Dispersion table Table 10 3 Names of the Radial Trough Parts No Name 1 Radial trough ...

Страница 332: ...e air dryer by checking the grain color of the dew point checker When the color is blue the performance is normal When the color is either pink white or brown the performance is degraded Refer to 11 4 Troubleshooting for detailed handling It takes about an hour from starting to supplying the air to the reaction of the grain color Main body Dew point checker Grains ...

Страница 333: ... hopper Monthly 10 3 4 Inspection of Open Close Roller for Hopper Monthly Inspection of the amplitude strength for radial feeder Monthly 10 3 5 Inspection of Amplitude Strength for Radial Feeder Monthly Inspection for cracks Annually 10 3 6 Inspection for Cracks Annually Inspection of the rubber cover Annually 10 3 7 Inspection of Rubber Cover Annually Replacement of the memory backup battery Appr...

Страница 334: ...press the Power key to turn the control unit power switch ON 1 On the Main Menu screen press the Zero Adjst key X The Zero Adjustment screen appears X All hoppers are selected and displayed in blue Fig 10 3 Main Menu Screen 2 Press the Start key Fig 10 4 Zero Adjustment Screen X The message Please wait a moment appears on the screen and zero adjustment starts Fig 10 5 Zero Adjustment Screen In Pro...

Страница 335: ...tus to selected or unselected Fig 10 6 Zero Adjustment Screen On Completion 4 Place the span adjustment weight on all of the weigh hoppers Make sure that the weight does not make contact with other portions Normally the span adjustment weight is 200g However it may vary depending on the weighing machine specifications X The weight of each head is displayed X Make sure that weight display of each h...

Страница 336: ...ND INSPECTION CCW R 2 B INSTRUCTION MANUAL 10 8 5 Remove the span adjustment weight 6 Press the Exit key X The screen previously displayed appears X The inspection for span is completed Fig 10 8 Zero Adjustment Screen ...

Страница 337: ...d when the weight display shows outside the specified value at the span inspection For the span adjustment follow the procedures below 1 Check that there are no objects in the weigh hopper 2 Display the Main Menu screen for the Site Engineer level or higher 3 Press the Machine Set pop up key X The Machine Set pop up menu appears Fig 10 9 Main Menu Screen 4 Select Manual Adjustment X The Manual Adj...

Страница 338: ...tment Screen 7 Press the Zero Adjst key X The zero adjustment will begin X The display of the zero adjusted Head key becomes normal and the weight is displayed 8 Make sure that the weight display is 0 0 0 1g X The zero adjustment is completed Fig 10 12 Weighing Adjst Tab Screen Manual Adjustment Screen Make sure that the span adjustment weight does not make contact with other portions 9 Place the ...

Страница 339: ...key X The span adjustment starts X The display of the span adjusted Head key becomes normal and the weight is displayed 12 If the weight display exceeds 200 1g or falls below 199 9g perform the span adjustment following steps 10 and 11 Fig 10 15 Weighing Adjst Tab Screen Manual Adjustment Screen 13 When the weight display is within 200 0 0 1g remove the span adjustment weight from the weigh hopper...

Страница 340: ...N MANUAL 10 12 10 3 3 Inspection of Open Close for Hopper Gate Monthly 1 Remove the pool hopper weigh hopper and booster hopper Fig 10 17 Pool Hopper Removal Fig 10 18 Weigh Hopper Removal Fig 10 19 Booster Hopper Removal BOOSTERHOPPER OPEN CLOSE LEVER ...

Страница 341: ...thly check for the distortion of the hopper 4 Check the wear condition of the bushing used for the supporting point of each gate If any replace with new parts Fig 10 20 Pool Hopper Open Close Roller and Lever Fig 10 21 Weigh Hopper Open Close Roller and Lever Fig 10 22 Booster HopperOpen Close Roller and Lever OPEN CLOSE ROLLER OPEN CLOSE LEVER OPEN CLOSE ROLLER OPEN CLOSE LEVER BOOSTER HOPPER OPE...

Страница 342: ...en wear replace with new parts 10 3 5 Inspection of Amplitude Strength for Radial Feeder Monthly If there is a failure in transferring the product on the radial trough it is possible that the radial trough and trough installation portion have cracks Check for cracks When the amplitude strength differs take the amplitude strength value into account when making a judgment 1 Set the amplitude time to...

Страница 343: ...ction for Cracks Annually 1 Check for cracks on the pool hopper weigh hopper and radial trough 2 Replace the pool hopper weigh hopper and or radial trough that have cracks 3 For possible crack portions check the circled areas shown in the figure below Fig 10 23 Crack Inspection ...

Страница 344: ...f the radial feeder The rubber cover with the failure above needs to be replaced Contact the distributor or Ishida customer support Fig 10 24 Dispersion Feeder Cover Table 10 5 Names of the Dispersion Feeder Cover Parts No Name 1 Main body 2 Rubber cover of the dispersion feeder 3 Rubber cover of the radial feeder 4 WH hanger 5 Dispersion portion 6 Drive unit 2 3 1 5 6 4 ...

Страница 345: ...resettings may already be deleted In order to protect presettings by replacing the battery before the battery voltage decrease due to battery life is detected it is recommended to periodically contact and ask the distributor or Ishida customer support to replace the battery for your weighing machine The rough standard for the battery replacement is every five years However the battery life may bec...

Страница 346: ...nd then start the procedures For fuse replacement follow the procedures below Fuses are used for the AC fuse board P 5507 and DC fuse board P 5508 Refer to the appendix for the details of each board Use the tester for the energization check 1 Remove the fuse board cover 2 Turn the fuse holder to the left and remove the blown out fuse 3 Install a new fuse 4 Put the fuse holder back to its original ...

Страница 347: ...uge reads 0Mpa Fig 10 25 Replacing Element 1 2 Unscrew the four screws to remove the separator Fig 10 26 Replacing Element 2 3 Turn the old element counterclockwise to remove from the body Attach a new element by turning it clockwise 4 Re screw the screws in the reverse order of the step 2 XReplacement of the air dryer element is completed Fig 10 27 Replacing Element 3 0 1 0 2 0 15 0 05 0 MPa Pres...

Страница 348: ...ve the separator Fig 10 29 Replacing Module Set 2 3 Check the packing and spacer are attached then set the new module to the case Ensure round hole of module is not seen from slot hole Set the packing properly into the end face of case Do not insert the packing all the way 4 Re screw the screws in the reverse order of the step 2 XReplacement of the air dryer module set is completed Fig 10 30 Repla...

Страница 349: ...t be performed by qualified maintenance electricians When working on the weighing machine with the main body cover open do not touch current carrying parts For inspection and repair unless instructed the operator must turn OFF and lock the main power switch and keep the key in his possession during the work 1 6 Power Supply Shut Off and Indication When performing inspection or repair clearly indic...

Страница 350: ...11 CAUSES AND ACTIONS FOR ERRORS AND FAILURES CCW R 2 B INSTRUCTION MANUAL 11 2 Intended reader System administrators Maintenance engineers ...

Страница 351: ...O ERROR Manual zero adjustment SPAN ERROR NETWORK ERROR RECHECK ERROR Count set weighing specification FDRV ERROR Error alarm sounds Operation stops 11 2 2 Pattern 2 Pattern 3 WARNING NO TRANSMISSION WARNING NO RESPONSE LOW PRODUCT WARNING OVERSCALE WARNING DETACHED HEAD WARNING OVERWEIGHT ERROR RCU fan stopped Contact to factory service WARNING AUTO ZERO ERROR WARNING COMMUNICATION ERROR WARNING ...

Страница 352: ...TRUCTION MANUAL 11 4 Pattern 7 ADC firmware error Operation stops Power OFF 11 2 7 Pattern 7 Pattern 8 FILE TRANSFER ERROR Error alarm sounds 11 2 8 Pattern 8 Table 11 1 Error Screen Patterns Continued Error Screen Pattern Error Name weighing machine Condition ...

Страница 353: ...st repair service 3 If repair cannot be achieved by the above actions 1 and 2 there is a possibility of malfunctioning of the ADC board or power Contact the distributor or Ishida customer support Table 11 11 OVERWEIGHT ERROR Proper combination was not obtained from calculation 1 Excessive product fed into weigh hopper 2 Excessive product fed into dispersion table or dispersion feeder 3 The set val...

Страница 354: ...ads that do not discharge products automatically during operation an overscale error will occur when the operation is stopped 1 Decrease the feeder amplitude or time by making feeder adjustment 2 Adjust the position of the infeeder supply chute so that the infeed position comes to the center of the dispersion table 3 Too many products are pooled in the dispersion unit because the position of the i...

Страница 355: ...mmunication line inside the weigher 2 The drive unit was requested to drive before receiving the drive parameters from the remote control unit 1 Turn off the main power switch and turn it on again ERROR CYCLE OVERLAP ERROR PH WH BH RS TH and DTH Hopper opening and closing are overlapped This error occurs when attempting to operate the running drive unit of TH DTH or RS in the next cycle 1 The sett...

Страница 356: ...g in the weigh hopper 2 Adjust the open close timing of the hopper Inspect for looseness breakage or loss of the screws of the weigh hopper If unable to repair contact the distributor or Ishida customer support to request repair service 3 If repair cannot be achieved by the above actions 1 and 2 there is a possibility of malfunctioning of the ADC board or power Contact the distributor or Ishida cu...

Страница 357: ...e result of the combination by count is not within target weight lower weight limit and target weight upper weight limit This error occurs when the count set weighing optional is used 1 Check the set value of the upper and lower weight limits FDRV ERROR 1 Error has occurred in the communication network This error occurs when there is a failure in the communication line 1 Contact the distributor or...

Страница 358: ...e main unit every second for more than 5 seconds 2 The power is not being supplied to the WCU 1 Check that the communication line between the remote control unit and the main unit is properly connected 2 There is a possibility that the WCU board is damaged Contact the distributor or Ishida customer support LOW PRODUCT 1 The product counts on the dispersion table are small 1 Supply products to the ...

Страница 359: ...tor or Ishida customer support WARNING COMMUNICATION ERROR 1 Error has occurred in the communication network 1 Contact the distributor or Ishida customer support to request repair service WARNING RECHECK ERROR 1 The result of the combination by count is not within target weight lower weight limit and target weight upper weight limit This error occurs when the count set weighing optional is used 1 ...

Страница 360: ...ERROR PH WH and BH 1 Communication is interfered due to momentary power loss of the power supply A failure in the communication line inside the weigher 2 The drive unit was requested to drive before receiving the drive parameters from the remote control unit 1 Turn off the main power switch and turn it on again ERROR CYCLE OVERLAP ERROR TH DTH and RS 1 Hopper opening and closing are overlapped Thi...

Страница 361: ...cription Cause Action The memory of Product Set may be corrupt 1 The internal data is damaged 1 Initialize the memory The memory of Weigh Spec Set may be corrupt 1 The internal data is damaged 1 Initialize the memory The memory of Combi Calc Spec Set may be corrupt 1 The internal data is damaged 1 Initialize the memory The memory of Sectioning Method Setting may be corrupt 1 The internal data is d...

Страница 362: ...cting action Table 11 6 Error Display List Pattern 5 Error Name Error Description Cause Action AFV ZERO ERROR 1 When performing manual zero adjustment or auto zero adjustment of AFV cell zero cannot be obtained 1 Perform manual zero adjustment AFV PARAMETER ERROR 1 Improper weighing data 1 Check the weigher specification setting AFV COMPENSATION ERROR 1 AFV compensation is not operating properly 1...

Страница 363: ...n 8 When the file transfer fails warning alarm sounds In addition an error screen is displayed on the screen of the remote control unit When a Pattern 8 error occurs refer to Table 11 9 Error Display List Pattern 8 to perform the correcting action Table 11 8 Error Display List Pattern 7 Error Name Error Description Cause Action ADC firmware error 1 System error 1 Turn off the main power switch and...

Страница 364: ... keys are used to clear the errors of patterns 1 and 2 as shown below Error clear and action Clearing error by using the E Clr Restrt key Method for restarting the operation after removing the cause of the error Clearing error by using the Err Clr Stop key Method for stopping the operation after removing the cause of the error Clearing error by using the Power key Method for forcibly clearing the ...

Страница 365: ... Turn ON the breaker PS 0 unit Turn ON the circuit protector of the PS 0 unit Breaking or poor connection Contact the distributor or Ishida customer support Table 11 12 Chattering when turning on the power Turn OFF the power and turn ON again Display malfunction Contact the distributor or Ishida customer support Table 11 12 The weigher does not operate when the power of the remote control unit is ...

Страница 366: ...roducts are spilling from the hopper Clean the hopper The weigh hoppers make contact with an object Adjust the open close timing of the hopper PH WH A product is stuck to the chute or the hopper Eliminate the object Clean the chute and the hopper Improper interlock timing with the packer Adjust the timing The products pass through the hopper Check the hopper timing adjustment set at the remote con...

Страница 367: ...eave the display screen as is Affected by vibration Reinforce the scaffold etc Load cell malfunction Contact the distributor or Ishida customer support Table 11 12 Preamp board malfunction Contact the distributor or Ishida customer support Table 11 12 ADC board malfunction Contact the distributor or Ishida customer support Table 11 12 The displayed weight data is the maximum or minimum value of th...

Страница 368: ... customer support Table 11 12 Memory card malfunction Replace the memory card Condensation is seen on the inside of main body WP specification The dry air supply is stopped Check the air supply power Supply dry air to the inside of the main body immediately Do not turn on the main power until the inside of main body is dried out Table 11 10 Failure and Malfunction List Continued Status Cause Actio...

Страница 369: ...ivity of the following connectors XJ384 DMU board P 5562 ZERO ERROR error display Board malfunction Replace the ADC board P 5576 When zero is unable to be obtained even when J320 to J322 are disconnected Replace the preamp board P 5527 Weigh mechanism malfunction Replace the load cell 15V power malfunction Check the ADC board P 5576 J324 connector Replace the PS CAL unit SPAN ERROR error display B...

Страница 370: ...Check the conductivity of the DUC board P 5579 P 5524 connector Check the WCU board P 5561 connector The fuse in the main body is blown PS 0 unit Replace the midget fuse on the DC fuse board P 5508 PS 0 unit 125V 5A Drive unit malfunction Repair or replace the drive unit OVERSCALE ERROR Infeed control phototube malfunction Replace the phototube to avoid pooling of the product caused by not being a...

Страница 371: ...ard machine midget fuse 250V 3 15A PS 0 unit The interlock signal is not input Interlock between the relay units LED for switch monitor does not blink abnormal Replace the relay board P 5506 The interlock signal is not input Interlock between the relay units LED for switch monitor blinks normal Replace the relay board P 5506 Check the connection between the relay board P 5506 XJ454 and WCU board P...

Страница 372: ...et cannot be printed RCU board malfunction Replace the RCU board P 970 Remote control BOX unit DMU board malfunction Replace the DMU board P 5562 CAL unit Printer malfunction Replace the printer Remote control BOX unit Reading from or writing to the memory card cannot be performed RCU board malfunction Replace the RCU board P 970 Remote control BOX unit Memory card malfunction Replace the memory c...

Страница 373: ...ing Ambient temperature is high Improve ventilation to lower the ambient temperature use conditions 5 to 50C no freezing Air flow rate is large Reduce the flow rate to rated flow rate at referenceperformance 375L min ALR or under Inlet air pressure is low Set the air pressure between 0 3Mpa and 1 0 Mpa Purging air volume is small Check if the outlet for purging air is clogged Table 11 12 Error Fai...

Страница 374: ...11 CAUSES AND ACTIONS FOR ERRORS AND FAILURES CCW R 2 B INSTRUCTION MANUAL 11 26 ...

Страница 375: ...when relocating or moving the device No one other than Ishida service engineers should perform the installation When relocating the device contact the distributor or Ishida customer support When the installation is not appropriate accurate weighing may not be achieved Contents Installation conditions transportation and lifting and installation procedures Purpose To understand the appropriate insta...

Страница 376: ...ight Room temperature 0 to 40 deg C Room humidity 35 to 85 R H No condensation is allowed No dust is allowed There should be sufficient light to take product photos with a camera Installation surface The floor should have a steady horizontal surface without vibrations Installation space There should be a working space around the weighing machine for maintenance and inspections Static electricity M...

Страница 377: ...on for Transporting When transporting the weighing machine observe the following items 1 Place a match mark on the pipes connections and fitting portions and do not remove the match mark during transportation 2 Seal the pipes and openings with removable sealing caps and remove the caps on site immediately before reassembling Protect the protruding part of the male screws with cloth or similar mate...

Страница 378: ...ufficient length The eyebolts should be securely installed 4 Check items during lifting Only a licensed personnel should perform the slinging work and operate a lifting weighing machine Select and use an appropriate lifting weighing machine in accordance with the load weight Apply patches or cloth for the protruding parts and edges in order to avoid damage to the weighing machine When starting the...

Страница 379: ... the weight and dimensions of the weighing machine refer to the specifications issued for the contract or contact the distributor or Ishida customer support When lifting the weighing machine use an appropriate lifting weighing machine in accordance with the weighing machine weight and take into account the center of gravity of the load when lifting Fig 12 1 Lifting Diagram Hc Lc G Lc 2 ...

Страница 380: ...machine If the load is lifted quickly it may damage the weighing machine and the lifting equipment such as the wire ropes 4 Begin the lift by removing slack from the lift cables 5 Continue the lift until the weighing machine is off the ground Check for inclination of the load If the load is inclined lower the weighing machine to the ground eliminate the cause of the inclination adjust and lift aga...

Страница 381: ... and remote control unit 12 4 4 Connecting Power Cable and Remote Control Unit Installing the timing hopper frame 12 4 5 Installing Timing Hopper Frame Installing the signal wire for the timing hopper 12 4 6 Connecting TH Signal Wire Installing components to the main body Installing the timing hopper 12 4 7 Installing Timing Hopper Installing the discharge chute 12 4 8 Installing Discharge Chute I...

Страница 382: ...g items 1 Damages to the weighing machine from shipping 2 Parts shortage If there is any damage or shortage of the parts contact the distributor or Ishida customer support 12 4 3 Carrying in and Installing the Weighing Machine When lifting the weighing machine follow the instructions in 12 3 1 Precaution for Transporting for safety If they are not observed injuries fatal accidents or damage to the...

Страница 383: ... power switch B to the fixing metallic fitting E using two screws E2 2 Adjust the remote control unit angle in accordance with the following procedures a Fix the installation bracket D of the remote control unit to the specified position using four screws D1 b Adjust the remote control unit to an easily viewable angle using the knob bolts D3 and angle adjustment screws D2 and fix it in the positio...

Страница 384: ...ding block 8 Connect the customer power source side of the power cable H to the plant power terminal outlet that is closest to the weighing machine Fig 12 2 Wiring Diagram for Power Cable Remote Control Unit Table 12 3 Power Cable Connecting Locations No Connecting Location 1 PS 0 unit Terminal block XT601 2 PS 0 unit QF2 primary side 3 PS 0 unit U01 XC21 connector 4 Ethernet relay connector 5 Gro...

Страница 385: ... hopper to the main body frame from inside of the main body frame 2 Insert the TH signal wire to the relay connector of the DUC board Connect in accordance with the connector number of the TH signal wire and the relay connector indication of the DUC board 3 Fix the shield coating portion of the TH signal wire to the main body with the shield clamp and bolts Fig 12 4 TH Signal Wire Table 12 3 Power...

Страница 386: ... by hanging the shaft to the hook of the main body 2 Check that the lever of the timing hopper fits appropriately Fig 12 5 Timing Hopper 1 Insert the arm holes of the discharge chutes over the four supporting pins of the main body frame Fig 12 6 Discharge Chute 1 Hang the hooks on both sides of the collection chute to the chute hanger of the main body frame support column Fig 12 7 Collection Chute...

Страница 387: ...rough base 2 Tighten the clamp lever to fix the radial trough Fig 12 8 Radial Trough 1 Attach the dispersion table and tighten the four pinches When installing the dispersion table check that it does not make contact with the trough Fig 12 9 Dispersion Table 1 Hang the hook of the booster hopper to the booster hopper hanger of the weigh drive unit 2 Make sure that the open close roller of the boos...

Страница 388: ...alled to any of the heads 1 To install the weigh hopper apply the hooks of the installation portions to the installation pins of the main unit 2 Make sure that the open close roller of the weigh hopper fits securely into the switching lever of the main body Fig 12 11 Weigh Hopper 1 To install the pool hopper apply the hooks of the installation portions to the installation pins of the main unit 2 M...

Страница 389: ...Interlock Target Signal Input Output Characteristics of the weighing machine 1 Packer Interlock signal The interlock signal from the packer to the weigher should output a no voltage contact signal Input characteristics Circuit opto isolator Voltage 24VDC Current approx 15 mA Signal width min 50 msec Discharge completion signal The discharge completion signal from the weigher to the packer outputs ...

Страница 390: ...1 5 6 Error signal 1 90 91 XJ451 7 8 Error signal 2 30 31 XJ451 9 10 Infeed control signal 1 Infeeder 88 89 XJ451 11 12 Infeed control signal 2 Infeeder 84 85 XJ451 13 14 Control 1 Optional 86 87 XJ451 15 16 Control 2 Optional 20 21 XJ452 1 2 Interlock signal 1 Packer 21 72 XJ452 2 3 Interlock signal 2 Packer 22 21 XJ452 4 5 Input signal 5 Optional 21 73 XJ452 5 6 Input signal 6 Optional 25 26 XJ4...

Страница 391: ...tor must turn OFF and lock the main power switch and keep the key in his possession during the work Table 12 6 Outline of Check and Adjustment After Installation Checking the assembly condition 12 5 1 Checking Assembly Condition of Each Unit Turning the power ON 12 5 2 Turning the Power ON Checking the installation level 12 5 3 Changing the Operation Level Zero adjustment 12 5 4 Zero Adjustment Sp...

Страница 392: ...per Make sure that the open close roller of the pool hopper fits securely into the switching lever of the main body Fig 12 15 Pool Hopper 3 Checking secure installation of the weigh hopper Make sure that the open close roller of the weigh hopper fits securely into the switching lever of the main body Fig 12 16 Weigh Hopper 4 Checking secure installation of the dispersion table Make sure that the d...

Страница 393: ...12 INSTALLATION 12 19 5 Checking for the interference between radial troughs Make sure that there is no interference between radial troughs If there is interference reinstall the radial troughs Fig 12 18 Radial Trough Partial View ...

Страница 394: ...nect the power outlet and turn the main power switch next to the remote control unit ON The Main Menu screen of the Operator level is displayed automatically 1 Check the wiring of terminal block PS 0 2 Check that the breaker is ON Keep the breaker inside the main body ON all of the time 3 Turn ON the main power switch of the factory side and turn ON the main power switch next to the remote control...

Страница 395: ...Level Selection key X The Operation Level Selection menu appears Fig 12 21 Main Menu Screen 2 Press Installation X The Password Input Keyboard screen appears 3 Enter the password XThe Main Menu screen for the Installation level appears The factory default password set for the Installation level is 2 The entered password is displayed as Fig 12 22 Operation Level Selection Drop down List ...

Страница 396: ...Machine Set pop up menu appears Fig 12 23 Main Menu Screen 2 Select Manual Adjustment X The Manual Adjustment screen appears 3 If the Weighing Adjst tab is not selected press the Weighing Adjst tab X The weight of each head is displayed Fig 12 24 Machine Set Pop up Menu 4 Press the ALL Head SLCT CLR key X All heads are selected Fig 12 25 Weighing Adjst Tab Screen Manual Adjustment Screen ...

Страница 397: ... Adjustment Screen 6 After the zero adjustment is complete check that the weight display of each weigh head is within 0 0g 0 1g If the weight display of each head exceeds 0 1g or falls below 0 1g repeat the procedure from step 3 The operation details of the zero adjustment procedures 6 6 Zero Adjustment Screen Then perform the span adjustment See the following Fig 12 27 Weighing Adjst Tab Screen M...

Страница 398: ...s Normally the span adjustment weight is 200g However it may vary depending on the specifications Fig 12 28 Weigh Hopper 2 Press the ALL Head SLCT CLR key X All heads are selected Fig 12 29 Weighing Adjst Tab Screen Manual Adjustment Screen 3 Press the WH Span Adjustment key X The span adjustment starts Fig 12 30 Weighing Adjst Tab Screen Manual Adjustment Screen SPAN ADJUSTMENT WEIGHT ...

Страница 399: ...hing Adjst Tab Screen Manual Adjustment Screen 5 Remove the span adjustment weight from the weigh hopper X Make sure that the weight display of each head is within 0 0g 0 1g If the weight display of each head exceeds 0 1g or falls below 0 1g repeat from step 3 of 12 5 4 Zero Adjustment Fig 12 32 Weighing Adjst Tab Screen Manual Adjustment Screen 6 Press the Exit key X The display returns to the Ma...

Страница 400: ...out presettings Check with remote control display 3 Check printer Set to preset and press Output key to print out Displayand printedcontents should match 4 Check zero adjustment Perform zero adjustment and check zero point of each head Weigher is in stable condition and zero point is within 0 1g 1 graduation 5 Check span adjustment After zero adjustment place span adjustment weight on each head an...

Страница 401: ...Check discharge completion signal Place weights on weigh hopper according to set value and perform discharging operations Check with relay board if LED lights up or by tester 3 Check infeed control signal Press dispersion table by hand Check with relay board if LED lights up or by tester 6 Check errors 1 Check for incorrect zero point Set auto zero interval and perform discharging operations Verif...

Страница 402: ...ifications Check main model of branch number and specifications Verify visually 4 Check specifications Verify visually 5 Check layout diagram Installation position and dimensions of remote control BOX Height width discharge height etc Check visually and byactual measurement 6 Check attachments and spare parts Check tool box weights weigher and attachments Table 12 7 Check Items at Installation Con...

Страница 403: ...ferent from the one described in this chapter Do not repair the device or replace parts on your own Contact the distributor or Ishida customer support Contents Board location of the electrical unit Overall wiring diagram and block wiring diagram Purpose To provide reference information for repairing the device or replacing parts Intended reader Maintenance engineers Ishida service engineers ...

Страница 404: ...3 1 Electrical Unit Layout Drawing Layout of the electrical unit differs depending on the model Table 13 1 Names of Electrical Unit Parts No Name 1 Main Electrical Unit HUB board MPS board FDRV board FDC board 2 CAL unit ADC board WCU board DMU board 3 RELAY unit EXC board RELAY board 4 PS 0 Unit 5 PS 2 Unit 6 PS FEEDER unit 1 2 4 5 6 3 ...

Страница 405: ...t Layout Drawing Table 13 2 Names of Electrical Unit Parts No Name 1 Electrical unit 1 HUB board FDRV board FDC board 2 Electrical unit 2 MPS board 3 CAL unit ADC board WCU board DMU board 4 PS 0 Unit 5 PS 2 Unit 6 RELAY unit EXC board RELAY board 7 SUB RELAY unit 8 PS FEEDER unit 1 9 PS FEEDER unit 2 5 1 2 3 4 6 7 8 9 ...

Страница 406: ...P 5436 DUC BOARD P 5428 FDC BOARD P 5532 PREAMP BOARD P 5435 PREAMP BOARD P 5488 PREAMP CAM SENSOR BOARD P 5207 CAM SENSOR BOARD P 5207 DU DDU BOARD P 5429 P 5439 DU BOARD P 5429 CAL UNIT HIGH SPEED COMMUNICA TION LINE TH DU RELAY UNIT EXC BOARD P 5426 RELAY BOARD P 5506 Switching power supply PS UNIT POWER IN PS 2 UNIT PS 0 UNIT REMOTE CONTROL BOX UNIT DC DC CONVERTER RCU BOARD P 970 SIGNALS IN P...

Страница 407: ...ION MANUAL 13 APPENDIX 13 5 13 4 Remote Control BOX Unit Fig 13 4 Remote Control BOX Unit Table 13 3 Names of Remote Control BOX Unit Parts No Name 1 Printer unit 2 Touch panel display 3 Memory card insertion slot 3 2 1 ...

Страница 408: ...Printer control and statistic calculation processing 3 Communication with the CAL unit DMU board via a high speed communication line 4 Input and output control of the memory card DIP SW settings SW1 Multipurpose DIP SW Table 13 4 Setting Items and Functions of SW1 No Function Default Setting 1 ON Debug mode OFF 2 Not used OFF 3 OFF 4 OFF SW3 SW1 BATTERY SW2 SW4 SW5 T1 ...

Страница 409: ...2 ON 1 OFF 1024 768 ON 2 OFF 3 OFF 4 OFF 5 Reverse display 2 XJ3 41pin OFF High level ON Low level ON 6 Reverse display 1 XJ3 38pin XJ6 3pin OFF High level ON Low level OFF Table 13 6 Setting Items and Functions of SW3 Function Default Setting OFF COM2 port is RS 232C level XJ16 used ON COM2 port is C MOS level XJ21 used ON Table 13 7 Setting Items and Functions of SW4 Function Default Setting OFF...

Страница 410: ...RN Board Fig 13 6 PRN Board Functions of the board 1 Control of the thermal printer Printing or paper feeding Setting of board jumper Set the data input format using the solder jumpers JP1 to JP6 Set JP1 to JP5 to open and JP6 to short Board Solder jumper ...

Страница 411: ...CCW R 2 B INSTRUCTION MANUAL 13 APPENDIX 13 9 13 4 3 TP I F Board P 5573 Fig 13 7 TP I F Board Functions of the board 1 Control of the touch panel ...

Страница 412: ...13 10 13 5 Main Electrical Unit Fig 13 8 Main Electrical Unit The drawing is an example of CCW R 216B D Table 13 9 Names of Main Electrical Unit Parts No Name 1 HUB board P 5535 2 MPS board P 5436 3 FDRV board P 5578 4 FDC board P 5532 3 4 2 1 ...

Страница 413: ... 13 11 13 5 1 HUB Board P 5535 Fig 13 9 HUB Board Functions of the board 1 Relay and distribution of communication between WCU board DUC board and FDC board via a high speed communication line Check the suffix number when replacing the board ...

Страница 414: ...13 APPENDIX CCW R 2 B INSTRUCTION MANUAL 13 12 13 5 2 MPS Board P 5436 Fig 13 10 MPS Board Functions of the board 1 Relay and distribution of DC39V power supply from PS 2 unit to DUC board ...

Страница 415: ...RUCTION MANUAL 13 APPENDIX 13 13 13 5 3 FDRV Board P 5578 Fig 13 11 FDRV Board Functions of the board 1 Drive control of the radial feeder 2 Relay and distribution of power supply from PS feeder unit to radial feeder ...

Страница 416: ...cing the board set the DIP SW to the setting as it was before the replacement Fig 13 12 FDC Board Functions of the board 1 Drive control of the radial feeder Setting of the board switches Table 13 10 Setting Items of DIP SW DIP SW Setting SW 1 1 OFF SW 1 2 OFF SW 1 3 OFF SW 1 4 OFF ...

Страница 417: ...in Electrical Unit CCW R 224B 13 6 1 Main Electrical Unit 1 Fig 13 13 Main Electrical Unit Table 13 11 Names of Main Electrical Unit Parts No Name 1 HUB board P 5535 2 FDRV board P 5578 3 FDC board P 5532 2 1 3 1 2 4 2 3 1 A B C J544 X J 5 11 4 X J 5 12 4 ...

Страница 418: ...13 16 13 6 1 1 HUB Board P 5535 Fig 13 14 HUB Board Functions of the board 1 Relay and distribution of communication between WCU board DUC board and FDC board via a high speed communication line Check the suffix number when replacing the board ...

Страница 419: ... 13 17 13 6 1 2 FDRV Board P 5578 Fig 13 15 FDRV Board Functions of the board 1 Drive control of the radial feeder 2 Relay and distribution of power supply from PS feeder unit to radial feeder Check the suffix number when replacing the board ...

Страница 420: ...to the setting as it was before the replacement Fig 13 16 FDC Board Functions of the board 1 Drive control of the radial feeder Setting of the board switches When replacing the board set as it was before the replacement Table 13 12 Setting Items of DIP SW DIP SW Setting SW 1 1 OFF SW 1 2 OFF SW 1 3 OFF SW 1 4 OFF ...

Страница 421: ...R 2 B INSTRUCTION MANUAL 13 APPENDIX 13 19 13 6 2 Main Electrical Unit 2 Fig 13 17 Main Electrical Unit 2 Table 13 13 Names of Main Electrical Unit 2 Parts No Name 1 MPS Board P 5436 2 PRE AMP board P 5435 ...

Страница 422: ...13 APPENDIX CCW R 2 B INSTRUCTION MANUAL 13 20 13 6 2 1 MPS Board P 5436 Fig 13 18 MPS Board Functions of the board 1 Relay and distribution of DC39V power supply from PS 2 unit to DUC board ...

Страница 423: ...TRUCTION MANUAL 13 APPENDIX 13 21 13 6 2 2 Preamp Board P 5435 Fig 13 19 Preamp Board Functions of the board 1 Amplification of the dispersion feeder load cell output Check the suffix number when replacing the board ...

Страница 424: ...NSTRUCTION MANUAL 13 22 13 7 Base Unit Feeder 13 7 1 Preamp Board P 5435 Fig 13 20 Preamp Board Functions of the board 1 Amplification of the dispersion feeder load cell output Check the suffix number when replacing the board ...

Страница 425: ...3 23 13 8 AFV Unit Fig 13 21 AFV Unit 13 8 1 AFV Preamp Board P 5488 Fig 13 22 AFV Preamp Board Functions of the board 1 Amplification of the AFV load cell output Table 13 14 Names of AFV Unit Parts No Name 1 PRE AMP Board 2 Load cell HAS 0 5L ...

Страница 426: ...13 APPENDIX CCW R 2 B INSTRUCTION MANUAL 13 24 13 9 Relay Unit Fig 13 23 Relay Unit Table 13 15 Names of Relay Unit Parts No Name 1 EXC board P 5426 2 RELAY board P 5506 ...

Страница 427: ...CTION MANUAL 13 APPENDIX 13 25 13 9 1 EXC Board P 5426 Fig 13 24 EXC Board In most instances set all DSW1 switches to OFF Functions of the board 1 Communication with the CAL unit 2 Control of the timing hopper Optional ...

Страница 428: ...onal signal Functions of Monitoring LED Table 13 16 Functions of Monitoring LED LED Function LED Function HL 451 Discharge completion signal 1 HL 461 Interlock signal 1 HL 452 Discharge completion signal 2 HL 462 Interlock signal 2 HL 453 Error signal 1 HL 463 Input signal 5 HL 454 Error signal 2 HL 464 Input signal 6 HL 455 Infeed control signal 1 HL 465 Input signal 1 HL 456 Infeed control signa...

Страница 429: ...CCW R 2 B INSTRUCTION MANUAL 13 APPENDIX 13 27 13 10 Relay Unit CCW R 224B Fig 13 26 Relay Unit Table 13 17 Names of Relay Unit Parts No Name 1 EXC board P 5426 2 Relay board P 5506 ...

Страница 430: ...NDIX CCW R 2 B INSTRUCTION MANUAL 13 28 13 10 1 EXC Board P 5426 Fig 13 27 EXC Board Set only the DSW1 No 1 switch to ON Functions of the board 1 Communication with the CAL unit 2 Control of the timing hopper ...

Страница 431: ...ional signal Functions of Monitoring LED Table 13 18 Functions of Monitoring LED LED Function LED Function HL 451 Discharge completion signal 1 HL 461 Interlock signal 1 HL 452 Discharge completion signal 2 HL 462 Interlock signal 2 HL 453 Error signal 1 HL 463 Input signal 5 HL 454 Error signal 2 HL 464 Input signal 6 HL 455 Infeed control signal 1 HL 465 Input signal 1 HL 456 Infeed control sign...

Страница 432: ...ENDIX CCW R 2 B INSTRUCTION MANUAL 13 30 13 11 Additional Relay Unit CCW R 224B Fig 13 29 Additional Relay Unit Table 13 19 Names of Additional Relay Unit Parts No Name 1 EXC board P 5426 2 Relay board P 5506 ...

Страница 433: ... B INSTRUCTION MANUAL 13 APPENDIX 13 31 13 11 1 EXC Board P 5426 Fig 13 30 EXC Board Set only the DSW1 No 1 switch to ON Functions of the board 1 Communication with the CAL unit 2 Control of the timing hopper ...

Страница 434: ...ontrol 7 HL 461 Input signal 9 HL 452 Control 8 HL 462 Input signal 10 HL 453 Control 9 HL 463 Input signal 11 HL 454 Control 10 HL 464 Input signal 12 HL 455 Control 11 HL 465 Input signal 13 HL 456 Control 12 HL 466 Input signal 14 HL 457 Control 13 HL 467 Input signal 15 HL 458 Control 14 HL 468 Input signal 16 KA452 KA453 KA454 KA455 KA456 KA457 KA458 KA451 HL461 HL462 HL463 HL464 HL465 HL466 ...

Страница 435: ...e remote control BOX unit and relay unit 4 AC power supply to the main electrical unit PS FEEDER unit and CAL unit Table 13 21 Names of PS 0 Unit Parts No Name 1 Circuit breaker 2 Noise filter 3 Terminal block 4 Grounding block 5 Circuit breaker 6 Electromagnetic contactor 7 Terminal block 8 AC FUSE board P 5507 9 Switching power supply for relay unit DC24V 10 Switching power supply for remote con...

Страница 436: ...ounding block 5 Circuit breaker 6 Electromagnetic contactor 7 Terminal block 8 AC FUSE board P 5507 9 Switching power supply for relay unit DC24V 10 Switching power supply for remote control BOX DC24V 3 4 3 4 3 4 PUSH FUSE PUSH FUSE PUSH FUSE PUSH FUSE FUSE PUSH FUSE PUSH FUSE PUSH FUSE PUSH PUSH FUSE PUSH FUSE PUSH FUSE PUSH FUSE FUSE PUSH FUSE PUSH FUSE PUSH FUSE PUSH 0 1 2 3 4 5 6 7 8 9 10 ...

Страница 437: ...35 Functions of the unit 1 Detects overcurrent and shuts the power off 2 Removes noise from the power source 3 DC power supply to the remote control BOX unit and relay unit 4 AC power supply to the main electrical unit PS FEEDER unit and CAL unit ...

Страница 438: ...2 Unit Functions of the unit 1 Power supply to the motor of the weigh drive unit The number of the fuse boards may differ according to the number of heads in the machine Table 13 23 Names of PS 2 Unit Parts No Name 1 DC FUSE board P 5508 2 DC39V switching power supply 1 1 2 2 2 ...

Страница 439: ...DIX 13 37 13 15 PS 2 Unit CCW R 224B Fig 13 35 PS 2 Unit Functions of the unit 1 Power supply to the motor of the weigh drive unit Table 13 24 Names of PS 2 Unit Parts No Name 1 DC FUSE board P 5508 2 DC39V switching power supply 1 2 1 1 2 ...

Страница 440: ...oard Functions of the board 1 Communication with the WCU board by a high speed communication line via HUB board 2 Open close control of the pool hopper and weigh hopper 3 Amplification of the load cell output by preamp circuit When replacing the weigh drive unit and DUC board perform the head setting by DIP SW ...

Страница 441: ...OFF OFF OFF OFF 8 OFF OFF OFF ON OFF OFF OFF OFF 9 ON OFF OFF ON OFF OFF OFF OFF 10 OFF ON OFF ON OFF OFF OFF OFF 11 ON ON OFF ON OFF OFF OFF OFF 12 OFF OFF ON ON OFF OFF OFF OFF 13 ON OFF ON ON OFF OFF OFF OFF 14 OFF ON ON ON OFF OFF OFF OFF 15 ON ON ON ON OFF OFF OFF OFF 16 OFF OFF OFF OFF ON OFF OFF OFF 17 ON OFF OFF OFF ON OFF OFF OFF 18 OFF ON OFF OFF ON OFF OFF OFF 19 ON ON OFF OFF ON OFF OF...

Страница 442: ...iving the motor for opening closing the pool hopper and the weigh hopper 13 16 3 Cam Sensor Board P 5207 Fig 13 38 Cam Sensor Board Functions of the board 1 Detects the stop position of the pool hopper and the weigh hopper using the cam with slit and sends the signal to the DUC board P 5439 J226 J224 J225 J223 J221 J222 ...

Страница 443: ...d P 5429 Fig 13 39 DU Board Functions of the board 1 Driving the motor for opening closing the booster hopper 13 17 2 Cam Sensor Board P 5207 Fig 13 40 Cam Sensor Board Functions of the board 1 Detects the booster hopper stop position using the cam with slit and sends the signal to the DUC board ...

Страница 444: ...CW R 2 B INSTRUCTION MANUAL 13 42 13 18 CAL Unit Fig 13 41 CAL Unit Table 13 26 Names of CAL Unit Parts No Name 1 ADC board P 5576 2 WCU board P 5561 3 DMU board P 5562 4 Switching power supply for CAL unit DC5V 15V ...

Страница 445: ... SW settings Table 13 27 Setting Items of DIP SW DIP SW Function Default Setting SW2 1 ON Starts DSP from PROM OFF Starts DSP from FLASH ON SW2 2 Not used OFF SW2 3 Not used OFF SW2 4 Not used OFF P 5576A IC20 IC21 IC22 SW2 IC23 IC42 IC41 IC24 IC26 IC29 IC30 IC27 IC48 IC32 IC28 IC19 IC3 IC34 IC35 IC1 IC2 IC4 IC5 IC6 IC7 IC8 IC15 IC36 IC37 IC38 IC39 IC40 IC31 IC33 IC12 IC13 IC17 IC11 IC14 IC18 IC16...

Страница 446: ...to each unit based on the combination weighing result 3 Sending and receiving of various data to and from the DMU board DIP SW settings Table 13 28 Setting Items of DIP SW DIP SW Setting SW1 OFF SW2 1 to 8 OFF Switches may be set to ON depending on the specification Check the setting when replacing the board SW3 1 ON SW3 2 OFF SW3 3 ON SW3 4 OFF SW4 1 OFF SW4 2 OFF SW4 SW2 SW3 SW1 ...

Страница 447: ...DMU Board Functions of the board 1 Data processing 2 Storing of total data and parameters 3 Communication with the remote control BOX unit RCU board by a high speed communication line SW4 3 ON SW4 4 OFF Table 13 28 Setting Items of DIP SW Continued DIP SW Setting SW1 SW2 SW3 BATTERY ...

Страница 448: ... Not used OFF SW2 1 to SW2 5 Not used OFF SW2 6 ON Clears SRAM when initializing memory OFF Does not clear SRAM when initializing memory OFF SW2 7 ON Does not output FIF0 at DMU application OFF Outputs FIF0 at DMU application OFF SW2 8 ON Does not output boot loader message OFF Outputs boot loader message OFF SW3 1 ON Boot loader mode OFF Application execution mode OFF SW3 2 Fix to OFF and should ...

Страница 449: ... 13 APPENDIX 13 47 13 19 CAL Unit CCW R 224B Fig 13 45 CAL Unit Table 13 30 Names of CAL Unit Parts No Name 1 ADC board P 5576 2 WCU board P 5561 3 DMU board P 5562 4 Switching power supply for CAL unit DC5V 15V 9 7 8 5 6 1 2 3 4 ...

Страница 450: ... SW settings Table 13 31 Setting Items of DIP SW DIP SW Function Default Setting SW2 1 ON Starts DSP from PROM OFF Starts DSP from FLASH ON SW2 2 Not used OFF SW2 3 Not used OFF SW2 4 Not used OFF P 5576A IC20 IC21 IC22 SW2 IC23 IC42 IC41 IC24 IC26 IC29 IC30 IC27 IC48 IC32 IC28 IC19 IC3 IC34 IC35 IC1 IC2 IC4 IC5 IC6 IC7 IC8 IC15 IC36 IC37 IC38 IC39 IC40 IC31 IC33 IC12 IC13 IC17 IC11 IC14 IC18 IC16...

Страница 451: ...to each unit based on the combination weighing result 3 Sending and receiving of various data to and from the DMU board DIP SW settings Table 13 32 Setting Items of DIP SW DIP SW Setting SW1 OFF SW2 1 to 8 OFF Switches may be set to ON depending on the specification Check the setting when replacing the board SW3 1 ON SW3 2 OFF SW3 3 ON SW3 4 OFF SW4 1 OFF SW4 2 OFF SW4 SW2 SW3 SW1 ...

Страница 452: ...ettings SW4 3 ON SW4 4 OFF Table 13 33 Setting Items of DIP SW DIP SW Function Default Setting SW1 1 ON Models with two distributed cameras OFF Models with one distributed camera OFF SW1 2 ON Models with no camera OFF Models with camera OFF SW1 3 to SW1 8 Not used OFF SW2 1 to SW2 5 Not used OFF SW2 6 ON Clears SRAM when initializing memory OFF Does not clear SRAM when initializing memory OFF Tabl...

Страница 453: ...W2 8 ON Does not output boot loader message OFF Outputs boot loader message OFF SW3 1 ON Boot loader mode OFF Application execution mode OFF SW3 2 Fix to OFF and should no be turned ON OFF SW3 3 ON Writing data to flash memory is prohibited OFF Writing data to flash memory is allowed OFF SW3 4 Fix to OFF and should no be turned ON OFF Table 13 33 Setting Items of DIP SW Continued DIP SW Function D...

Страница 454: ...AL 13 52 13 20 PS FEEDER Unit Fig 13 49 PS FEEDER Unit The figure is an example of CCW R 216B Table 13 34 Names of PS FEEDER Unit Parts No Name 1 FPS Board P 5580 2 FPS Board P 5581 3 Switching power supply DC12V 4 Electromagnetic contactor ...

Страница 455: ...CCW R 2 B INSTRUCTION MANUAL 13 APPENDIX 13 53 13 20 1 FPS Board P 5580 Fig 13 50 FPS Board Functions of the board 1 Converts AC power to DC power Feeder power ...

Страница 456: ...13 APPENDIX CCW R 2 B INSTRUCTION MANUAL 13 54 13 20 2 FPS Board P 5581 Fig 13 51 FPS Board Functions of the board 1 Converts AC power to DC power Feeder power ...

Страница 457: ...13 APPENDIX 13 55 13 21 PS FEEDER Unit CCW R 224B 13 21 1 PS FEEDER Unit 1 Fig 13 52 PS FEEDER Unit 1 Table 13 35 Names of PS FEEDER Unit 1 Parts No Name 1 FPS Board P 5580 2 Switching power supply DC12V 3 Electromagnetic contactor ...

Страница 458: ...13 APPENDIX CCW R 2 B INSTRUCTION MANUAL 13 56 13 21 1 1 FPS Board P 5580 Fig 13 53FPS Board Functions of the board 1 Converts AC power to DC power Feeder power ...

Страница 459: ...TRUCTION MANUAL 13 APPENDIX 13 57 13 21 2 PS FEEDER Unit 2 Fig 13 54 PS FEEDER Unit 2 Table 13 36 Names of PS FEEDER Unit 2 Parts No Name 1 FPS Board P 5580 2 Switching power supply DC12V 3 Electromagnetic contactor ...

Страница 460: ...13 APPENDIX CCW R 2 B INSTRUCTION MANUAL 13 58 13 21 2 1 FPS Board P 5580 Fig 13 55 FPS Board Functions of the board 1 Converts AC power to DC power Feeder power ...

Страница 461: ...R 216B D 1 CCW R 216B D 102 4577 05 102 4578 091 1 REMOTE CONTROL UNIT 105 3851 04 2 RELAY UNIT 107 2454 00 3 AFV UNIT 107 2452 02 4 ELECTRICAL UNIT 107 2459 08 5 WEIGH DRIVE UNIT 107 2457 01 107 2458 04 6 CAL UNIT 105 0490 021 105 3665 081 7 POWER SUPPLY UNIT 102 3901 053 8 POWER SUPPLY UNIT CE 1 086 0964 073 9 POWER SUPPLY UNIT CE 2 108 7064 062 ...

Страница 462: ...13 APPENDIX CCW R 2 B INSTRUCTION MANUAL 13 60 13 23 Connection Diagram CCW R 224B 13 23 1 TOTAL DIAGRAM 13 23 2 BLOCK DIAGRAM 1 CCW R 224B 086 6134 04 086 6135 08 1 POWER SUPPLY UNIT 086 2153 013 ...

Страница 463: ... 0 00 102 4577 052 ...

Страница 464: ... D D D D D D D D D D D D D D D D D D D D D PRE AMP BOARD 8 J205 8 1 5V GND 8 2 D 25 26 27 28 29 30 31 J572 32 B RCU EXTENSION CABLE C RCU PS CABLE D EXC OUT CABLE E EXC IN CABLE F EXC COMMUNICATION CABLE G DUC COMMUNICATION CABLE H CAL DC15V CABLE I CAL DC5V CABLE J HUB DC5V CABLE K FEEDER CABLE L FEEDER EXTENSION CABLE M WEIGHT SIG CABLE N WEIGHT SIG CABLE O DUC COMMUNICATION CABLE P WEIGHT SIG C...

Страница 465: ... 00 1 11 2 34 34 2 5 5 66 6 7276 89 4 0 8 03 0 0344 A93 A 3 8 A B 4A 3 3C 5 ...

Страница 466: ... 107 2454 00 ...

Страница 467: ... 107 2452 02 ...

Страница 468: ... 2 FD16 SIG FD 9 SIG Vcc 8 7 FD14 SIG 6 5 FD13 SIG FD12 SIG 1 FD15 SIG 4 3 2 9 FD10 SIG FD11 SIG XJ511 1 J542 6 3 2 8 7 5 4 9 1 J543 J543 FDRV BOARD NO 2 P 5578 RF9 J501 3 1 J501 RF10 J502 3 1 J502 RF11 J503 3 1 J503 RF12 J504 3 1 J504 RF13 J505 3 1 J505 RF14 J506 3 1 J506 RF15 J507 3 1 FD PS 13 14 15 16 FD PS 9 10 11 12 J507 J508 J508 1 3 RF1 RF2 RF3 RF4 RF5 RF6 RF7 RF8 RADIAL FEEDER J544 1 1 FRE...

Страница 469: ... 8 9 10 11 J211 14 12 13 BOOSTER CAL UNIT DRIVE UNIT 4 BOOSTER BOOSTER DRIVE DRIVE UNIT 3 UNIT 2 WEIGH P 5576 FERRITE CORE WEIGH DRIVE UNIT 1 2 MODEL MACHINE CCW R 2 SERIES 3 MOTOR ELECTRICAL UNIT BOARD ADC CAL UNIT P 5436 P 5535 J572 4 3 2 J572 1 BOARD HUB BOARD MPS RAM J320 4 3 2 J320 1 MOTOR B MOTOR B MOTOR A MOTOR A J226 4 2 3 J208 1 DUC BOARD P 5428 DDU BOARD J226 1 VEX IN IN AGND AGND SELF C...

Страница 470: ... 107 2458 04 ...

Страница 471: ... 0 1 0 1 0 1 0 1 0 1 0 1 2 3 105 0490 021 ...

Страница 472: ...SHOWS THE LATEST VERSION CCW R 2 SERIES MODEL MACHINE CAL UNIT 2 2 FERRITE CORE J592 1 2 J592 2 2 J592 1 3 J592 2 3 J592 1 4 J592 2 4 J322 2 6 J322 3 7 J322 4 8 15V AGND 15V SIGDF2 J592 2 1 ELECTRICAL UNIT SIG16 SIG15 J201 16 1 15 1 BOARD P 5435 BOARD P 5428 J322 29 25 21 J322 17 J322 13 9 5 J322 1 J321 29 25 21 17 13 9 5 J321 1 J320 29 25 21 17 13 9 5 J320 1 J201 1 1 2 1 3 1 4 1 5 1 6 1 7 1 8 1 9...

Страница 473: ... 0 123 2456781597 0 102 3901 053 00 ...

Страница 474: ...G10 MAIN BODY RCU UNIT 4 5 DC24V DC24V XC456 4 3 2 XC456 1 U02 DC24V DC24V GND GND RELAY PS XC12 1 XC12 3 XC12 5 3 15A 3 15A 3 15A 3 15A 3 15A J604 2 1 J604 2 2 J604 1 1 J604 1 2 J602 2 6 5 4 3 2 J602 2 1 J601 2 6 5 4 3 2 J601 2 1 J601 1 6 5 4 3 2 J601 1 1 AC FUSE BOARD 1 AC FUSE BOARD 2 7 8 7 8 J603 1 1 J603 1 2 J603 2 1 J603 2 2 P 5507 F601 1 F602 1 F603 1 F604 1 F601 2 F602 2 F603 2 F604 2 P 55...

Страница 475: ...A 3 15A 3 15A 3 15A J604 2 1 J604 2 2 J604 1 1 J604 1 2 J602 2 6 5 4 3 2 J602 2 1 J601 2 6 5 4 3 2 J601 2 1 J601 1 6 5 4 3 2 J601 1 1 AC FUSE BOARD 1 AC FUSE BOARD 2 7 8 7 8 J603 1 1 J603 1 2 J603 2 1 J603 2 2 P 5507 F601 1 F602 1 F603 1 F604 1 F601 2 F602 2 F603 2 F604 2 P 5507 3 15A 3 15A 3 15A 9 10 7 8 BK AWG14 BK AWG14 U04 BK AWG14 BK AWG14 U03 GND DC39V DC39V GND J602 1 1 2 3 4 5 J602 1 6 RF5...

Страница 476: ... 0 0 1 2 1 1 2 1 1 1 3 33 086 6134 04 ...

Страница 477: ...086 6135 08 ...

Страница 478: ... XC23 1 XC23 3 A2 A1 KM03 1 60 61 A1 A2 KM04 1 RF9 12 XJ12 1 XJ12 4 2 3 PS 3 2 XJ13 4 XJ13 1 66 67 68 69 82 83 84 85 KM04 1 1 2 3 5 13 4 6 14 XJ633 2 4 2 XJ633 2 1 3 XJ631 2 6 5 4 3 2 XJ631 2 1 P 5580 XJ631 1 6 5 4 3 2 XJ631 1 1 RF1 4 XJ10 1 XJ10 4 2 3 PS 62 63 64 65 78 79 80 81 KM03 1 1 2 3 5 13 4 6 14 P 5580 PS 3 2 XJ11 4 XJ11 1 RF5 8 XJ633 1 4 2 XJ633 1 1 3 PS FEEDER 1 J613 3 2 J612 3 2 J613 2 ...

Страница 479: ...DIX 13 1 Attached Locations of Warning Labels 1 6 Auto zero adjustment 2 5 B Bag On Demand mode 2 5 Base Unit Feeder 13 22 BH 2 6 BH ON 6 113 BH WH 6 112 BLOCK DIAGRAM 13 59 13 60 Bonus Adding 8 3 Booster Hopper 9 11 Booster hopper 2 6 Booster Hopper Drive Unit CCW R 224B 13 41 BS key 3 9 BS key numeric keypad 3 8 C CAL Unit 13 42 CAL Unit CCW R 224B 13 47 CANCEL key 3 8 3 10 CAPS key 3 9 Carrying...

Страница 480: ...ount Range 6 86 Count Set Weighing 8 12 Current Total Output 4 32 Current Total Screen 6 84 D Daily Inspection 10 2 Data Input 3 7 Date Time Setting Screen 6 28 DDU Board P 5439 13 40 Destination ID Tab Screen 6 25 Device Check Tab Screen 6 123 dew point checker 10 4 DF 2 6 DF AMP lower limit 6 106 DF AMP upper limit 6 106 DF time lower limit 6 106 DF time upper limit 6 106 DF weight upper limit 6...

Страница 481: ... 53 Full Open Lock Operation 6 53 Full Open Lock Screen 6 50 Full scale 2 5 FUNCTIONS OF THE OPERATION SCREENS 6 1 G General Precautions 1 3 H Handling Drive Unit 4 36 Head 2 4 Help Function 6 30 HUB Board P 5535 13 11 13 16 I In Output Signal Tab Screen 6 124 Infeed control 2 4 Infeeder 2 4 Infeedr Cntl Set Tab Screen 6 161 Initializing All Machine Setting Items 6 146 Initializing All Preset 6 13...

Страница 482: ...8 M Machine Set Mngr Tab Screen 6 140 Machine Set Pop up Menu 6 114 Machine Tab Screen 6 66 Main Body 9 16 Main Electrical Unit 13 10 Main Electrical Unit CCW R 224B 13 15 Main Electrical Unit 1 13 15 Main Electrical Unit 2 13 19 Main Menu Screen 6 31 Main power switch 2 7 MAINTENANCE AND INSPECTION 10 1 Manual Adjustment Screen 6 115 Master mode 2 5 MAX Count 6 86 MAX Piece Weight 6 86 MAX Weight...

Страница 483: ...Parent 3 Total Wt 6 87 Parent 4 Total Wt 6 87 Parent and Child Mix Weighing 8 2 Parent and Child Weighing 8 2 Password 6 17 Password Set LangSlct Set Tab Screen 6 24 Pattern 1 11 5 Pattern 2 11 8 Pattern 3 11 10 Pattern 4 11 13 Pattern 5 11 14 Pattern 6 11 14 Pattern 7 11 15 Pattern 8 11 15 Pckr Intrlck Set Index Screen 6 156 Pckr Intrlck Set Tab Screen 6 155 Per Head Cmb Participation Data Screen...

Страница 484: ... Radial feeder 2 6 Radial Trough 9 10 Radial trough 2 6 Range 2 5 RCU 2 7 RCU Board P 970 13 6 RCU fan stopped Contact to factory service 11 11 RECHECK ERROR 11 9 Recheck Error 6 87 Reducing Product Change Time 7 7 REGISTERING OF PRODUCTS 5 1 Registration Details Double Weigher 5 2 Registration Details Mix Weigher 5 14 Relay Board P 5506 13 26 13 29 13 32 Relay Unit 13 24 Relay Unit CCW R 224B 13 ...

Страница 485: ...5 7 Setting the Product Mix Weigher 5 22 Setting the Speed Preset 5 10 Setting the Weighed Product 5 25 Setting the Weight Value Double Weigher 5 11 Setting the Weight Value Mix Weigher 5 28 SHIFT key 3 9 Slave mode 2 5 Space key 3 9 Span 2 4 Span Adjustment 10 9 12 24 SPAN ERROR 11 8 Special Precautions 1 5 Specifications of the Device 2 3 STAGGER 2 4 6 112 Standard Specifications 2 3 Start Time ...

Страница 486: ...NS 7 1 Using Feeder Adjustment of Drain Function 7 7 Using Full Open Lock Function 7 8 V Various Parameter Setting index 6 8 Various Parameter Setting Screen 6 148 W WARNING AUTO ZERO ERROR 11 11 COMMUNICATION ERROR 11 11 DETACHED HEAD 11 10 NO RESPONSE 11 10 NO TRANSMISSION 11 10 OVERSCALE 11 10 OVERWEIGHT ERROR 11 11 RECHECK ERROR 11 11 Warning Label 1 6 Warning Label Handling 1 6 Warning Terms ...

Страница 487: ...NDEX Weight Setting Index Screen 6 76 WH 2 6 WH ON 6 113 WH BH 6 112 WH DS 6 112 WH PH 6 112 WP specification 4 5 10 4 10 19 10 20 X X bar Chart Screen 6 89 Z Zero Adjustment 4 16 12 22 Zero Adjustment Screen 6 35 ZERO ERROR 11 5 11 8 ...

Страница 488: ...10 INDEX CCW R 2 B INSTRUCTION MANUAL ...

Страница 489: ...MODIFICATION HISTORY Version Date Part Number Changes 4 Jan 2008 108 6497 39 Descriptions about WP Specification air dryer are added ...

Страница 490: ......

Страница 491: ......

Страница 492: ......

Отзывы: