


Page 9 of 18
2. If you drill through the bumper or any part of the body to route the wires, be sure to install a
rubber grommet in the hole to prevent fraying of the wires at that point.
3. Route the cables (44) from the solenoid to the battery and from the solenoid to the winch,
following the precautions discussed above.
4. Remove the red battery clamp from the red wire and attach the wire to the positive (+/red)
terminal of the battery.
5. Remove the black battery clamp from the black wire and attach the wire to the frame of the
vehicle, creating a secure electrical ground.
Preparing the Wire Rope
1.
The wire rope must be properly coiled under tension to be able to support a load without damage.
2.
Uncoil the wire rope, expect for 5 full warps.
3.
Recoil the rope back into the winch under at least 500 lb. of tension.
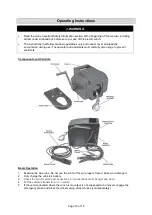
Attaching the Hand Crank
1. Attach the hand crank (18) only when manually rewinding.
2. To attach the hand crank, tighten the clutch first by turning the clutch knob (19) clockwise until
you are able to hand tighten. Remove the outer lock nut and slide the hand crank over the thread
shaft up against the inner lock nut. Secure the hand crank in place with the outer lock nut.
Before Each Use
⚠
WARNING
Inspect winch rope, hook, and slings before operating winch. Frayed, kinked, or damaged winch
rope must be replaced immediately. Damaged components must be replaced before operation.
Wrap the wire rope under 500 lbs. of tension before use. Otherwise, the wire rope may bind
during operation.
Ventilate the area well before and while working on the battery. Explosive hydrogen gas can
accumulate and explode when ignited by a spark or open flame.
Remove all jewelry and metallic objects before working near the battery.
Содержание 54127
Страница 14: ...Page 14 of 18 Parts Diagram...


