The Twin Head Compact Fluorescent Worklight WL552 is suitable for indoor
(ambient temperature 25˚C) or temporary outdoor use. The worklight can be plugged into
a standard power point and has a weatherproof classification of IP44.
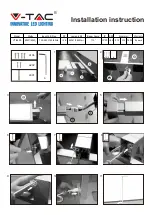
Assemble the worklight as shown in diagram.
To assemble the worklight on a tripod stand, loosen
the locking knob on the tripod and then push down
the black locking bracket until the legs are fully
extended. Tighten the locking knob. Always make
sure the central telescopic pole is vertical for
maximum stability and safety while the outer tube sits
flat on the black metal cap at the bottom and is
secured by a wing knob.
Next mount the cross bar on the metal bracket
attached at the top of the tripod inner pole with a
threaded knob. Ensure that the knob is tight, firmly
holding the assembly together.
Fix the worklight heads to the cross bar using a bolt
and a threaded knob. Ensure that the threaded knobs
are tight, firmly holding the assembly together.
NOTE: Arlec safety adjustment stop prevents
worklight heads from tilting too far forward.
This helps avoid accidental scorching or burning.
Do not remove support bracket from worklight head.
When adjusting the worklight head tilt, tighten the
side lever with finger pressure only, do not over
tighten. While adjusting the lamp head avoid pinching
or bending of the supply cord.
Fix the 'Y' junction of the power cord to the rear of
the crossbar.
The poles of the tripod stand may be raised by
loosening the plastic locking ring (anti clockwise
direction) and extending the sections.
Tighten locking ring (clockwise direction) to hold in
place.
Two locking knobs on the tripod allow height
adjustment up to 1700mm.
WARNING
:
When the worklight is operated outdoors the supply plug must be appropriately covered or located
such that it is subjected to indoor conditions only. Do not point worklight head directly at each
other or on the back of other worklight.
If the external flexible cable or cord of this worklight is damaged:
Contact the Arlec Customer Service Team (Refer to details on back page)
or a similar qualified person in order to avoid hazard.
Tripod legs must be at widest spread for maximum stability.
1. The CFL tube is supplied and packed separately to avoid damage.
2. Ensure that worklight is unplugged from wall socket.
3. Open the worklight housing by releasing the toggle latches.
4. The glass front of the housing will hinge forward and down.
5. Insert the tube in the holder, ensuring that you do not touch the
glass envelope of the tube with bare hands.
6. Close glass front.
7. Your worklight is now ready to use.
Please observe the following do's and don'ts to ensure safe and trouble free use:
DO
use the carry handle to adjust the beam.
DO
keep the worklight out of reach of children when in use.
DO
switch off and allow to cool for a minimum of 10 minutes before storing.
DON’T
stand worklight in pools of water.
DON’T
handle with wet hands or operate when standing on wet surface.
DON’T
allow power cable to come into contact with front of worklight or housing.
DON’T
allow overhanging shrubs or foliage to come into contact with worklight.
DON’T
place or operate the worklight closer than 5 metres to a swimming pool or spa.
DON’T
operate the worklight with the front of housing opened.
INTRODUCTION
3
INSTaLLING CFL TUBe
DO'S aND DONT'S
Easy adjustment
of Lamp Head
Toggle
Latch
Locking
Knob
Carry
Handles
Tighten
Locking
Rings to
hold the
poles in
place
OPeRaTION
2
Adjusting Wing
Knob
Crossbar
Metal Cap
Locking
Bracket
WL552_Instructions REV.indd 3-4
28/02/11 3:17 PM