background image

For more detailed information, visit: www.irobot.com

21


Sending Schedules

After setting a cleaning time, you need to send the schedule to Roomba 
and the scheduling Virtual Walls.  

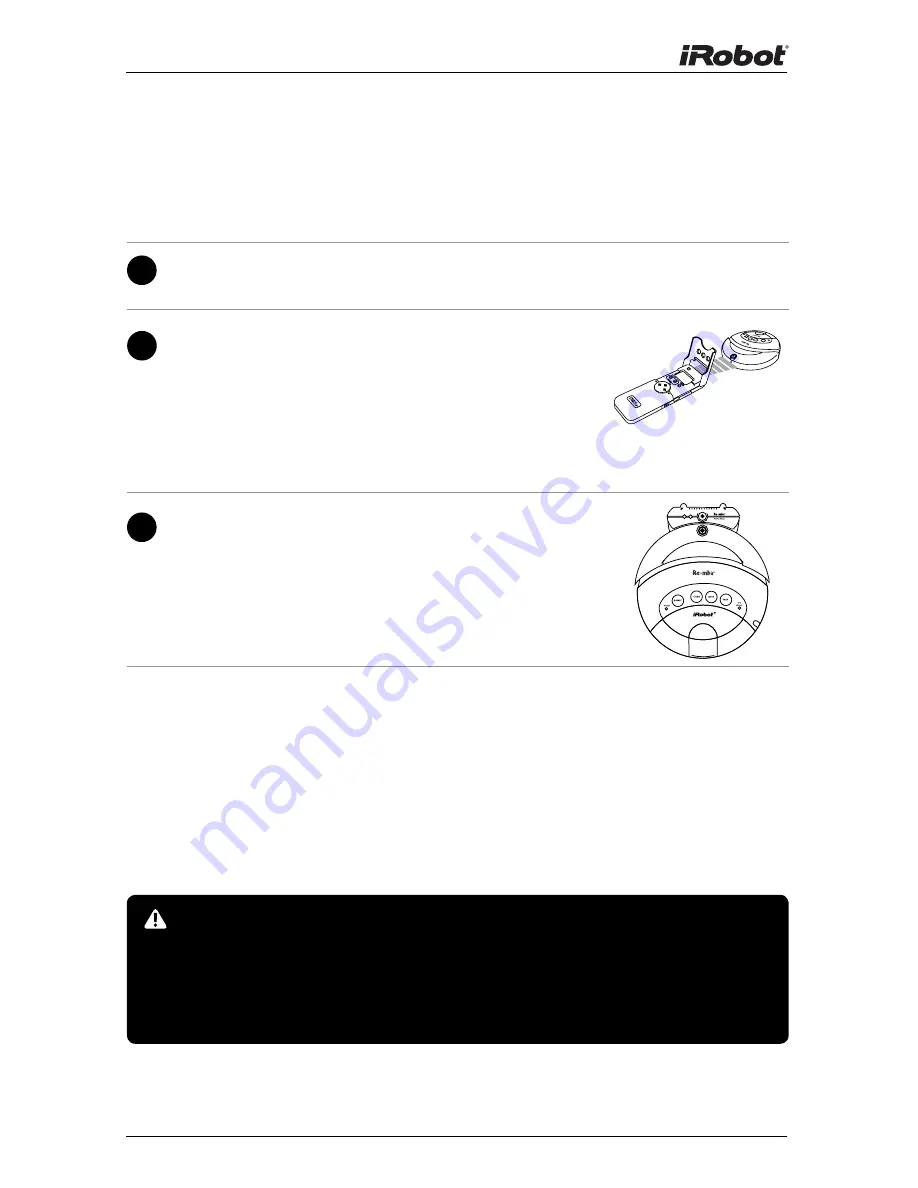
To send a schedule to your Roomba:

1

   Power on Roomba with the Power button.

2

   Open the Scheduler Remote Control’s front  

cover, point the remote at Roomba and press 
Send All. The display will flash to indicate the 
remote is sending the schedule. Roomba will  
play a song to indicate the schedule is received 
and the Status light will begin blinking.

3

   Make sure Roomba is on the Home Base or in  

the center of the area you want to clean. Roomba 
will clean at the time you have scheduled.  
 
Roomba’s Status light will blink amber to  
indicate that Roomba is scheduled to clean.

  To accept a schedule, Roomba must either be at least 8 feet from the Home 

Base or charging on the Home Base and Roomba’s power must be on. 
iRobot Scheduler, Virtual Walls and Home Base all operate using invisible 
infrared beams. If used in the same area, Roomba may see multiple infrared 
signals and not respond to commands. Make sure all Virtual Walls are turned 
off when using Scheduler.

Содержание Discovery/400 series

Страница 1: ...Discovery 400 series Owner s Manual...

Страница 2: ...ons maintenance tips video demos live chat and more Get product updates and other valuable information Be among the first to find out about new robots exclusive discounts and special promotions When y...

Страница 3: ...accessory to keep Roomba cleaning where you want it Use your Roomba frequently Battery Life To extend Roomba s battery life and keep Roomba cleaning at peak performance Always keep Roomba plugged in w...

Страница 4: ...age and Charging 13 14 Virtual Wall optional accessory for select models 15 16 Home Base optional accessory for select models 17 Remote Control optional accessory for select models 18 Scheduler Remote...

Страница 5: ...n visit www irobot com 5 Cliff Sensor Openings Edge Cleaning Side Brush Vacuum Inlet Replaceable Caster Wheel Battery Flexible Brush Brush Guard Release Tabs Brush Bearings Brush Guard Main Brush Brus...

Страница 6: ...6 iRobot Roomba Owner s Manual iRobot Roomba Anatomy Power and Clean Button Virtual Wall Sensor Bin Release Battery Charger Socket Serial Port Handle Bin 4000 Model Series...

Страница 7: ...m 7 iRobot Roomba Anatomy User Interface TM Power and Clean Button Virtual Wall Sensor Bin Release Battery Charger Socket Serial Port Handle Bin 410 Model Series Spot Cleaning Button Cleaning Button S...

Страница 8: ...Roomba Anatomy User Interface 411 419 Model Series Virtual Wall Sensor Bin Release Battery Charger Socket Serial Port Handle Spot Cleaning Button Cleaning Button Max Cleaning Button Status Light Dirt...

Страница 9: ...www irobot com 9 iRobot Roomba Anatomy User Interface 420 434 Model Series Battery Charger Socket Serial Port Bin Release Virtual Wall Sensor Handle Power Button Spot Button Cleaning Button Max Clean...

Страница 10: ...a Owner s Manual User Interface 435 440 Model Series iRobot Roomba Anatomy Virtual Wall Sensor Bin Release Button Battery Charger Socket Serial Port Bin CLEAN Power Button SPOT Button SPOT Button CLEA...

Страница 11: ...om and navigate around furniture and obstacles Room Crossing Roomba crisscrosses the room to ensure full cleaning coverage TIP For most efficient cleaning clear your floor of clutter and use a Virtual...

Страница 12: ...ly to different floor types Roomba automatically senses stairs and other cliffs Roomba is not recommended for shag carpet or rugs with tassels 1 Side brush sweeps along edge of walls and into corners...

Страница 13: ...Recharge Roomba as soon as possible Waiting several days to recharge Roomba can damage the battery TIP For storage off the charger remove the battery from Roomba and store in a cool dry place Cleanin...

Страница 14: ...g Use the chart to determine that status of the battery CLEAN Power Indicator Light Battery Status Solid red Battery empty Amber pulse Charging Solid green Fully charged Quick amber pulse 16 hour refr...

Страница 15: ...reases creating a cone shaped area which Roomba cannot pass The Virtual Wall also creates a halo of protection around itself preventing Roomba from getting too close Slim Virtual Wall models 400 420 T...

Страница 16: ...epeatedly to indicate it is on When battery levels are low the Virtual Wall blinks repeatedly twice to indicate that it needs new batteries To save battery power switch the Auto Virtual Wall to Off Wh...

Страница 17: ...Base Location You should position the Home Base on a hard level surface and in an area where Roomba has a clear path to return to the dock at the end of a cleaning cycle If Roomba is unable to dock on...

Страница 18: ...Original Remote Control SPOT Roomba focuses on intensely cleaning a local area CLEAN Roomba calculates the room size and adjusts its cleaning time appropriately MAX Roomba runs until battery is deplet...

Страница 19: ...n the Scheduler Remote Control s front cover The display will turn red and read SET TIME 2 Press New Save and Delete simultaneously The display will change to read SUN 12 00 3 Press to change the day...

Страница 20: ...schedule the hour To select AM or PM simply scroll past 12 00 6 Press to navigate to the minute field 7 Press to schedule the minute 8 Press to navigate to the Once Weekly field 9 Press to choose Onc...

Страница 21: ...ule is received and the Status light will begin blinking 3 Make sure Roomba is on the Home Base or in the center of the area you want to clean Roomba will clean at the time you have scheduled Roomba s...

Страница 22: ...o send the schedule The display will flash indicating that the remote is sending the schedule to the Virtual Wall 3 The Virtual Wall s Scheduled light will blink to confirm that it is scheduled to aut...

Страница 23: ...e the to change the time day or frequency 5 Press New Save to save the new time 6 Send the updated schedule to Roomba and the scheduling Virtual Walls Deleting Schedules 1 Open the Scheduler Remote s...

Страница 24: ...done after every cleaning cycle Also be sure to regularly check the front caster wheel for hair build up Replace filter every 2 months Tip If you notice Roomba picking up less debris from your floor...

Страница 25: ...hair in Roomba s brushes and bearings can permanently damage Roomba Inspect brush bearings regularly 3 Clean Roomba s brushes A Remove brush guard by lifting both yellow tabs E Use the included cleani...

Страница 26: ...ave failed or are blocked Turn over Roomba and clear any debris that might be caught underneath the front bumper in the cliff sensors You can also use compressed air to clean them out 6 Wheel obstruct...

Страница 27: ...to be cleaned contains a balcony a physical barrier should be used to prevent access to the balcony and ensure safe operation Always remove the battery before long term storage or transportation Roomb...

Страница 28: ...bot Customer Care If you have questions or comments about Roomba please contact iRobot before contacting a retailer Please visit our web site at www irobot com for support tips frequently asked questi...

Отзывы: