background image

Safety

Additional

Information

Precautions

6-

6-2

"

Avoid dropping or impacting the player.

The player is designed to operate while walking or running, but dropping or excessively impacting

the player maybe cause damage.

"

Avoid contacting the player with water.

Damage to the internal parts of the player may occur if the player comes into contact with water. If

your player gets wet, dry the outside with a soft cloth as soon as possible.

"

Do not leave the player in a location near heat sources, or in a place subject to direct sunlight, 

excessive dust or sand, moisture, rain, Mechanical shock, unleveled surface, or in a car with

its windows closed.

"

Remove the battery if player is unused for long periods of time.

Battery left in the player for a long time can corrode and damage the device.

"

All data stored on this device may be erased by a excessive impact, a thunder or an

electricity failure, etc. on the device.

The manufacturer does not warrant and will not be held responsible in any way for damages or loss

of data, including loss of data stored on this device, resulting from a excessive impact, a thunder or

an electricity failure, You will be responsible for safe-guarding all data stored on this device.

"

Road Safety 

Do not use headphones/earphones while driving, cycling, or operating any motorized vehicle. 

It may create a traffic hazard and is illegal in some areas.  It can also be potentially dangerous to

play your headsets at high volume while walking, especially at pedestrian crossings. 

You should exercise extreme caution or discontinue use in potentially hazardous situations. 

"

Preventing hearing damage

Avoid using headphones/earphones at high volume. Hearing experts advise against continuously

loud and extended play. If you experience a ringing in your ears, reduce volume or discontinue use.

"

Consideration for others 

Keep the volume at a moderate level.  This will allow you to hear outside sound and to be

considerate of the people around you.

On headphones andearphones

Trouble Shooting

6-1

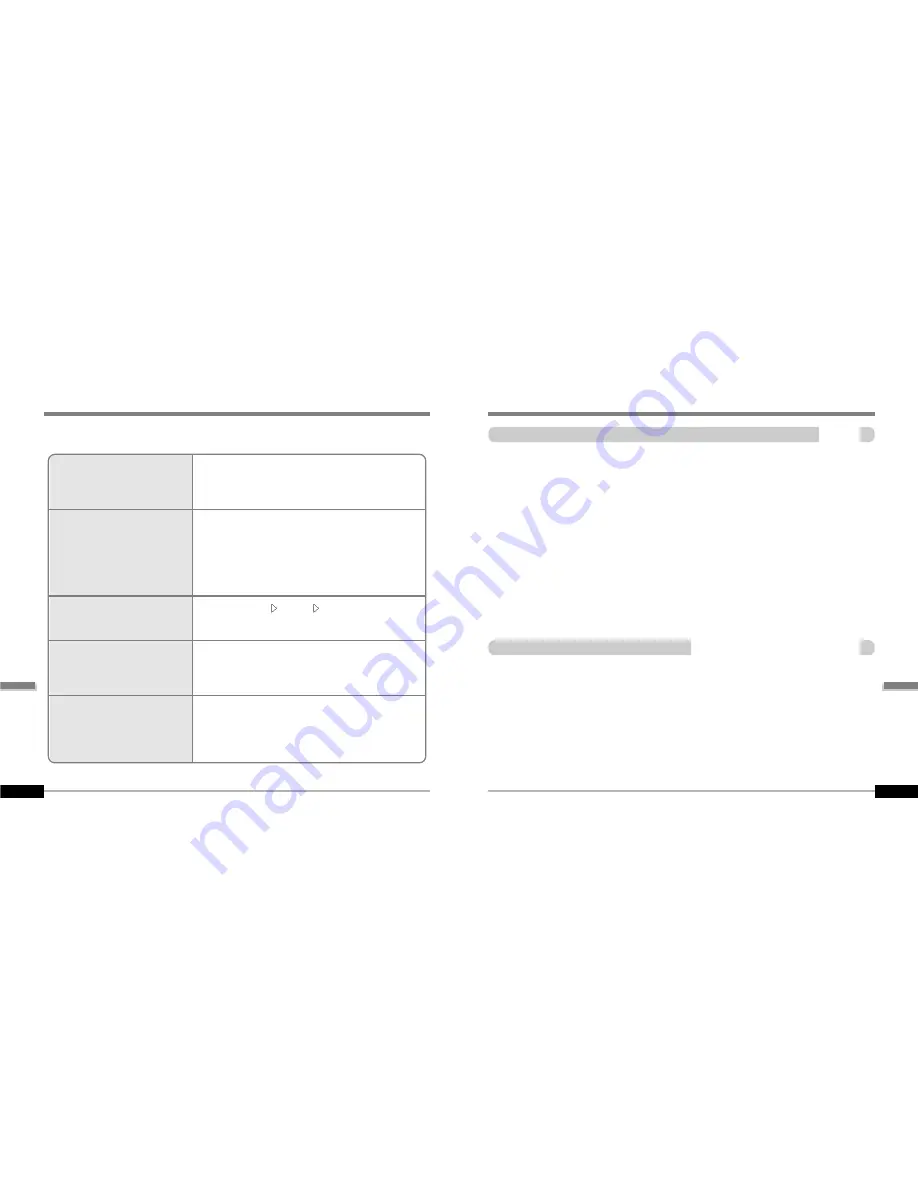
Should any problem persist after you have checked these symptoms, consult your iRiver
dealer or contact support at www.iRiver.com.

No Power

No sound or distortion
during playback.

Characters in LCD are
corrupted.

Poor FM Reception.

Failed download of MP3 file

"

Check whether the HOLD switch on the player is ON 

(Switch to OFF position)

"

Check the condition of the battery.

"

Insert a fresh battery.

"

Check whether VOLUME is set to "0".   

"

Connect the earphones plug firmly. 

"

Check whether the plug is dirty. Clean the plug with a 

dry and soft cloth.

"

Corrupted MP3 or WMA files may make a static noise

and the sound may cut off. Listen to your  files on the PC
to see if they are corrupted.

"

Check out Menu  General 

Language and confirm 

whether the right language has been selected.(Refer to
page 5-15)

"

Adjust the position of the player and earphones.

"

Turn off the power of other electric devices near the player.

"

The Earphone cord functions as the antenna, they must

be plugged in for best reception.

"

Check the condition of the battery.

"

Check the connection between your computer and the

player to ensure that the cable is secure.

"

Check the Manager program to make sure it is operating.

"

Check whether the player’s memory is full.

Additional

Information

Содержание iFP-1000 Series

Страница 1: ...tp www iRiver com HardwareInstructionManual Thank you for your purchase Please read this manual carefully before using your new player http www iRiver com DigitalAudioPlayer recorder Camera FMTuner Mo...

Страница 2: ...terference in a residential installation This equipment generates uses and can radiate radio frequency energy and if not installed and used in accordance with the instructions may cause harmful interf...

Страница 3: ...arted Internet Features About power supply 1 1 1 2 1 3 This manual covers the installation and use of the player hardware For details regarding the software operation including transferring music to t...

Страница 4: ...f their respective companies or organization All other product names may be trademarks of the companies with which they are associated 1999 2004 iRiver Limited All rights reserved Multi Codec Player S...

Страница 5: ...ayer until it locks into place The charging time Approx 2 5 3 hours At full discharge Note The player will charge even if it is turned off A charging indicator light will illuminate while the player i...

Страница 6: ...nt View Rear View LCD screen 2 1 2 2 2 3 Getting started 1 5 This manual covers the installation and use of the player hardware For details regarding the software operation including transferring musi...

Страница 7: ...Earphone USB connection port I Previous Fast Reverse I Next Fast forward Volume Enlarge Up LCD Screen NAVI MENU Microphone Camera Charging indicator Volume Reduce Down Rechargeble Battery Hold Neck st...

Страница 8: ...Visualization Clock Status Current bar Folder icon ASF ASF IRM IRM MP3 MP3 OGG OGG WMA WMA According to file type displayed as follows IRM iRiver Rights Management iRiver Rights Management is a digit...

Страница 9: ...Manager Program Download latest versions of drivers and iRiver Music Manager at www iRiver com Insert the Installation CD into the CD ROM drive The following screen appears after inserting the CD If...

Страница 10: ...on the PC USB port on the iFP 1000 Series USB cable Type A Type B Turn on the player by pressing the button marked STEREO Lift the protective cover over the USB port and connect the USB cable to the p...

Страница 11: ...ter 1 1 3 3 4 4 After installing iRiver Music Manager from the CD and connecting the player to your PC Found New Hardware screen is displayed 2 2 The computer will automatically search to find your ne...

Страница 12: ...FM station Digital Camera Viewing to picture My Album 4 1 4 9 4 10 4 15 4 19 4 23 Click the OK after confirming the hardware to remove 1 1 3 3 4 4 Select the Safely Remove hardware after clicking the...

Страница 13: ...olume Push NAVI MENU button to the VOL direction to increase volume Push NAVI MENU button to the VOL direction to decrease volume Adjusting the volume Changing functions Press and hold MODE button to...

Страница 14: ...stop recording or shot Long Click Click Navigation Menu Press NAVI MENU button and find the desired music file by pushing NAVI MENU button to VOL or VOL direction To play the files press the NAVI MEN...

Страница 15: ...ick Click Push Long Click Setup start Select Settings Click Setting the camera To flip a picture Camera zoom in zoom out Push Zoom in Zoom out Selecting the FM stereo mono Press the STEREO PLAY STOP b...

Страница 16: ...will enter the menu system 1 Scroll between menus Push NAVI MENU button to the or diretion 2 Select sub menus Push NAVI MENU button to the VOL or VOL diretion 3 Select Function Press the NAVI MENU bu...

Страница 17: ...s NAVI MENU VOL button to confirm Push the NAVI MENU button to the or direction to select FM frequency 1 1 2 2 3 3 1 2 Click Push Push Push To increase To decrease Push Previous Next To select music f...

Страница 18: ...in sequential order It only activates while the player is not in PRESET mode Auto store Long Click 2 2 Press NAVI MENU VOL button to cancel preset mode Press and hold MEMORY A B button Automatically s...

Страница 19: ...ed at preset mode 1 1 2 2 The next station will appear when station delete is completed Push the memory button if you also want to delete the next station Press and hold the MEMORY EQ A B button PRESE...

Страница 20: ...The recorded file is saved as TUNER000 REC It is saved in the RECORD folder Recorded REC files can be converted to MP3 files using iRiver Manager Refer to iRiver Music Manager Instruction Manual To p...

Страница 21: ...cording voice Long Click Click Push Click Click Click Pause Restart Click Click Press the MODE REC button to stop recording Note After stopping a recording starting again will create a new voice file...

Страница 22: ...L direction to zoom in or zoom out X1 X2 X3 6 6 Press MEMORY EQ A B button to take a picture Press A B button to flip a picture to flip a picture Long Click Push Zoom in Zoom out to flip Click A click...

Страница 23: ...iew the available settings 1 1 2 2 3 3 4 4 I Push NAVI MENU VOL to the I or Idirection to select desired setting 7 7 Press PLAY STOP STEREO button to exit 5 5 6 6 640x480 I Push NAVI MENU VOL to the I...

Страница 24: ...ush MEMORY EQ A B button to enlarge or to reduce a picture x1 5 x2 0 x3 0 x1 0 Push MENU NAVI button to the VOL VOL or I Idirection to shift the enlarged point Push MENU NAVI button to the I or Idirec...

Страница 25: ...5 13 5 15 5 17 5 19 5 22 5 24 5 27 Deleting a picture Press and hold NAVI MENU button after selecting the picture to delete My Image 1 1 2 2 Push MENU NAVI button to the or direction to select Yes or...

Страница 26: ...n Click Push Select the file Scroll up Scroll down Select the track 4 4 Select folder or scroll to upper folder Upper folder Scroll up Select the folder or file Scroll down 3 3 Click Push or Select fo...

Страница 27: ...te You can select EQ mode in accordance to the playing music genre Press and hold the MEMORY EQ button to display the current EQ setting Then press the button repeatedly to chose a different EQ Long C...

Страница 28: ...nd stop Play a single track repeatedly Skip forward will select a new random track to play repeatedly Randomly play all tracks in the folder and stop Randomly play all tracks in the folder repeatedly...

Страница 29: ...een programmed already the current program list will display Program No File name Press NAVI MENU button then select the music to program by using the VOL VOL switch 1 1 2 2 Up Down Push Press the MEM...

Страница 30: ...the MODE REC button after selecting the file to be deleted using the MEMORY EQ button at stop mode The program list is automatically changed Exit Push Click Delete Convenient functions Playing in a fa...

Страница 31: ...the function settings Menu Configuration 5 12 Customizingthefunctionsettings Menu Convenient functions Configuration 5 11 Functions are subject to change with different firmware versions Users can co...

Страница 32: ...select menu Click NAVI MENU button Long Click Previous Next Push Click You can set cancel or change sub nenu by pushing the NAVI MENU button toward or or VOL VOL Push MENU NAVI button to the or direct...

Страница 33: ...enus to the original factory settings The button s operation order is as below Click NAVI MENU select default menu or VOL select YES Press NAVI MENU select YES Initialization Support 39 languages Song...

Страница 34: ...the track or the free memory on your player Normal display elapsed time Remain display remaining time On Display track with ID3 tag information Off Display track with file name Adjust scroll speed by...

Страница 35: ...played Once powered off the sleep timer will reset to 0 min Sleep Power Off Stop Power Off Alarm Record Select Set Alarm Set the current time Push the NAVI MENU switch toward I or Ito select the item...

Страница 36: ...2x 4x 6x OFF Skip doesn t activate 10 Skip 10 tracks at time DIRECTORY Skip to previous or next folder This defines the operating method of short or long press of or switch FF RW Skip FF RW Scan Speed...

Страница 37: ...10 Record pause time second slider Set the number of seconds of silence to record before pausing 1 10 Use this setting to playback audio files while the player is attached to your PC OFF The player wi...

Страница 38: ...he range is 1 60 seconds You can input your name or custom text Select the character by using and switch and press Navi Menu button to input the character To delete the character press MODE button To...

Страница 39: ...D sound minimum Natural and Maximum You can extend 3D sound by selecting Bass Boost or 3D EQ You can also adjust the level of 3D sound with the or lever Select DBE or 3D EQ with the Navi Menu button Y...

Страница 40: ...d outputs the same level at both earphones ON Limit the control of equalizer frequency to prevent distortion of sound OFF You can enjoy the original sound though distortion of sound may occur 0 You ca...

Страница 41: ...Contents Additional Information 6 Convenient functions 5 31 Trouble shooting Precautions Accessories Specifications 6 1 6 2 6 3 6 4 Additional Information...

Страница 42: ...treme caution or discontinue use in potentially hazardous situations Preventing hearing damage Avoid using headphones earphones at high volume Hearing experts advise against continuously loud and exte...

Страница 43: ...mm 63 g Battery included Rechargeble Battery 20 Hz 20 KHz L 18 mW R 18 mW 16 Ohm max Volume L 12 mW R 12 mW 32 Ohm max Volume 90 dB MP3 MPEG 1 2 2 5 Layer 3 WMA OGG ASF 8 Kbps 320 Kbps OGG 44 1KHz 96K...

Страница 44: ......

Отзывы: