background image

User Guide

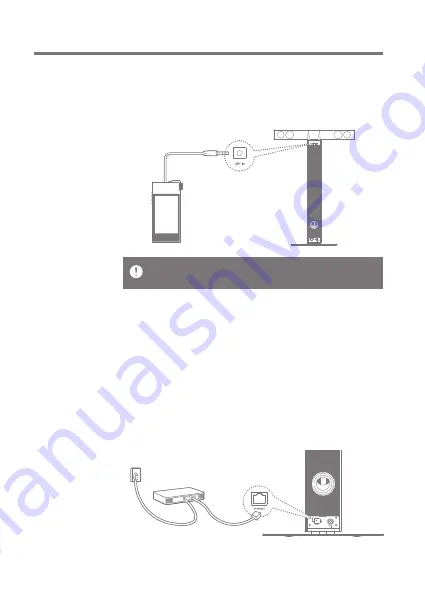
Connecting an External Device to the OPTICAL Port

1. Connect an external device to the [OPTICAL IN Port] 
  using an optical cable.

Gently insert the cable into the port. Avoid using excessive force.
Do not move the product while a cable is connected.

Connecting to a Network

1. Connect the appropriate Internet-ready network cable 
  (ADSL, VDSL, cable modem, wired/wireless router, etc.) 
  to the [LAN Port] on the back of the product, or connect 
  wirelessly to an access point (AP) that provides Wi-Fi access.
2. When connected to a network, the Connect Library menu 
  is activated on the Home screen. You may check the 
  network connection status from the Settings menu.

Getting Started


14

Содержание Astell & Kern AKT1

Страница 1: ...INSTRUCTION BOOK AKT1 User Guide...

Страница 2: ...ecting Music MQS Streaming AK Connect App Listening to Music Listening to Internet Radio Purchasing Music from the Store Connecting an External Device Settings Connecting to a Network Equalizer Setup...

Страница 3: ...tomer support Water damaged devices will be repaired for a fee regardless of warranty status but the device may not be repairable Do not attempt to disassemble repair or modify the product iRiver is n...

Страница 4: ...ug from the outlet before attempting to clean the power plug pins or mounting surface Observe the following when handling the power cord Do not damage the power code Do not attempt to modify the cord...

Страница 5: ...concentrations of dust oil or smoke e g kitchen Areas with extreme temperatures Normal operating temperatures 5 C 40 C 23 F 113 F Areas with rapidly fluctuating temperatures Areas exposed to strong v...

Страница 6: ...to control or limit the use of digital media content Specially encoded or encrypted files cannot be played on this product Do not disconnect a USB device while a file on the device is being played Th...

Страница 7: ...ionality Warranty Card The Warranty Card is required for customer and technical support Do not misplace the card User Guide The User Guide can be downloaded from the Astell Kern website http www astel...

Страница 8: ...D Card Slot Woofer Port Woofer AUX Port USB HOST Port OPTICAL IN Port Power Volume Key Back Button Home Button LCD Touchscreen Power Input LAN Port Getting Started 07 The AKT1 requires assembly of the...

Страница 9: ...the user to the main menu microSD Card Slot A microSD card can be inserted and music files can be selected for playback USB HOST Port A USB storage device can be connected and music files selected for...

Страница 10: ...bove the stand 2 Align the bolt holes on the main unit and base and secure the base to the main unit using the supplied T wrench and bolts 3 Connect the power cord to the adapter and then connect the...

Страница 11: ...duct and the grill on the main unit Please note that any impact or shock during assembly may damage the product User Guide 4 Align the connection points on the stand and behind the LCD screen and then...

Страница 12: ...r connecting the power cord to the product insert the power plug into an available outlet To avoid malfunction or damage to the device only use the power cord supplied with the product Unplug the powe...

Страница 13: ...ay damage the device or prevent it from being removed Notes on removing a microSD card Be sure to safely unmount and remove the microSD card from the device Not following the proper procedure may corr...

Страница 14: ...e separate drivers or the creation of multiple drives multi card readers etc may not be supported Some USB devices that require a separate power supply external HDD etc may not function properly Conne...

Страница 15: ...cable is connected Connecting to a Network 1 Connect the appropriate Internet ready network cable ADSL VDSL cable modem wired wireless router etc to the LAN Port on the back of the product or connect...

Страница 16: ...ower code while the firmware update file is being upgraded If an error occurs or the notice in the Notification Bar disappears during an upgrade you can download the Firmware Upgrade again through Set...

Страница 17: ...lect the appropriate time zone from the world time settings screen and then press Basic Operations Using the LCD Touchscreen 1 This device features an LCD touchscreen that allows you to perform operat...

Страница 18: ...Connect to a network from the network settings screen Wired network The device will automatically connect to your network when a LAN cable is connected Wireless network To connect to a wireless networ...

Страница 19: ...User Guide Refer to page 42 for more information on connecting to a network 5 Press Start after completing the network setup to begin using the AKT1 Using the Device 18...

Страница 20: ...User Guide 1 Scroll through a list by dragging Down Up Up Down on the screen Moving up down in the list 1 Press to return to the previous screen Previous Screen Using the Device 19...

Страница 21: ...Home Screen Connect Library You can select other storage devices on the same network as the AKT1 including a PC NAS AK500N and AK380 Connect Speaker Set the sound output to the AKT1 on a product such...

Страница 22: ...t music for playback through the AKT1 Optical Connect an external device to the AKT1 via an optical cable and touch the Optical menu to output sound through the AKT1 Store Use the Groovers Store Setti...

Страница 23: ...creen Displays bitrate and sampling frequency data Song title information File name is displayed when ID3 metadata is unavailable Artist name Displays album covers Indicates song duration Previous Scr...

Страница 24: ...se the current song Short press Previous song Long press Rewind the current song Set the repeat mode Set the playback mode Indicates the song s total duration Short press Next song Long press Fast for...

Страница 25: ...splay its database contents If the device connected to Connect Library supports the AK database the contents will be automatically sorted according to Songs Artists Albums Genres and Folders Press at...

Страница 26: ...he microSD card Refer to page 12 for more information on connecting a microSD card Press at the top of the screen to display the current playback screen Selecting Music on a USB Storage Device 1 Conne...

Страница 27: ...Kern website and download the MQS Streaming Server installer that corresponds to your operating system http www astellnkern com Support Download 2 Run the downloaded installer and follow the on screen...

Страница 28: ...on the AKT1 3 Music contained in the shared folder set in the MQS Streaming Server can be played in real time on the AKT1 Installing the AK Connect App 1 Enter akconnect in the search field of the Goo...

Страница 29: ...ding on wireless network conditions Setting the access point to 802 11 n is recommended We strongly recommend using a wired network environment when streaming MQS music Connecting to a Library 1 Selec...

Страница 30: ...Play Stop and Volume buttons NowPlaying Displays a list of songs currently playing Playlist Displays the playlist Songs can be added or removed Library Select from an external device with the songs yo...

Страница 31: ...sting playlist New Playlist Add the selected file to a new playlist NowPlaying List Add the selected file to the current playlist 2 Select the song you want to add and then press ADD TO to add the son...

Страница 32: ...er to output sound through the speaker App Usage Example Select the AKT1 from the AK Connect app s Speaker menu Specify NAS in the Library menu and then select the desired song to play back music thro...

Страница 33: ...bar to the desired location during playback Press during playback to cycle through different repeat modes Repeat the entire playlist Repeat the current song Disable repeat mode Press during playback...

Страница 34: ...vided by vTuner 1 Select vTuner from the Home screen to display the Internet Radio home screen 2 Select the desired item from the Internet Radio home screen to display a list of available stations 3 S...

Страница 35: ...creen to display the Internet Radio home screen Press at the top right corner of the screen to display the search field Enter search terms and press to search for and display a list of Internet radio...

Страница 36: ...de within the store for detailed instructions 3 Purchased music is downloaded to a connected USB storage device or microSD card You cannot download music unless a USB storage device or microSD card is...

Страница 37: ...may be different for each individual Bluetooth device Always refer to the respective instruction manual for details Maintain a distance of 20 cm 8 in between the AKT1 and the paired Bluetooth device...

Страница 38: ...rs underground etc affect performance Connecting via AUX Port 1 Connect an external device to the AKT1 s AUX Port using an AUX cable 2 Select the AUX menu item from the Home screen and set to ON 3 Mus...

Страница 39: ...settings The device will automatically connect to your network when a LAN cable is connected To connect wirelessly disconnect the LAN cable and set up the network again Refer to page 42 for more info...

Страница 40: ...SD playback Using the equalizer may negatively affect device performance Refer to pages 43 44 of the manual for more information on using the equalizer You can change the device name by using the on s...

Страница 41: ...nt date and time Date and Time Select a language English Korean Japanese Chinese Simplified Traditional German French and Russian Language Set a suitable keyboard for the selected language Keyboard Se...

Страница 42: ...ion device name firmware version USB storage device capacity and microSD card capacity System Information Revert all user settings back to their original values Default Setting Storage capacity is dis...

Страница 43: ...ect wirelessly disconnect the LAN cable You will not be able to wirelessly connect to the your network if additional authentication is required e g web browser authentication etc Channels 1 through 11...

Страница 44: ...its default settings Equalizer Setup Equalizer Setup 1 Enable the equalizer menu from Settings Equalizer 2 Press USER EQ at the top of the screen and select ADD 3 Enter a name for the equalizer and th...

Страница 45: ...evice 44 Deleting an Equalizer 1 Press next to the desired EQ setting Press YES to complete process Renaming an Equalizer 1 Select next to the desired EQ setting and then enter a new name 2 Press OK t...

Страница 46: ...or benzene Avoid extended contact with rubber and plastics Do not spray the surface with volatile substances such as insecticides Notes Check for solutions to common problems 1 The device won t turn...

Страница 47: ...ack or a specific file causes instability The following may occur due to the condition of a file Playback is unstable or difficult The device may not function properly The file may sound different fro...

Страница 48: ...les are not based on actual data iRiver has no intention to be associated with any company institution product person or incident through this instruction manual and no such inference should be made I...

Страница 49: ...d is adding new complementary features and will continue to apply new technologies in the future All specifications are subject to change without prior notice There is no warranty against data loss du...

Страница 50: ...C WMA MP3 OGG APE AAC ALAC AIFF DFF DSF FLAC WAV ALAC AIFF 8 192kHz 8 16 24bits per Sample DSD64 1bit 2 8MHz DSD128 1bit 5 6MHz Wi Fi 802 11b g n 2 4GHz Ethernet 10 100 1000Mbps DLNA UPnP BT3 0 with a...

Отзывы: