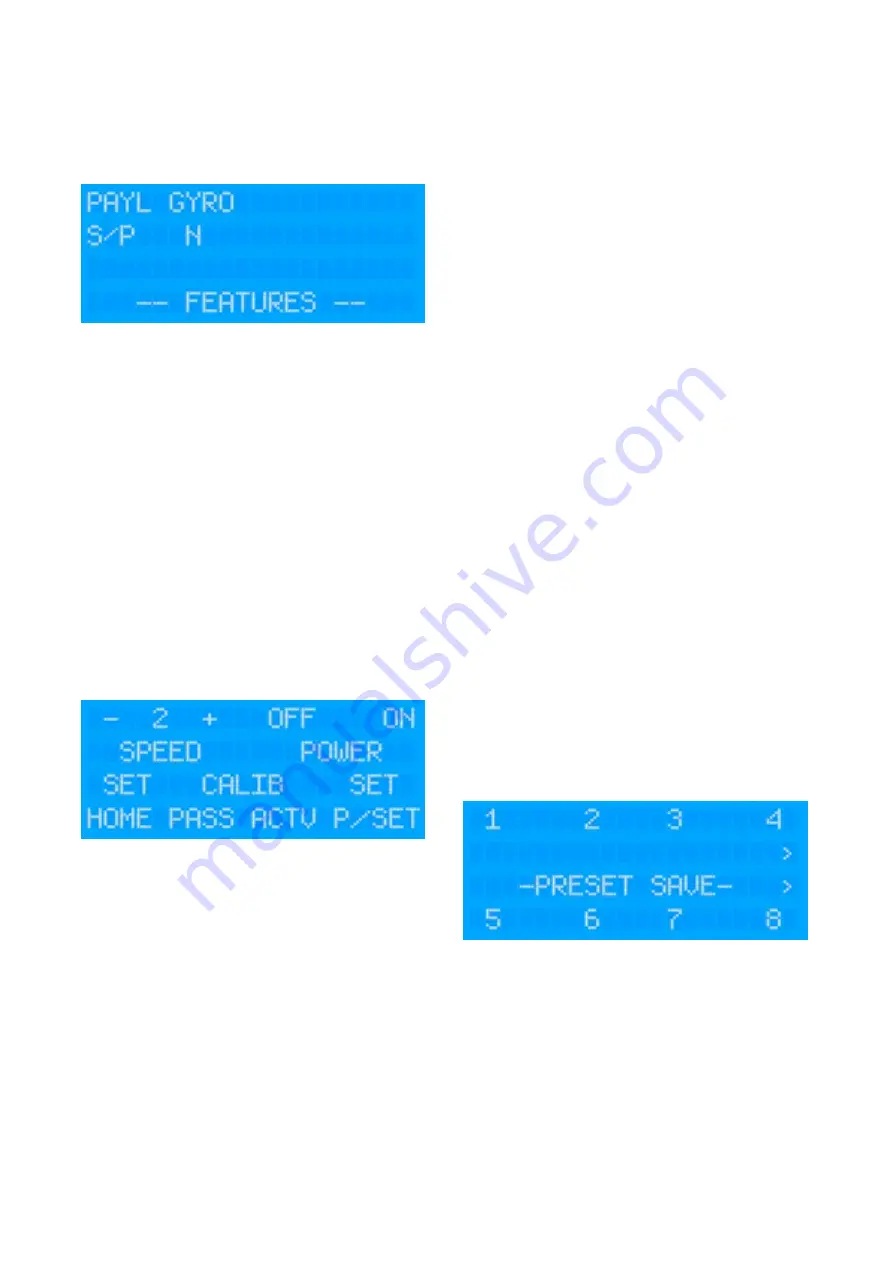
FEATURES (FEAT)
The features menu should only be used on initial installation and
is used to determine which controls are displayed. This will be
factory set so you shouldn
ʼ
t need to change settings, but an
explanation of the current features is listed below:
Payload Select (PAYL)
Determines whether the camera is single payload (IRIS290 /
IRIS390) or dual payload (295 / 395) in order to display the
appropriate controls.
GYRO
Determines whether the camera features Gyro stabilization in
order to display the gyro specific controls.
To select any of the features above, toggle the keys until the
appropriate value is shown.
Incorrectly setting these features will merely display functions on
the controller that will have no effect.
SET MENU
From the SET menu, user presets and a home position can be
stored and the camera can be sent into Standby Mode and be
told to Wake up (Power Off/On). You can also set the camera
speed and re-calibrate the thermal camera image (NUC).
SPEED
Sets the camera control speed from 1 (slowest) to 3 (fastest).
Standby / Power Mode
From the SET menu, select POWER OFF to send the camera
into Standby Mode. This will switch off the video feed and tilt the
camera down so that the lens windows look into the housing
cradle in order to protect the front face of the camera. To
reawaken the camera, select the POWER ON key. This switches
on the video and sends the camera to the Home position.
SET HOME
Sets the cameras home position.
Move the camera to your desired position (usually looking
straight forward) and press SET HOME. The camera can then
be sent to the HOME position from the main Menu.
Camera Calibration
Although the thermal camera core automatically calibrates itself
every couple of minutes, from time to time, especially in hot
temperatures or in conditions of low thermal contrast it may be
desirable or necessary to perform a manual calibration.
There are two levels of manual calibration available, called
Passive or Active:
Passive:
Also referred to as NUC
ʼ
ing (pronounced nuking), this is the
standard method of calibration. Usually required in low thermal
contrast conditions.
Active:
Active calibration can be used to improve the image if the
camera temperature is high. Once selected, the camera will tilt
down into it
ʼ
s standby position and operate it
ʼ
s shutter. This
calibrates the thermal sensor to a
ʻ
flat
ʼ
external image. Once the
shutter has operated the camera will tilt back up to it
ʼ
s previous
tilt position.
To calibrate the camera select the desired function (PASS or
ACTV) from the SET menu.
User Presets
The camera has a built in memory that can be used to store up
to 100 user
ʻ
preset
ʼ
positions. A preset allows you to move the
camera to a favorite or important position and learn that position
so that the camera can be instructed to move at top speed to
that position at the touch of a button. For example, you may
want to point the camera so that it
ʼ
s facing directly aft so you
can take a look at what
ʼ
s coming up behind you. By saving this
position as a Preset, you can send the camera back to this
position immediately by recalling the preset. Presets can also be
used to form
ʻ
Tours
ʼ
, where the camera can be instructed to step
through each preset within the Tour in sequence with a pre-
determined dwell time between each position.
User presets are numbered 100-199. Usually the controller you
are using will have the ability to SET a Preset to learn the
position and then CALL a Preset to send the camera to that
position. This will depend on the model of controller you are
using. Consult the user guide of your controller for details. The
IRIS595 controller allows you to set and recall 16 presets as
described below:
Set Presets
To set a user preset, first move the camera to the desired
position. Next, from the SET menu select PRESET. A list of
presets labelled 1~8 will be presented. For presets 9~16, nudge
the joystick right. Select the preset number you wish to store.
You preset will now be saved in that memory position and you
will be exited back to the Home screen.
Call Presets
From the MENU screen select the PRESET option. You will now
be presented with a list of presets 1~8. For presets 9~16 nudge
the joystick right. Select the desired preset and the camera will
move at full speed to the position stored in memory. If there is
no position stored in memory the camera will not respond. To
return to the Home screen nudge the joystick up.
Содержание 595
Страница 1: ...v3 00 04 06 15 595 IRIS595 Installation Manual ...
Страница 11: ...10 01 Notes Continued ...


