


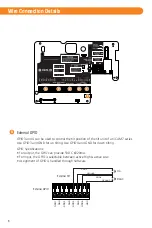


IMPORTANT:
IT IS RECOMMENDED TO SUPPLY THE CORRECT AMOUNT OF POWER TO THIS UNIT. AN OVER OR
UNDER VOLTAGE APPLIED TO THIS PRODUCT MAY CAUSE PERMANENT DAMAGE AND VOID THE WARRANTY.
5
1
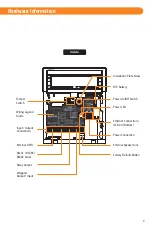
Open each cap at both sides of unit,
and loosen the captive screws (with included L wrench)
to release the interface panel.
(Left : MIC / Screw Cap.
Right : USB Connector / Screw Cap)
2
iCAM7 series Mounting & Stand Solutions
iCAM Installation
The iCAM7 series unit can be fitted to a surface mount (available out-of-the-box), recess mount
(with optional recess mounting kit), or optional desktop stand.
Surface Mounting
After opening the interface panel, loosen the screw.
Unscrew the installation plate screw to separate from the installation plate.
Separate the installation plate
by sliding the plate downward.
3
Cover Rear
Installation Plate
The iCAM can be surface mounted with standard equipment provided with the contents of your unit.
Review the following procedure for instruction on how to surface mount your iCAM7 series unit.


