iQ Returnstar Technology QTi02 Скачать руководство пользователя страница 11

QTi02 User Manual

QTi02 User Manual

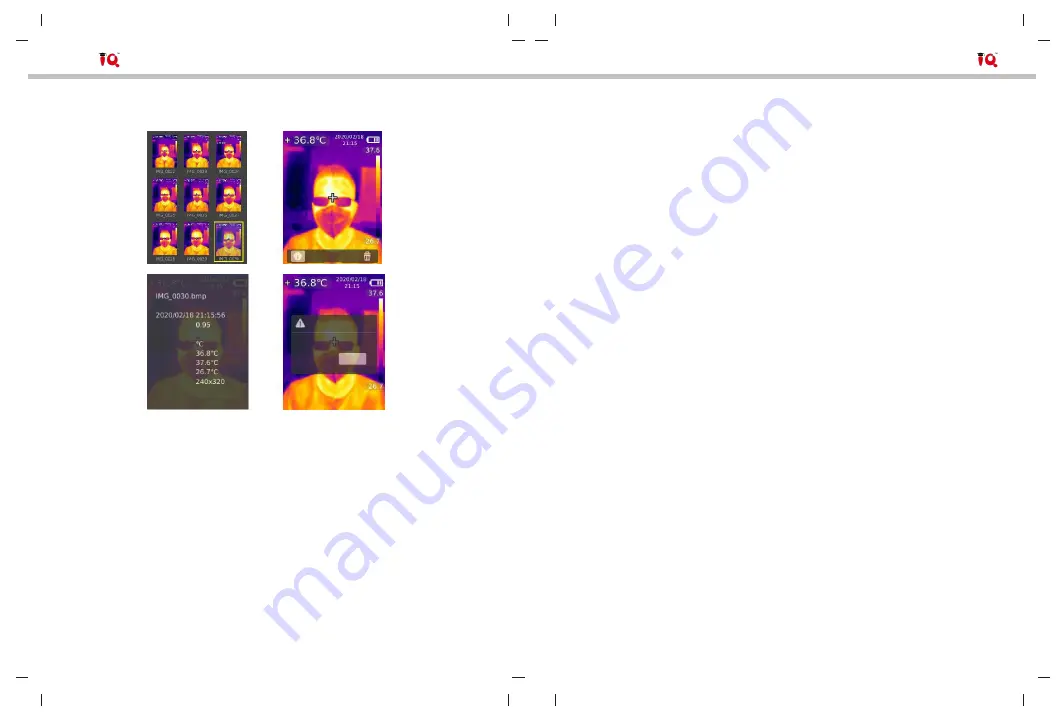
6.2 Image Viewing

Information

Image name:

Date and Time:

Emissivity:

Delete IMG_0003.bmp?

Temperature:

Unit:
Center:

Yes

No

Max:

Min:

Resolution:

1. Press the replay button to enter the gallery interface.

2. Use the up/down/left/right button to select the desired image.

3. Press the SET button to view the image in full screen mode.

4. Press the SET button in full screen mode to delete the image or view

its information.

Note: Do not remove or insert the SD card in viewing images.

6.3 Temperature Compensation

To adapt to different environments and places, manual temperature compensation is

available. For the specific setting method, please refer to 5.5.5 Measurements.

6.4 Flashlight/Warning Light

Press and hold the flashlight button for 3 seconds to turn on/off the LED light.

When the temperature alert is on and the measured temperature exceeds the

set temperature range, the LED light will flash.

Note: When the flashlight is on, please do not point to the eyes of people or animals.

19

6.5 USB Communication and Image Projection

1. Download and install the PC software (refer to IQ Documents Download

Operation Guide).

2. Connect the USB cable to the PC.

3. Set the USB mode to USB Disk to browse pictures and analyze data

through the PC software; set the USB mode to USB Camera to realize real-

time image projection through the PC software.

4. Regarding the usage of the PC software, retrieve the Software User

Manual from the Help option of the operation interface.

Note: Please do not unplug the USB cable during image projection; after use,

please close the PC software before unplugging the USB cable.

6.6 SD Card

This device supports Micro SD card (TF card) to store images. To avoid affecting

the operating speed of the device, please copy the backup data regularly and clean

up the SD card in time. To avoid causing abnormal data on the SD card, do not

insert or remove the SD card repeatedly. Try to remove and insert the

SD card when the device is turned off.

6.7 Charging

Please use a safety-certified 5V/1A or 5V/2A power adapter for charging. Do

not turn off the product easily during charging. If shutdown or restart is needed,

please unplug the Type-C power cord and disconnect the power supply first.

20

Содержание QTi02

Страница 1: ...frared Thermal Imager User Manual MARKETED BY GZ INDUSTRIAL SUPPLIES LIMITED 18 Adeshina Street Behind Holy Trinity Hospital Ikeja Lagos Nigeria Call us at 234 8181069339 info gz ind com https www gz supplies com ...

Страница 2: ...d Warranty and Liability IQ guarantees that the product is free from any defect in material and workmanship within one year from the purchase date This warranty does not apply to damage caused by accident negligence misuse modification contamination or improper handling The dealer shall not be entitled to give any other warranty on behalf of IQ If you need warranty service within the warranty peri...

Страница 3: ... in the measurement environment for 10 to 30 minutes before measuring The product tests the surface temperature of the object If temperature compensation is needed please adjust in the Settings menu The product has a self calibration function If the reading jumps quickly please read the temperature after it gets steady After measuring extremely high or low temperature objects please leave the prod...

Страница 4: ...utton Trigger Back button LCD display SET button Power button Tripod mounting hole 5 3 Display Display size 2 8 Display resolution 320 vertical x 240 horizontal pixels 10 9 1 2 3 Calibrating 8 7 4 Settings 5 6 Item Description Item Description 1 Center point temperature 6 High temperature alert sign 2 Maximum temperature 7 Maximum temperature point 3 Self calibration 8 Temperature bar 4 Minimum te...

Страница 5: ...2 Press the left right button to select the option 3 Press the SET button to enter the Measurement menu 4 Press the up down button to select Center Spot center point measurement or HiLo Spot maximum and minimum temperature measurement 5 Press the SET button to turn on off Center Spot or HiLo Spot 6 Press the back button to exit 7 1 Press the SET button to open the main menu 2 Press the left right ...

Страница 6: ...ead the temperature of the current point B Press the SET button to turn off the point Press the back button to exit 9 1 Press the SET button to open the main menu 2 Press the left right button to select the option 3 Press the SET button to enter the Image Mode menu 4 Press the up down button to select the desired mode from Thermal infrared image Digital visual light image and Fusion image blending...

Страница 7: ...me 1 Press the up down button to select the Date and Time option in the settings menu 2 Press the SET button to enter the Date and Time submenu 3 Press the left right button to select the parameter to be adjusted 4 Press the SET button to enter the parameter adjustment state 5 Press the up down button to increase or decrease the value 6 Press the SET button to save the settings and return to set o...

Страница 8: ...nt state 5 Press the up down button to increase or decrease the value 6 Press the SET button to save the current setting 7 Press the back button to exit Note For emissivity values of common materials please refer to the Common Emissivity 13 5 5 6 Display Brightness To set display brightness 1 Press the up down button to select the Display Brightness option in the Settings menu 2 Press the SET butt...

Страница 9: ...he up down button to select Yes or No 4 Press the SET button to confirm 5 Press the back button to exit Note Do not remove or insert the SD card in saving pictures It is recommended to save no more than 1000 pictures so as not to af fect the response speed of the product When the number of pictures exceeds 1 000 please clean up the SD card in time 15 5 5 10 System Settings To enter System Settings...

Страница 10: ...lect the Format SD Card option in the System Settings submenu 2 Press the SET button to enter 3 Press the up down button to select Yes 4 Press the SET button to confirm 5 Press the back button to exit Note When formatting the SD card please do not remove it or perform other operation to avoid program errors 6 Operating Instructions 6 1 Image Capture Saved 1 Pull and release the trigger to capture ...

Страница 11: ...6 5 USB Communication and Image Projection 1 Download and install the PC software refer to IQ Documents Download Operation Guide 2 Connect the USB cable to the PC 3 Set the USB mode to USB Disk to browse pictures and analyze data through the PC software set the USB mode to USB Camera to realize real time image projection through the PC software 4 Regarding the usage of the PC software retrieve the...

Страница 12: ... added CE Certifications EN 61326 1 2013 EN 61326 2 2 2013 EN 61326 2 3 RoHS 21 Visual light camera Yes Visual light resolution 640 x 480 pixels Image blending ratio 0 pure visual light image 25 50 75 and 100 pure infrared image PC software Yes Real time image transmission Yes real time image projection through PC software Data transmission Type C USB interface Product size L x W x H 236mm x 75 5m...

Страница 13: ...r shell lens or window 9 Common Emissivity Material Emissivity Material Emissivity Wood 0 85 Black paper 0 86 Water 0 96 Polycarbonate 0 8 Brick 0 75 Concrete 0 97 Stainless steel 0 14 Copper oxide 0 78 Tape 0 96 Cast iron 0 81 Aluminum plate 0 09 Rust 0 8 Copper plate 0 06 Gypsum 0 75 Black aluminum 0 95 Paint 0 9 Human skin 0 98 Rubber 0 95 Asphalt 0 96 Soil 0 93 PVC 0 93 23 ...

Отзывы: