background image

LIP-9071  


iPKTS 

User Guide 


14


iPECS Phone for iPECS system 

iPECS Phone application is accessed with the icon in the Apps Dock, a Launcher screen or automatically when 
answering a call. iPECS Phone window is a virtual construction of the functional elements of an advance business 
telephone.  Along the left are the first six (6) programmable ‘Flex’ buttons.  These allow access to CO Lines/Trunks, 
calls to other stations or activation of an iPECS system feature.  In the center of the window is the Call information 
screen that displays information about active, incoming and held calls. 


On the left at the top is the Station identifier with the Station Name or number 


Across the bottom are two menus.  In the left menu are three soft keys that are context sensitive and show available 
call functions from iPECS host.  If more than three selections are available a left/right arrow is exposed to access the 
additional items.  The idle mode iPECS menu presents: 

Pickup

: answer calls ringing another station. 

Menu

: access the Station User or Phone local main menu,  

Redial

: redial one of the last 10 dialed numbers. 


Содержание LIP-9071

Страница 1: ...LIP 9071 User Guide for iPECS iPKTS Please read this manual carefully before operating Phone Retain it for future reference ...

Страница 2: ...G Enterprise Co Ltd Any unauthorized reproductions use or disclosure of this material or any part thereof is strictly prohibited and is a violation of Copyright Laws Ericsson LG Enterprise reserves the right to make changes in specifications at any time without notice The information furnished by Ericsson LG Enterprise in this material is believed to be accurate and reliable but is not warranted t...

Страница 3: ...an Energy Related Product ErP with High Network Availability HiNA and automatically switches to a sleep mode within 15 minutes default set of inactivity If it is not needed during certain periods of time it can be unplugged to save energy LIP 9071 1 Networked standby mode 5 0 watts Note The power consumption of the product in networked standby if all wired network ports are connected and all wirel...

Страница 4: ...to the following two conditions 1 This device may not cause harmful interference and 2 This device must accept any interference received including interference that may cause undesired operation This Class B digital apparatus complies with Canadian ICES 003 Cet appareil numérique de la classe B est conforme à la norme NMB 003 du Canada CAN ICES 3 B NMB 3 B The use of this device in a system operat...

Страница 5: ...ll instructions Follow all warnings and instructions marked on the product To prevent the risk of fire electric shock or energy hazard do not use this product near water or expose this product to rain or any type of moisture at any time Do not place this product on an unstable table stand or card table the product may fall causing serious damage to the product or serious injury to those nearby Thi...

Страница 6: ...leak do not use the telephone near the leak Never attempt to insert wires pins etc into the product If the product does not operate properly the equipment should be repaired by an authorized Ericsson LG Enterprise service center Do not use benzene paint thinner or an abrasive powder to clean the product Wipe it with a soft cloth only Disposal of Old Appliance When the displayed symbol crossed out ...

Страница 7: ...9 Wall Mount 7 2 10 Connecting expansion module 7 2 10 1 LIP 9012DSS LIP 9024DSS 7 2 10 2 Cascade the external consoles LIP 9048DSS 8 3 Power up and Setup Wizard 9 3 1 Language Selection 9 3 2 Protocol Selection 9 3 3 Registration 9 4 Basics Operation for iPECS system 10 4 1 Incoming Calls 11 4 2 Outgoing Calls 11 4 3 Holding Calls 12 4 4 Transferring a Call 12 4 5 Conference 13 5 iPECS Phone for ...

Страница 8: ... 6 Basics Operation for iPECS CM 34 6 1 Incoming Calls 35 6 2 Outgoing Calls 35 6 3 Holding Calls 36 6 4 Transferring a Call 36 6 5 Conference 37 7 iPECS Phone for iPECS CM 38 7 1 Speed 40 7 1 1 Using Speed button 40 7 2 Call Back Message Wait 41 7 3 Flex Buttons 42 7 4 Video Calling 43 7 5 iPECS Phone Call Settings 44 7 5 1 Sound 45 7 5 2 Call Preferences 45 7 5 3 Video Call Preference 46 7 5 4 C...

Страница 9: ...n Icons 64 8 7 2 Status icons 65 8 7 3 Managing Status Bar 66 8 7 4 Managing System Setting Status Bar 66 8 8 Customize the Launcher Screens 67 8 8 1 Change wallpaper 67 8 8 2 Adding Apps and Widget 68 8 8 3 Reposition or Delete a Screen Item 69 9 Working with Contacts 70 9 1 Searching the Contacts 70 9 2 Communicating with Contacts 71 9 3 Managing the Contact Database 72 9 3 1 Adding a Contact 72...

Страница 10: ... 12 Settings 86 12 1 Ethernet 87 12 1 1 IP address 88 12 1 2 VLAN 88 12 1 3 802 1x 89 12 2 Wi Fi 92 12 2 1 Turn Wi Fi on connect to a Wi Fi network 92 12 2 2 Add a Wi Fi network 92 12 2 3 Forget a Wi Fi network 93 12 2 4 Configure proxy settings for a Wi Fi network 93 12 2 5 Wi Fi static IP Settings 94 12 3 Network Services 95 12 3 1 OpenVPN 95 12 3 2 LLDP Setting 97 12 3 3 Ping Test 99 12 4 Bluet...

Страница 11: ...hedule details 114 13 1 2 Managing Schedules 114 13 1 3 Responding to a Reminder 115 13 2 Setting the Alarm Clock 116 13 3 Handling Pictures and Videos 117 13 3 1 Taking Pictures 117 13 3 2 Recording Videos 117 13 3 3 Review Pictures and Videos 118 13 3 4 Using the Gallery and Albums 118 14 Android Basic Apps 121 14 1 Using the Calculator 121 14 2 Playing Music 121 14 2 1 Playing Songs 122 14 2 2 ...

Страница 12: ...ix 139 15 1 DHCP option 156 139 15 1 1 DHCP 139 15 1 2 Option 156 format 139 15 1 3 VLAN Setting 139 15 1 4 Call Server Setting 140 15 1 5 Web admin setting 140 15 2 DHCP Option 60 141 15 2 1 Option 60 141 15 3 Web admin 141 15 3 1 Web Manager Login 141 15 3 2 Overview Screen 143 15 3 3 Language web admin setting 143 15 3 4 Change password 144 15 3 5 System Setting 144 15 3 6 Device Number 145 15 ...

Страница 13: ...LIP 9071 iPKTS User Guide vii 15 3 17 Update History 151 15 3 18 LogCat 152 15 3 19 Reboot 152 ...

Страница 14: ...cation is permanently installed and provides the user with access to all the features and functions of the Call server host plus the interaction with other communications aware apps with a truly intuitive user touch interface In addition the Mini tab is loaded with apps for Contacts Calendar Video etc to improve productivity and ease of use Note Before installing 3rd party applications to this han...

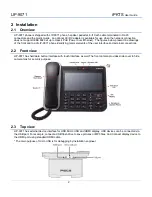
Страница 15: ... LIP 9071 phone identifying major elements of the user interface and external connections 2 2 Front view LIP 9071 has hardware button interface with touch interface as well The front camera provides slide cover to hide camera lens for security purpose 2 3 Top view LIP 9071 has external device interface for USB Micro USB and HDMI display USB devices can be connected via the USB port For example con...

Страница 16: ...V 0 3A option PoE 802 3af up to Class 4 USB Micro USB for debug Host USB HDMI HDMI A type connector LCD size 7 inch LCD resolution 1024 x 600 Touch screen Multi touch capacitive type Note The available wired headset is as follows up to now 1 Plantronics Blackwire 500 series 2 Plantronics Blackwire 600 series We can t guarantee the quality of voice if customers use the other wired headset 2 4 1 Mou...

Страница 17: ...her end of the HDMI cable into the HDMI port on the LCD display or TV User needs to adjust the resolution on the LCD display or TV for proper display if it is needed 3 On LIP 9071 it does not need to go Settings because it set as automatically when connected Just make sure the HDMI cable is correctly connected between devices 4 The pictures displayed on the remote HDMI device will always be same a...

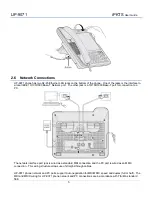
Страница 18: ...0 1000 Base T port for connection to a PC The network interface port jack is wired as a standard MDI connection and the PC port is wired as an MDIX connection This wiring structure allows use of straight through cables LIP 9071 phone network and PC ports support Auto negotiation for MDI MDIX speed and duplex full or half The MDI and MDIX wiring for LIP 9071 phone network and PC connections are in ...

Страница 19: ...er is plugged into a standard AC wall outlet and the DC connector is inserted in the DC jack located on the bottom of the phone 2 8 Connect the Handset The handset and headset connectors are located slightly to the right center on the bottom of the phone The handset coil cord RJ 9 is plugged into the upper RJ 9 jack of the phone A and handset After connecting the handset coil cord and the headset ...

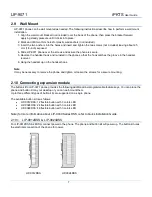
Страница 20: ...g the handset up on the handset hook Note It may be necessary to remove the phone and tighten or loosen the screws for a secure mounting 2 10 Connecting expansion module The button kit for LIP 9071 phone provides the following additional line programmable feature keys You can place the phone and button kit on your desktop or you can wall mount them Up to three different types of button kits are su...

Страница 21: ...he phone side and to the secondary DSS NOTE A Linked Pair slave station cannot use a serial DSS The name of LIP 9048DSS Setting The setting switches are hidden on the back of right side of DSS module Before you begin remove the protective cover from the DSS module PoE Class The Class switch is used to select the PoE class To connect LIP 9071 phone you set the class on 4 The default position of Swi...

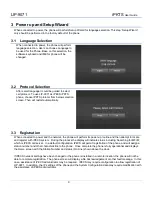
Страница 22: ...outine and then attempt to locate and register with iPECS system During the process the display will indicate status including Searching for MFIM which is iPECS call server In a default configuration iPECS will permit registration of the phone and will assign a station number and other characteristics to the phone Once complete the phone is fully operational and displays the Home screen with the S...

Страница 23: ...fully available once LIP 9071 completes registration with iPECS host as outlined in Registration section iPECS Call icon in the Apps Dock opens iPECS Phone app where calls can be managed Details for using iPECS Phone window beyond the basics are covered in Mini Tab Phone Display Basics section ...

Страница 24: ...4 2 Outgoing Calls LIP 9071 employs a live dial pad meaning that you need not lift the handset or press the Speakerphone button to start a call To place a call dial the desired number This will activate the speakerphone send the digits to iPECS host and show the dialing screen When sufficient digits have been dialed iPECS host routes the call Outgoing calls can also be placed from the Contacts and...

Страница 25: ...e button will light to indicate the held call 4 4 Transferring a Call Once connected to a call the Transfer Button as is left bottom of dial and function button layout is used to send the call to another destination After touching the Transfer icon dial the station to receive the call The call transfer can be unannounced simply hang up or announced after the receiving party answers announce the ca...

Страница 26: ...e calls 1 Place receive first call as usual 2 Touch the CONF soft button 3 Place next call and press the CONF soft button 4 Repeat step 3 for additional parties 5 Press the CONF soft button again to connect all parties Note LIP 9071 supports a 3 party conference without the need of a Conference bridge If conferences with more than three parties are required iPECS host must be equipped with a confe...

Страница 27: ...em feature In the center of the window is the Call information screen that displays information about active incoming and held calls On the left at the top is the Station identifier with the Station Name or number Across the bottom are two menus In the left menu are three soft keys that are context sensitive and show available call functions from iPECS host If more than three selections are availa...

Страница 28: ...e Several of the buttons and icons provide multiple functions based on the state of the phone For example the Hold Save button places an active call on hold and saves entries made by the user when entering speed dials and other information LIP 9071 does not support as same as legacy iPECS Muted Ring feature It support with notification message on top bar as new call wait with one time beep tone Th...

Страница 29: ... system users and Station Speed dial numbers numbers available and configured by the station user To use an auto dial feature 1 Press the Speed button 2 Dial the code for the auto dial feature desired a To dial a number in a Speed dial dial the Speed dial bin number b Press Call A number must be stored in the Speed Dial bin System Speed numbers are stored by the Attendant The user may assign Stati...

Страница 30: ...to 99 5 Dial the telephone number for the Speed dial 6 Touch the Hold Save button 7 Enter an optional Name using the dial pad with two digits for each character 8 Touch the Hold Save button to complete the Speed Dial entry 5 2 Call Back Message Wait When calling another station in iPECS system and the call is not answered you can leave a request for a call back and activate an Intercom Message Wai...

Страница 31: ...ring a Flex button see Appendix A In addition to configuring Flex buttons the user may assign a label to the button as discussed in Flexible Buttons section IPECS Phone screen displays the first six 6 Flex buttons on the left of the screen The full 48 Flex buttons including first 6 Flex buttons can be displayed in iPECS Phone screen using the Flex button icon The buttons are shown with dial pad ic...

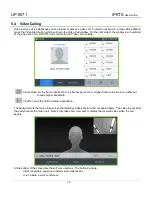
Страница 32: ...ame Rate set the frame rate from 5 to 24 frames per second Higher frame rates improve quality but require higher bandwidth Transfer send the call to another destination The background is the main video screen that displays video sent from the connected party The video is sent after the party accepts the Video call Note it may take a few moments to display the received video when the call begins At...

Страница 33: ...ll handling button appearance sounds and other characteristics of the phone To view the Call Settings menu 1 While on iPECS phone screen press the Menu button 2 Select the Call Settings icon The Call Settings menu includes Sound select the hand piece voice equalizer and assign ringtone for incoming external calls Call Preferences set signaling and answer for internal calls configure wired headset ...

Страница 34: ... CO 1 In the Call Setting screen select Sound 2 Select the ICM internal or External Ring Group down arrow 3 Select the desired ringtone 4 Click Apply to save the selection Note Voice Equalizer Setting works only on Handset hand piece of LIP 9071 5 5 2 Call Preferences Call Preferences determine how calls to a busy station are handled how calls are answered and if calls are sent to the user s mobil...

Страница 35: ...ows current CO codes which come from iPECS system 5 5 3 Video Call Preference The user can manage characteristics of the video settings including the resolution substitute image as well as the Video CODEC icon and Video Info icon for the display Video Call Resolution Tx it sets the resolution of transmitting video as manually External Video Camera Resolution Tx it sets the external USB camera reso...

Страница 36: ...ck type as digital or analog type Clock Layout User can adjust the position of clock along the left area of idle screen 5 5 5 Flexible Button Name A Name field up to 12 characters can be configured for each Flex button by the user If a label is not configured the default name based on the type button is used To configure a button label 1 In the Call Setting screen select Flexible Button 2 Select t...

Страница 37: ...call setting by on touch tagging without complicated menu control when using a call setting For these features LIP 9071 provides NFC tag write and read features In case of tag write User can write call setting information to an NFC tag in the NFC Call Features of Call Settings menu User can execute call setting by using the NFC tag recorded at the NFC Call Feature menu Warning User must check if i...

Страница 38: ...following information for call forward feature 1 Station Number ID station number 2 Password It must be configured by Web admin before setting Call Forward on LIP 9071 3 Forward Type There are four types Unconditional Busy No Answer Busy No Answer 4 Forward Destination There are four destinations Station Group Speed Tel num 5 Forward Number Forward number After entering right information for each ...

Страница 39: ...ion of the tag In order to use the NFC call forward tag user just tags the NFC tag on the tag pad of LIP 9071 The following is the screen by tagging the NFC call forward tag First make sure that the information shown is correct User touch Apply button for call forward setting Otherwise touch Close User must tag one more time to cancel call forward setting by using the same tag and check the check ...

Страница 40: ...gs are the information required for hot desk feature and screen 1 Station Number ID station number 2 Password It must be previously configured by admin 3 Logout Forward Destination 4 destinations Station Group Speed Tel num No Forward Change 4 Logout Forward Number Forward number optional for Tel num and No Forward Change After entering right information for each item touch Write button otherwise ...

Страница 41: ... After touching Write button the following screen is shown Then tag the prepared NFC tag on the tag pad User can cancel writing tag in this step by pressing Close button After writing is success LIP 9071 shows the following screen ...

Страница 42: ...k information on the screen The following is the screen by tagging the NFC hot desk tag First make sure that the information shown is correct The hot desk screen shows new station number and call forward information when user logs out from hot desk station User touch Apply button for hot desk setting otherwise touch Close User must tag one more time to cancel call forward setting by using the same...

Страница 43: ... call setting 5 5 7 4 Invalid Response When user executes a call setting by using an NFC tag LIP 9071 shows an appropriate error message for some reason In this case user can ask administrator The followings are invalid error message and error screen 1 Invalid Common 2 Invalid Input Type 3 Invalid Station Log ID 4 Invalid Password 5 Invalid Forward Type 6 Invalid Forward Number 7 Invalid Logout Ty...

Страница 44: ...9071 iPKTS User Guide 31 5 5 7 5 NFC Tag Erase LIP 9071 provides erase function for NFC Tag which has some information already If user taps the tag with Erase Tag option all tag information will be deleted ...

Страница 45: ...it is necessary to reboot LIP 9071 To reboot operate the following procedures 1 With iPECS Phone screen display select the Menu button 2 Touch the Call Settings icon 3 Select Reboot from the Call settings 4 Select OK to reboot LIP 9071 phone will restart and register with iPECS system ...

Страница 46: ...rties during a call 12 characters Station Number select a desired Station number that will be requested by the phone during registration If available iPECS will assign the Station with the requested number Set Password set the phone password 12 digits 5 6 2 System Configuration The System Configuration menu allows input of the IP address for iPECS system and the connection mode local remote and lo...

Страница 47: ...y available once LIP 9071 completes registration with iPECS CM host as outlined in Registration section iPECS Call icon in the Apps Dock opens iPECS Phone app where calls can be managed Details for using iPECS Phone window beyond the basics are covered in Mini Tab Phone Display Basics section ...

Страница 48: ... 9071 employs a live dial pad meaning that you need not lift the handset or press the Speakerphone button to start a call To place a call dial the desired number This will activate the speakerphone send the digits to iPECS host and show the dialing screen When sufficient digits have been dialed iPECS host routes the call Outgoing calls can also be placed from the Contacts and Logs as well as Speed...

Страница 49: ...on will light to indicate the held call as the left figure below 6 4 Transferring a Call Once connected to a call Transfer Button as is left bottom of dial and function button layout is used to send the call to another destination After touching the Transfer icon dial the station to receive the call The call transfer can be unannounced simply hang up or announced after the receiving party answers ...

Страница 50: ...e calls 1 Place receive first call as usual 2 Touch the CONF soft button 3 Place next call and press the CONF soft button 4 Repeat step 3 for additional parties 5 Press the CONF soft button again to connect all parties Note LIP 9071 supports a 3 party conference without the need of a Conference bridge If conferences with more than three parties are required iPECS host must be equipped with a confe...

Страница 51: ...at displays information about active incoming and held calls On the left at the top is the Station identifier with the Station Name or number Across the bottom are two menus In the left menu are three soft keys that are context sensitive and show available call functions from iPECS host If more than three selections are available a left right arrow is exposed to access the additional items The idl...

Страница 52: ...ate of the phone For example the Hold Save button places an active call on hold and saves entries made by the user when entering speed dials and other information LIP 9071 does not support as same as legacy iPECS Muted Ring feature It support with notification message on top bar as new call wait with one time beep tone This is almost same as what normal mobile phone call waiting service ...

Страница 53: ... Station Name System Speed and Station Name Storage is allocated in iPECS CM system for System Speed 0001 3 000 numbers available to all system users and Station Name name or numbers available and configured by the station user To use System speed 1 Touch the Speed button 2 Select 1 System Speed 3 Enter the desired system speed index To use Station name 1 Touch the Speed button 2 Select 2 System N...

Страница 54: ... Call Back Message wait is activated and the called station user receives a message waiting indication for the Intercom ICM call To respond to a Call Back message of Message wait 1 Press the flashing Message button 2 Select the message type Message Wait radial button 3 Select the Station to call back from the Station message list To check the voice mail service 1 Press the flashing Message button ...

Страница 55: ...n configuring a Flex button section In addition to configuring Flex buttons the user may assign a label to the button as discussed in Flexible Buttons section iPECS Phone screen displays the first six 6 Flex buttons on the left of the screen The full 48 Flex buttons including first 6 Flex buttons can be displayed in iPECS Phone screen using the Flex button icon The buttons are shown with dial pad ...

Страница 56: ...5 to 24 frames per second Higher frame rates improve quality but require higher bandwidth Transfer send the call to another destination The background is the main video screen that displays video sent from the connected party The video is sent after the party accepts the Video call Note it may take a few moments to display the received video when the call begins At the bottom of the screen are the...

Страница 57: ... call handling button appearance sounds and other characteristics of the phone To view the Call Settings menu 1 While on iPECS phone screen press the Menu button 2 Select the Call Settings icon The Call Settings menu includes Sound select the hand piece voice equalizer and assign ringtone for incoming external calls Call Preferences set signaling and answer for internal calls configure wired heads...

Страница 58: ...or CO 1 In the Call Setting screen select Sound 2 Select the ICM internal or External Ring Group down arrow 3 Select the desired ringtone 4 Click Apply to save the selection Note Voice Equalizer Setting works only on Handset hand piece of LIP 9071 7 5 2 Call Preferences Call Preferences determine how calls to a busy station are handled how calls are answered and if calls are sent to the user s mob...

Страница 59: ... user is on a call it shows CODEC information as an icon 7 5 3 Video Call Preference The user can manage characteristics of the video settings including the resolution substitute image as well as the Video CODEC icon and Video Info icon for the display Video Call Resolution Tx it sets the resolution of transmitting video as manually External Video Camera Resolution Tx it sets the external USB came...

Страница 60: ... type as digital or analog type Clock Layout User can adjust the position of clock along the left area of idle screen 7 5 5 Flexible Button Name A Name field up to 15 characters can be configured for each Flex button by the user If a label is not configured the default name based on the type button is blank To configure a button label 1 In the Call Setting screen select Flexible Button name 2 Sele...

Страница 61: ...ll setting by on touch tagging without complicated menu control when using a call setting For these features LIP 9071 provides NFC tag write and read features In case of tag write User can write call setting information to an NFC tag in the NFC Call Features of Call Settings menu User can execute call setting by using the NFC tag recorded at the NFC Call Feature menu Warning User must check if iPE...

Страница 62: ...the NFC Call Feature of Call Settings menu Making NFC Call Forward tag In order to make an NFC call forward tag User must enter the following information for call forward feature 1 Forward Type There are four types Unconditional Busy No Answer Busy No Answer 2 Forward Destination There are four destinations Station Group Speed Tel Num After entering right information for each item touch Write butt...

Страница 63: ...n re write the tag if user needs to change the information of the tag In order to use the NFC call forward tag user just tags the NFC tag on the tag pad of LIP 9071 The following is the screen by tagging the NFC call forward tag First make sure that the information shown is correct User touch Apply button for call forward setting Otherwise touch Close User must tag one more time to cancel call for...

Страница 64: ... menu Write NFC Hot Desk tag The followings are the information required for hot desk feature and screen 1 Station Number ID station number 2 Password It must be previously configured by admin 3 Logout Forward Destination 4 destinations Station Group Speed Tel num No Forward Change After entering right information for each item touch Write button otherwise touch Cancel for cancel Except for the ho...

Страница 65: ...n Read NFC Hot Desk tag Using NFC Hot Desk tag User can executes hot desk feature by an NFC hot desk tag previously recorded And user can re write the tag if user needs to change the information of the tag Basically the way to use an NFC hot desk tag is the same as a call forward tag If user tags the NFC tag on the tag pad of LIP 9071 LIP 9071 shows the recorded hot desk information on the screen ...

Страница 66: ... and call forward information when user logs out from hot desk station User touch Apply button for hot desk setting otherwise touch Close User must tag one more time to cancel Hot Desk setting by using the same tag and check the check box for cancel on the dialog window Then Use can cancel the hot desk by pressing Apply button ...

Страница 67: ... call setting 7 5 7 4 Invalid Response When user executes a call setting by using an NFC tag LIP 9071 shows an appropriate error message for some reason In this case user can ask administrator The followings are invalid error message and error screen 1 Invalid Common 2 Invalid Input Type 3 Invalid Station Log ID 4 Invalid Password 5 Invalid Forward Type 6 Invalid Forward Number 7 Invalid Logout Ty...

Страница 68: ...9071 iPKTS User Guide 55 7 5 7 5 NFC Tag Erase LIP 9071 provides erase function for NFC Tag which has some information already If user taps the tag with Erase Tag option all tag information will be deleted ...

Страница 69: ... is necessary to reboot LIP 9071 To reboot operate the following procedures 1 With iPECS Phone screen display select the Menu button 2 Touch the Call Settings icon 3 Select Reboot from the Call settings 4 Select OK to reboot LIP 9071 phone will restart and register with iPECS CM system ...

Страница 70: ...al parties during a call 16 characters Station Number select a desired Station number that will be requested by the phone during registration If available iPECS will assign the Station with the requested number Set Password set the phone password 12 digits 7 6 2 System Configuration The System Configuration menu allows input of the IP address for iPECS CM system and the connection mode local remot...

Страница 71: ...tacts 9 Downloads 10 Email 11 Gallery 12 Message 13 Music 14 Play Store 15 Settings 16 Sound Record In addition to the major applications above several widgets are installed in LIP 9071 phone Widgets are small applications that display on a Launcher screen and are self contained that is no additional screens are needed by the widget Widgets may open a related application but are primarily intended...

Страница 72: ...item touch and maintain contact with the screen until an action occurs Swipe or Flick To move from one Launcher screen to another or view the next or previous picture touch the screen and quickly move to the finger across the surface of the screen Drag and drop To move an app or icon on the Launcher screens touch and hold momentarily then while maintaining contact with the screen drag the item on ...

Страница 73: ...ens have an Option menu that is accessed by touching the Option Menu icon in the upper right that is related screen The menu which is specific to a screen displays along the bottom of the screen A Option menu selection is shown if there are more menu items then can be displayed comfortably and displayed in a popup list in the upper right Some screens including the Launcher screens have an Option m...

Страница 74: ...icons and widgets 8 5 Home Screen The Home screen as with all the Launcher screens is composed of the Notification and Status bar at the top of the screen the main display area where application icons and widgets are displayed and the App Dock on the right The dots on the bottom of the screen indicate the exposed Launcher screen 1 to 5 with the center screen 3 as the Home screen 8 5 1 Managing run...

Страница 75: ...icker access to apps than moving across the Launcher screens The first eight dock locations are available and the first four are fixed with icons for applications in LIP 9071 iPECS phone including 8 6 1 Managing the App Dock The icon for any installed application can be added to the dock deleted from the dock by dragging an icon to desktop or to the trash can The number of available dock positions...

Страница 76: ...ion is given a summary is displayed briefly along with the icon The user can view details of the notification and in most cases respond from the Notifications panel The panel is a scrollable list of all active notifications starting with ongoing events To view the Notification panel 1 Touch anywhere along the Notification and Status bar to expose the Notification tab and drag the tab down to open ...

Страница 77: ...d Call Sever IP Address collision between nodes Memory removed unexpectedly was not unmounted properly External memory being mounted New messages Missed calls Call is on line with other party Call is set to transfer Alarm Snooze Now music is playing Reminder of an upcoming event You have a new voice mail Headset is enabled Download file is exist Upload file is exist ...

Страница 78: ... parameter yet Wi Fi network parameter settings are not properly completed Alarm clock set Speaker of speakerphone off music and alarms still sound PC port has a connection Shows current flexible button location up to 4 pages VPN is enabled Phone is connected to a network through TLS VPN is enabled Phone is connected to a network using VPN VLAN is set as enable VLAN enabled and working on the netw...

Страница 79: ...the top to the bottom of the screen as the following figure shows The running process will show up in the list For example the following items indicate a Calendar event Alarm event and a Missed call Tap on the notification message to view the details Slide the notification message to left side to remove it 8 7 4 Managing System Setting Status Bar Slide down the top status bar and select System Set...

Страница 80: ...repositioned on the screens Also the background wallpaper can be changed 8 8 1 Change wallpaper To add a shortcut icon or widget to a Launcher screen 1 Touch and hold an empty spot on the screen or on the desired Launcher screen press the Menu button and touch the Option menu button at the right side bottom of window and touch Wallpapers 2 Select the type of application from 3 In the gallery selec...

Страница 81: ...hortcut icon widgets 3 Launch holding icons on the home screen Note If there is no available space on a Launcher screen the Add selection in the Options menu will be grey out To place another widget or icon on the screen an existing icon or widget must be deleted A picture taken with the Camera app can be used as wallpaper Deleting an app or widget from a screen does not delete the application fro...

Страница 82: ...rag and drop gesture 1 Touch and hold the application until the Waste can appears to the left 2 Drag the icon across the screen releasing the item at the desired location or on Waste can to delete 3 Release the item to reposition or delete it Note When an item is dragged to the Waste can X which will change to a red color ...

Страница 83: ...n optional Bluetooth device The Contacts list is opened with the Contacts icon in the Apps Dock 9 1 Searching the Contacts The Contact list can be searched to quickly locate a contact for further activity such as calling the contact To search for a contact 1 Open the Contact app by touching the Contact icon in the Apps Dock 2 Touch the Search button in the upper right 3 Touch the Search text box t...

Страница 84: ... Locate and touch the desired contact on the left list 3 Touch the icon on the right to send an SMS Touch the Number on the right to call The appropriate screen for the communication option selected opens The Option menu for the Contact screen includes tools as listed below Share share the contact information with a connected Bluetooth device Delete contact delete the contact Import export import ...

Страница 85: ... a whole and permits contacts to be added imported or exported 9 3 1 Adding a Contact To add a Contact 1 Open the Contacts list by touching the Contact icon in the Apps Dock 2 Touch the new contact icon in the upper right 3 Touch and complete entries in the New contact form and select Done Use the flick gesture to scroll to additional entries in the New contact form ...

Страница 86: ...elete all contacts menu provides a way to delete all contact at once To delete all contacts 1 Open the Contacts database by touching the Contact icon in the Apps Dock 2 Touch the Option menu in the upper right 3 Select Settings 4 Touch OK to delete all contacts ...

Страница 87: ...Option menu in the upper right 3 Select Settings and Display options 4 Select the desired option for Sort list by or View contact names The changed setting will be displayed on LCD as below 9 3 4 Import and Export Contacts Import from Storage 1 Open the Contact application 2 Touch the Option menu in the upper right 3 Select Import Export 4 Select Import from Storage 5 If multiple VCard files exist...

Страница 88: ...r right 3 Select Import Export 4 Select Fetch all visible contacts 5 In the popup select Import to Storage the USB stick or the Contacts database The phone scans for and displays a list of nearby Bluetooth devices 6 Select the desired Bluetooth device for the import the phone imports the V card files Export with Bluetooth Share all visible contacts 1 Open the Contact application 2 Touch the Option...

Страница 89: ...k 2 Touch the desired Contact 3 Touch the Edit icon in the upper right 4 Modify the desired information and Touch DONE in the upper left Note Returns to the previous screen by pressing Back button 9 4 2 Deleting a Contact To delete a Contact 1 Open the Contacts list by touching the Contact icon in the Apps Dock 2 Touch the desired Contact 3 Touch the Option menu in the upper right 4 Select Delete ...

Страница 90: ...of the Call Log Contact screen is selected The list shows the Favorite Contacts sorted alphabetically followed by a listing of recent calls To assign a Contact to the Favorites list 1 Open the Contacts list by touching the Contacts icon in the Apps Dock 2 Locate and touch the desired contact 3 Touch the star icon to the right of the Contact name to toggle the Favorite status of the contact The sta...

Страница 91: ...o view the Contact s details 3 Touch hold the phone number to use as the default number 4 Touch Make default number in the Context menu 9 6 2 Contact Ringtone The ringtone received when a call from the contact is received can be customized allowing the user to quickly identify the calling party To set the ringtone for a Contact 1 Open the Contacts list by touching the Contacts icon in the Apps Doc...

Страница 92: ...the contact s first and last name as the file name John Smith vcf To share a contact 1 Open the Contacts list by touching the Contacts icon in the Apps Dock 2 Touch the desired contact 3 Touch the Option menu in the upper right 4 In the menu selecting Share displays the Bluetooth device screen 5 Select the Bluetooth device to receive the record the record is sent ...

Страница 93: ...om a user or group of users are shown as a single thread in the Messaging screen Up to 100 threads with up to 100 messages each can be stored The Messaging screen is shown when the Message icon in a Launcher screen or the message button is pressed or when a New message notification is selected from the Notifications screen 10 1 Send a Message From the Messaging screen or from the Messaging screen ...

Страница 94: ...saging screen displays with the new message added to the appropriate thread Prior to sending the message the message can be edited or smile faces can be added Note To hide the keyboard press the Back button 10 2 Compose Screen Options Menu The Compose screen has an Option menu with the following tools Send send the message Discard erase the message and return to the Messaging screen Settings move ...

Страница 95: ... touch and hold a message In the menu the following tools are available Copy Text copy a selected message enter the To user and send Forward send a copy of the message to another user Lock lock a message to avoid accidental deletion If a message is locked a pad lock icon appears to the right of the message record To unlock a message touch and hold the message record View details view details inclu...

Страница 96: ...tifications Delete all threads delete all messages in a thread 10 6 Deleting a Message Thread All messages in a thread can be deleted When a thread is deleted that contains a locked message the delete confirmation includes a check box to delete the locked messages as well as the unlocked messages in the thread In addition if the sender receiver is not a contact a popup menu appears to allow the se...

Страница 97: ... the message retention and activating new message notification Text message limit set the maximum number of messages for each thread 1 to 100 Notifications check the box to receive new SMS message notifications in the Status bar Sound set the alarm sound when it receives new SMS message notifications in the Status bar ...

Страница 98: ...am turned on LIP 9071 support NFC and Android beam always Normally follow these steps 1 Open a screen that contains something you d like to share such as a Browser page YouTube video or place page in Maps 2 Move the back of your mobile phone toward the front of the tagging area on LIP 9071 device 3 When the devices connect you hear a sound the image on your screen reduces in size and you see the m...

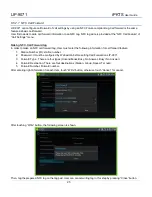
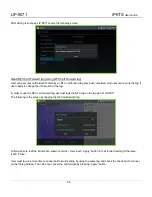
Страница 99: ...one and ringtone for Notifications Display adjust display brightness enable animations and configure the screen time out Storage view storage of built in memory and external USB stick manage USB and unmounts the USB Applications manage and control applications and view storage use Location access set the location of the phone Security lock the screen allowing only outgoing calls from the phone Lan...

Страница 100: ...ault If you would like to use Ethernet connection for network access please make sure the Ethernet cable is plugged in to the LAN port on the back of LIP 9071 The Ethernet setting includes IP address VLAN 802 1x The Ethernet settings permit configuration of LIP 9071 phone network interface and the local PC connection Configurable characteristics include ...

Страница 101: ...he network 4 For static mode enter IP Address Subnet Mask Default Gateway DNS Server and Alternative DNS server to correctly connect to network 12 1 2 VLAN OpenVPN VLAN settings define the Ethernet frame priority and VLAN identification in accordance with IEEE 802 1p Q standards Separate VLAN tags are assigned for the IP Phone PC port and the LAN voice port With a VLAN Id assigned only frames with...

Страница 102: ... zero 0 Note 3 Changing the VLAN ID PC port requires a reboot of the IP Phone when you leave the menu you will receive a reboot notice The IP Phone must reboot to utilize the new values entered To disable VLANs assign the VLAN ID as zero 0 Note 4 VLAN configuration Data Category Description Data Type Field Name Initial Value Boot Required VLAN Enable disable Boolean Vlan_enable 0 disable 1 enable ...

Страница 103: ...t to carry the EAP information 1 Supplicant sends EAPOL Start frame to Authenticator 2 Authenticator sends EAP Request Identity packet to Supplicant 3 Supplicant sends EAP Response Identity packet includes User ID to Authenticator 4 Authenticator sends it as a RADIUS Access Request packet to Authentication Server 5 Authentication Server sends RADIUS Access Challenge packet to Authenticator to deci...

Страница 104: ...or each Supplicant device must be provisioned in the RADIUS server 3 Password The IP Phone is challenged to access the network by specifying a username and password when supplicant option is enabled Authentication user names and passwords for each Supplicant device must be provisioned in the RADIUS server 4 Pass Through Mode The IP Phone has Ethernet Port for PC or other Ethernet device The IP Pho...

Страница 105: ...up your device Wi Fi is turned on automatically 1 Touch Settings Wireless networks Wi Fi 2 Slide the Wi Fi switch to the on position 3 The device scans for available Wi Fi networks and displays the names of those it finds Secured networks are indicated with a Lock icon If the device finds a network that you connected to previously it connects to it 4 Touch a network name to see more details or con...

Страница 106: ...n make the tablet forget about the detail of a Wi Fi network that you added for example if you don t want the device to connect to it automatically or if it s a network that you no longer use 1 Turn on Wi Fi if it s not already on 2 In the Wi Fi settings screen touch the name of the network 3 Touch Forget in the dialog that opens 12 2 4 Configure proxy settings for a Wi Fi network Some network adm...

Страница 107: ...or 6 Touch Save The proxy settings apply only to the Wi Fi network you modified To change the proxy settings for other Wi Fi networks modify them individually 12 2 5 Wi Fi static IP Settings To work with advanced Wi Fi settings 1 Turn on Wi Fi if it s not already on 2 In the Wi Fi settings screen touch Menu Advanced Static This screen also displays the following information IP address The Internet...

Страница 108: ...n install and run this function without relying on a special configuration OpenVPN can be a little daunting to configure the first time you jump into it but once you get your configuration worked out it s a pleasure to use After you have the software running on your network it s possible to seamlessly perform a great number of tasks One of the most popular and practical uses for OpenVPN is its abi...

Страница 109: ...r Port for OpenVPN 4 Setting the protocol type for OpenVPN It can be changed to radio button and have TCP or UPD as a value 5 Showing and setting the default crypto It can be BF CBC AES 128 CBC DES EDE3 CBC 6 Showing and setting the compression setting It can be enable or disable 7 Showing and setting the ID of VPN 8 Showing and setting the Password of VPN 9 Installing the root certificate ...

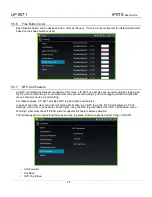
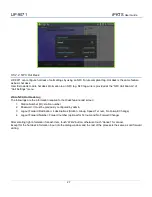
Страница 110: ...No VPN PASSWORD string Vpn_password No 12 3 2 LLDP Setting When enabled LIP 9071 phone employs LLDP Link Layer Discovery Protocol to advertise capabilities and determine characteristics of the surrounding network environment The phone can determine and automatically configure VLAN settings for both the LAN and PC ports when LLDP is enabled The IEEE 802 1AB Link Layer Discovery Protocol LLDP define...

Страница 111: ... Identifies the types of LLDP MED capabilities supported by the phone Capabilities 0x33 LLDP Med capabilities Network policy Extended Power Via MDI PD Inventory Class Type III 9 Network Policy specifies the VLAN ID the 802 1 priority and the differentiated services code point DSCP value Application Type Voice 1 Policy Unknown 1 Defined 0 Unknown if phone is in booting stage or if switch doesn t su...

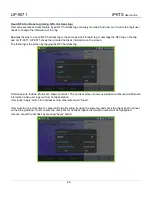
Страница 112: ...itial Value Boot Required LLDP Enable disable Boolean Lldp_enable 0 disable 1 enable 0 no LLDP Auto Manual Boolean Vlan_type 1 auto 2 manual 2 No 12 3 3 Ping Test LIP 9071 phone supports basic ping test menu Input destination IP address then press Ping Test button It will take few second to see the result ...

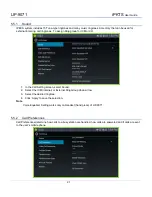
Страница 113: ...ton the option for Bluetooth Or users could open the top right status bar System Settings and tap on Bluetooth icon to turn it on off Settings for the Bluetooth interface are My Device Name enter a name that is advertised to other devices Allowed to Search for My Device check to allow other Bluetooth devices to detect the phone the interface advertises for 2 minutes as default Visibility timeout s...

Страница 114: ... unpair device and select Unpair 12 4 5 Bluetooth Headset The headset connection delivers audio from the phone to the Bluetooth headset paired with the phone A fixed button is assigned for the Headset function and when the button is touched the audio is delivered to the headset and the button illuminates Touching the button again disconnects the call When the handset is lifted the active voice dev...

Страница 115: ...points quickly change your phone settings for example or open a website featured on an advertising poster without typing the Web address and lots more 12 5 1 NFC Tag Erase This terminal provides erase function for NFC Tag which has some information already If user taps the tag with Erase Tag option all tag information will be deleted ...

Страница 116: ...ing intercom calls Default notification sound select the ringtone for new message and missed call notifications 12 7 Display Display settings include Brightness set the screen brightness Wallpaper set screen home wall appearance picture Sleep set the duration the screen will stay on when the user takes no action with the phone Daydream set the type of the screen save type on the phone Font size se...

Страница 117: ...e view and manage contents of USB stick 12 8 1 USB Storage A USB stick can be inserted in the USB host slot on the rear upper side of LIP 9071 phone With the USB stick Settings the total and available memory on the stick displays a stick can be safely removed with the Unmount command and the data on the card may be erased Also support of importing or exporting media files to or from USB stick Medi...

Страница 118: ...s used to manage and view the status of Android applications in the phone Selections include Downloaded sources list of applications from Android apps store or other places Running sources manage active process and services Storage use view the storage in use by active applications ...

Страница 119: ... an outgoing call can be made To set up the screen lock the user will receive instructions to connect a series of on screen dots The pattern must link a minimum of four 4 dots Once the pattern is accepted the idle screen will display the dots with the date time and an outgoing call icon as shown below While an outgoing call may be placed other functions of the phone are unavailable until the user ...

Страница 120: ...elect and configure the standard Android QWERTY keyboard Korean keyboard select and configure the Korean keyboard 12 13 Factory Reset Privacy is used to return LIP 9071 phone to the default configuration The reset removes all entries in the Contacts and Calendar databases and all other personal data stored in the internal Flash memory Note the reset to default does not impact information stored on...

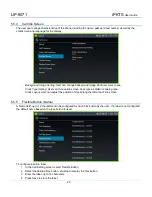
Страница 121: ...d time when Automatic is not used Select Time Zone select the Time zone Use 24 hour format select time to display in the 24 or 12 hour format Select date format select to display date as year month day or month day year NTP settings enter the URL of the NTP Network Time Protocol Server 12 15 Lock Unlock config About some important menus can be controlled by password lock setting And this menu prov...

Страница 122: ...s information about LIP 9071 phone including the OS version build and MAC address In addition System Updates can be selected to update the phone software from the USB stick Note You may need to scroll down the screen to see all selections 12 16 1 Software Updates ...

Страница 123: ...LIP 9071 iPKTS User Guide 110 Note During the update procedure do NOT unplug or remove the phone from the power source Note Available update options can be managed through Network Update Setting menu ...

Страница 124: ...LIP 9071 iPKTS User Guide 111 12 17 Restart The soft restart of the phone can be started at this menu without power plug out from the Phone ...

Страница 125: ...inder times The Calendar is presented in four 4 views Agenda displays events in chronological order beginning with the next upcoming event Day displays the day s schedule with the hour on the right side and events highlighted over the hours the event is scheduled Week displays the week schedules with the hour on the right side the day across the top and events highlighted over the hours the event ...

Страница 126: ...he next or previous Day Week or Month as appropriate To select the schedule view 1 Touch the Appointment Calendar icon in a Launcher screen or the Apps Dock 2 Touch Week text in the upper right 3 Select the desired view Agenda Day Week or Month Note The Event Calendar does not work with the Google Calendar calendaring service ...

Страница 127: ...ons menu of any schedule view 13 1 2 1 Add an Event Schedule An event can be scheduled in the Day Week or Month view with the Context menu or from any view using the New event icon To schedule an event 1 In any view touch the New event icon in the upper right or Touch and hold a spot in the Day Week or Month view 2 In the popup select New event the Event details screen appears 3 In the Event detai...

Страница 128: ...n icon appears in the Notifications and Status bar and if assigned the audible reminder tone plays Also the event name displays briefly in the Notification and Status bar The notification icon remains until the notification response To respond to a notification 1 Touch the Notification and Status bar and drag the bar down to display the Notifications screen The screen displays all active notificat...

Страница 129: ...selected days of the week Alarms can be added edited turned on or off or deleted Touch Add Alarm icon at the left side bottom of window to add an alarm then follow the on screen instructions The Alarm time days of week and state on off for the alarm can be set To edit change the alarm state or delete an alarm touch Arrow mark of the desired Alarm then select the desired function Then enter the mod...

Страница 130: ...ail displays a thumbnail of the last picture or Video in the upper right of the screen Picture Video Control switch the Camera mode between still shots or video Shutter Record take picture or start stop video recording To take a picture 1 Frame the subject in the display 2 Touch and hold the shutter icon The camera focuses on the subject and takes the picture The picture is displayed for a few mom...

Страница 131: ...counterclockwise Rotate Right rotate the picture 90 clockwise Details display details for the picture including name type of file date and album To return to the Camera move to the first picture by Flick gesture and you will see the camera button 13 3 4 Using the Gallery and Albums The Gallery application organizes and displays picture albums on the USB stick and in the Camera Items in the album a...

Страница 132: ...t picture or video displays Videos display with the play arrow when touched the video plays The navigation arrow is used to view the next or previous picture in the album In addition the Picture tools are available under the Menu button to modify the picture 13 3 4 2 Selecting Multiple Pictures Multiple pictures can be selected with the Multiple select view Once selected the pictures can be rotate...

Страница 133: ...y a picture 1 Touch the picture thumbnail 13 3 4 4 Viewing Videos In the Gallery videos can be selected for display To display a video 1 Touch the video thumbnail The initial frame in the video displays 2 Touch the video frame to display the Video controls for fast forward or reverse as well as the play pause control ...

Страница 134: ... application organizes manages and plays music and other audio files located on the USB stick When the Music icon in the Dock or Launcher screen is selected the Music app builds a Music Library from information in the audio files MP3 MIDI and OOG Vorbis formats on the USB stick Constructing the catalog takes a short period of several seconds or longer depending on the number of files on the USB st...

Страница 135: ...t the current song album or playlist Note The music will continue to play even when you switch applications Music stops when the last song in the playlist is reached unless the repeat option is active or if playback is stopped by the user 14 2 2 Playing a Party Shuffle When Party Shuffle is selected LIP 9071 phone plays songs from the USB stick in a random order To play a Party Shuffle 1 In the Mu...

Страница 136: ...aylists A Playlist is a set of songs that have been organized in a group Songs in the Playlist are played in the order entered in the Playlist or the list can be shuffled before playback 14 2 4 1 Create a Playlist To create a new Playlist 1 From a Library touch and hold the first song title to add to the new Playlist 2 In the menu touch Add to Playlist 3 Touch New in the popup menu and enter a nam...

Страница 137: ... name 4 Press Save to store the new playlist 14 2 4 2 Add Songs to a Playlist To add a song to a Playlist 1 From a Library list touch and hold a song title 2 Touch Add to Playlist 3 Select the Playlist to receive the song the song is added to the Playlist A song that is playing can be added to a Playlist as follows 1 While the song is playing in the Playback screen press the Menu button 2 Select A...

Страница 138: ...ic Library 2 From the list touch and hold the song to delete 3 In the menu select Remove from Playlist The song is removed from the playlist but remains on the USB stick 14 2 5 Use as Ringtone A song in the Music library can be assigned for use as a Ringtone To assign a song as a Ringtone 1 Select a music library 2 From the library list touch and hold the song to be used as a Ringtone 3 In the men...

Страница 139: ... is displayed If you have not used Browser recently your home page opens The web address URL of the current page is displayed at the top of the window unless a mobile site scrolls the URL bar off the top of the screen if so just drag the page down to bring the URL bar into view 14 3 1 2 Open a webpage or search the web 1 Touch the URL box at the top of the Browser screen If the URL box isn t visib...

Страница 140: ...page 3 Touch Use current page Or enter a different page s address URL 4 Touch OK If you prefer to open new Browser windows without opening a webpage by default leave this field blank This can make new Browser windows open more quickly 14 3 2 Navigating within a webpage Web pages that are optimized for mobile devices typically open at a size appropriate for your phone Often you can t zoom or even s...

Страница 141: ...ge navigate back and forward and review your browsing history just as in any web browser You can also take advantage of some shortcuts for working with links and other kinds of information 14 3 3 1 Open a link Touch a link to open it Links that you touch are highlighted in orange until the webpage they refer to opens in the window Go back and forward among the pages you ve opened Press the Back bu...

Страница 142: ...ookmarking saving and sending the link via email Touch a phone number to open the Phone application with the number entered Touch a street address to open it in Maps 14 3 4 Working with multiple Browser windows You can open up to eight Browser windows at once and switch among them 14 3 4 1 Open a new Browser window Press Menu and touch New Tab Press Menu and touch New tab In the screen that opens ...

Страница 143: ...about downloading a file or start downloading one by accident you can cancel the download in progress 1 Press Menu and touch Downloads 2 Touch hold an item in the list and in the menu that opens touch Cancel download Or press Menu again and touch Cancel all downloads 14 3 4 8 View the files you ve downloaded Press Menu and touch Downloads The Downloads application opens with a list of the files yo...

Страница 144: ...ation you want to use to send the bookmark The application opens with the bookmark s address entered 14 3 5 5 Add a bookmark shortcut to the Home screen You can add a shortcut to your phone s Home screen that you can touch to open one of your bookmarks in a Browser window 1 Touch hold an empty spot on your phone s Home screen 2 Touch Shortcut 3 Touch Bookmarks 4 Touch a bookmark to add it The book...

Страница 145: ...at text the next time you use that form Uncheck to disable this feature Clear form data Touch it to delete all the information the Browser remembers about what you ve entered in forms Enable location Check to permit websites with location specific content to ask whether you want to share your location using your phone s location information To provide a website with your location you must also hav...

Страница 146: ... the magnification level that Browser uses when first opening a webpage Open pages in overview Uncheck to open web pages displaying their top left corners at 100 size Check to open web pages zoomed out in an overview Auto fit pages Check to have Browser optimize the presentation of text and other elements of web pages to fit your phone s screen Checking this option also causes the browser to reflo...

Страница 147: ...ovides built in Email application for users to access personal or business Email account User can use this Email application to read and send email from services other than Gmail Email includes a wizard that makes it easy to configure it for several popular email service providers Fully fill the below wizard form as your account information Use the Email application to view individual email accoun...

Страница 148: ... are stored in the central Exchange mail server and can be checked using capable mail client such as Microsoft Outlook Please check with your network administrators for the correct Email account settings for EXCHANGE After account complete communication with exchange server it will guide security warning 4 After select OK if Next is selected in step 2 users will see the following default account s...

Страница 149: ... Next again Users should be able to start using the Email account now 6 Depending on the server setting email application need to send Activation request to server if server need to get activation pop up window will be guided to set 7 After success of activation email application start sync to account ...

Страница 150: ...messages from an individual or a combined inbox While an email message open the inbox is displayed in the left tab 1 Refresh Inbox tap sync icon 2 Sort Mailbox 1 Tap menu 2 Tap Sorting Options 3 Select a sorting method 3 Search Email Messages 1 Tap search icon 2 Select the type of search 3 Enter your search query in the search bar 14 4 3 Send Email Message 1 Tap icon 2 Enter the recipient email ad...

Страница 151: ...elete The item is deleted from your phone s USB storage 4 Press Menu button and touch Sort by size or Sort by time to switch back and forth 14 5 2 Downloads and install application 1 Open Playstore market and find the app you would like to install 2 Tap on Install softkey for the app It will start downloading 3 Once downloaded the installation process will start automatically 4 Tap on to view the ...

Страница 152: ... and syntax of option 156 is below Parameter Description Syntax Cs Call server IP address IPv4 address Format Vid LAN VLAN id 1 4094 Prioriyh LAN VLAN priority 0 7 Cmod Connection Mode local remote localremote If there is no parameter and the value is IP address format it indicates Call Server address Only a parameter that needs to be set is added If not it doesn t need to be added Valid format is...

Страница 153: ...CP Option 156 Set VLAN with Disable N A N A N A Set DHCP option 156 Set Set 1 VLAN menu Enable VLAN policy LLDP set in web admin default N A N A Discovered LLDP Set Discovered LLDP Set N A Discovered LLDP Set1 Discovered LLDP Enable VLAN policy Manual set in web admin N A N A N A Set DHCP option 156 Set N A VLAN menu Set VLAN menu 1 vid priority parameter is ignored and cs cmod parameter is applie...

Страница 154: ...sed to configure LIP 9071 phone IP addressing Call server parameters Network setting characteristics flexible buttons etc The Web Manager allows for remote access through the LAN port and is intended for use by the system administrator To access to the web admin page please try through HTTPS connection with default port or port number as 8000 e g https 192 168 140 100 8000 Note LIP 9071 web admin ...

Страница 155: ...LIP 9071 iPKTS User Guide 142 ...

Страница 156: ... menus on the left and general information for the phone Touching the menu item in the left navigation exposes the menu where data can be entered and saved 15 3 3 Language web admin setting The change language menu for language selection between English and Korean is only for LIP 9071 web admin screen ...

Страница 157: ...it must follow strong password rule the strong password will be required in LIP 9071 phone Web Manager Login screen 15 3 5 System Setting The System Setting assigns the IP address of iPECS system and the type of connection that can be local remote or Local remote If these values are changed the phone must restart to properly register with iPECS system ...

Страница 158: ...ed in iPECS or through the Station User Programming For more on Flex button assignments see the host iPECS manuals For example if user attach LIP 9012DSS button kit to LIP 9071 then screen shows the button of extra 12 buttons as well The Flex button menu defines a label for the button of up to 16 characters The Flex buttons are assigned in single layout menus with 48 buttons Enter a custom label f...

Страница 159: ...For the wi fi interface user can set the same parameter field of Ethernet 15 3 9 VLAN Settings The VLAN Setting menu configures the Id and password of Virtual LANs for both the LAN and PC port Enable the VLAN Status enter a priority and id for both the LAN and PC port and save the changes The PC port should have a lower priority than the terminal typically a PC priority of 3 and Terminal priority ...

Страница 160: ... Layer Security Among the needed parameters once the Status is enabled the remote server must be identified and the authentication parameters ID and Password or certificate must be defined 15 3 11 LLDP When enabled LIP 9071 employs LLDP Link Layer Discovery Protocol to advertise capabilities and determine characteristics of the surrounding network environment The phone can determine and automatica...

Страница 161: ...ccess Control EAP MD5 method is used for ID and password authentication for access to the network The Id and password can be a maximum of 128 characters 15 3 13 Time Setting NTP Network Time Protocol Server Configuration defines the URL of an NTP sever LIP 9071 will employ to determine the time when verifying VPN certificates ...

Страница 162: ...ters apply the DSCP for packet priority handling higher priority packets first However at congested routers higher priority packets are discarded first Thus a median value for DSCP is recommended 15 3 15 Video setting LIP 9071 provides 5 options for video frame rate It can be chosen depending on the network traffic or the video quality And it provides 14 transmission video resolutions with bitrate...

Страница 163: ...g the upgrade procedure do NOT unplug or remove the phone from the power source or LAN An upgrade will return the Call Preferences Flex button labels and Call Sound settings to the default values 15 3 16 1 Firmware Upgrade Configuration Prior to upgrading the software the phone must be configured with the upgrade server information The information required includes the server IP address or URL and...

Страница 164: ...LIP 9071 iPKTS User Guide 151 15 3 17 Update History Update history shows all package installation history of LIP 9071 Also selected history list can be deleted using Delete button ...

Страница 165: ... as separate files 15 3 19 Reboot When certain parameters see list below are modified the phone will require a reboot to modify the active configuration A reboot will terminate all network connections and registrations with an iPECS host After the reboot the phone will establish the network connection and register with iPECS ...

Отзывы: