background image


56 

3 Advanced Settings 


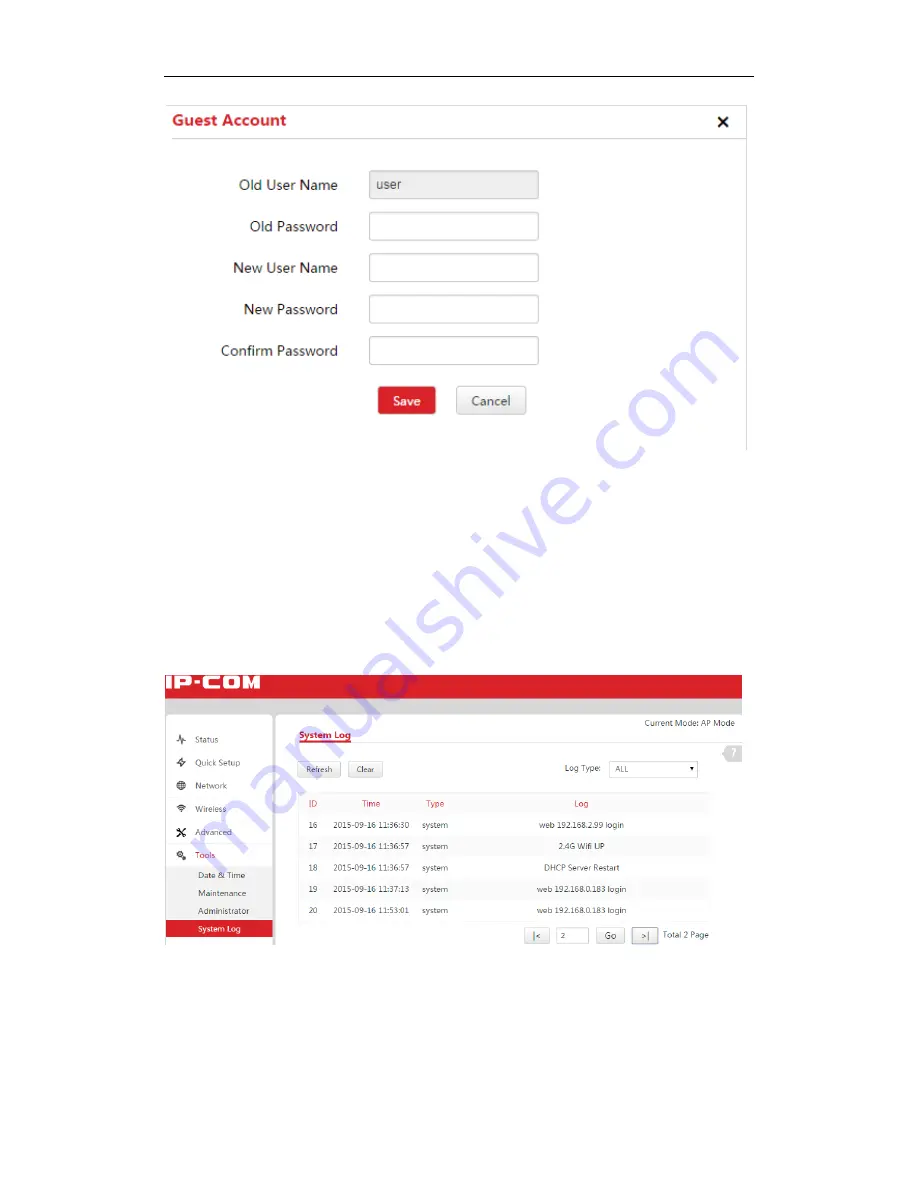
System Log 

Click 

Tools  >  System  Log

  to  enter  page  below.  Here  you  can  view  the  history  of  the  device’s 

actions. Three types of logs are supported on this device: All, System and  WAN. You can select 

any one of them from the drop-down list. Click 

Refresh

 to update current log info or click 

Clear


to clear all logs. 


Содержание AP615

Страница 1: ...i 1 Product Overview...

Страница 2: ...ithout the prior written permission of IP COM Networks Co Ltd Disclaimer Pictures images and product specifications herein are for references only To improve internal design operational function and o...

Страница 3: ...d Click the Save button can be simplified as Click Save Menu Bold The menu Basic can be simplified as Basic Continuous Menus Click Wireless Basic Symbols in this User Guide Item Meaning Note This form...

Страница 4: ...jector 6 Step 4 Quick Setup the AP 6 AP Mode 8 Station Client Mode 9 Universal Repeater Mode 11 WISP Mode 13 Repeater P2MP Mode 16 Router 21 3 Advanced Settings 24 Status 24 Quick Setup 26 Network 26...

Страница 5: ...v 1 Product Overview Administrator 54 System Log 56 Appendix 57 1 Configure PC 57 Windows 8 57 Windows 7 59 Windows XP 61 2 FAQs 63 3 Safety and Emission Statement 63...

Страница 6: ...quipped with built in 12dBi directional dual polarized antenna it offers high data transmission of up to 5km on 2 4GHz band with maximum transmission power of 800mW With waterproof housing and flexibl...

Страница 7: ...evice 2 RST Pressing and holding the reset button for over 7 seconds restores this device to factory defaults 3 LAN A 100Mbps LAN port for connecting the Ethernet device such as a switch a computer et...

Страница 8: ...olid There is a device linked to this port but no data transmission Blinking Data transmission is occurring on this port LAN Off There is no device linked to this port Solid There is a device linked t...

Страница 9: ...4 1 Product Overview Label 1 IP Address Default login IP address for web login of this device 2 Default login user name and password admin for both 3 Power specification of this device...

Страница 10: ...nect an Ethernet cable 60m which will be connected to the injector to the PoE LAN WAN port of your AP Gently replace the cover by sliding it up until it clicks into place Step 2 Install the AP Set up...

Страница 11: ...a standard power outlet Step 4 Quick Setup the AP 1 Verify that your PC is set to Obtain an IP address automatically Tip As the DHCP server of this AP is enabled by default the first time you log in t...

Страница 12: ...on your keyboard 3 Enter the default username and password admin for both defaults and click Login 4 Please select the proper operating mode and follow instructions on the web UI to apply your setting...

Страница 13: ...to a wired network and transform the wired access into wireless that multiple devices can share together Configuration Steps Select AP mode and click Next Customize SSID WiFi name set wireless securit...

Страница 14: ...il the device restarts automatically Station Client Mode In this mode the device can be connected to another device via an Ethernet port and act as an adapter to grant your wired devices access to a w...

Страница 15: ...Installation Guide Configuration Steps Select Station Client mode and click Next Select the SSID WiFi name you wish to connect to and click Next Enter the key WiFi password of the remote device and c...

Страница 16: ...he device restarts automatically When the Bridge LED stays solid it has been bridged successfully Universal Repeater Mode In this mode the device extends the wireless coverage of another wireless AP o...

Страница 17: ...Installation Guide Configuration Steps Select Universal Repeater mode and click Next Select the SSID WiFi name you wish to connect to and click Next Enter the key WiFi password of the remote SSID and...

Страница 18: ...e but on the same network segment and then click Next Click Save to apply your changes Wait until the device restarts automatically When the Bridge LED stays solid it has been bridged successfully WIS...

Страница 19: ...k Installation Guide Configuration Steps Select WISP mode and click Next Select the SSID WiFi name you wish to connect to and click Next Enter the key WiFi password of the remote SSID if needed and cl...

Страница 20: ...omize the SSID WiFi name and wireless security settings Recommended WPA PSK AES for your local network and then click Next Make sure that the IP address is different from that of ISP hotspot and on th...

Страница 21: ...MP Mode Both the Repeater mode and P2MP mode support point to multipoint bridge connection Only the base device and remote device scan each other and keep their SSIDs channels security modes and keys...

Страница 22: ...7 11111111 AP4 IP COM_4EF409 00 B0 C6 4E F4 09 11111111 Note 1 As for IP addresses they should not be the same but on the same network segment 2 The base AP s and the remote device s SSIDs channels se...

Страница 23: ...base AP and click Next Make sure the IP address is different from the base AP s IP address but on the same network segment and click Next In this example the base AP s IP address is 192 168 2 1 and y...

Страница 24: ...k Save to apply your changes Wait until the device restarts automatically Then you can go to the Status page to view that its SSID is identical with the base AP s which indicates that this AP has brid...

Страница 25: ...nd AP4 one by one and click Next Enter the key of the remote APs Here these APs refer to AP1 AP2 AP3 and AP4 and click Next Note As SSIDs channels and security settings of all devices involved in both...

Страница 26: ...ck Next Click Save to apply your changes Wait until the device restarts automatically When the Bridge LED stays solid it has been bridged successfully Router In this mode the device enables multi user...

Страница 27: ...s Select Router mode and click Next Select the WAN connection type set corresponding parameters if needed and click Next Customize the SSID WiFi name and wireless security settings Recommended WPA PSK...

Страница 28: ...to apply your changes Wait until the device restarts automatically Tip After finishing operating mode settings mentioned above please verify that devices connecting to the AP are set to Obtain an IP a...

Страница 29: ...Display the current system date and time The date and time are displayed in YEAR MONTH DAY HOURS MINUTES SECONDS format Firmware Version Display the device s current firmware version LAN MAC Display...

Страница 30: ...on the operating frequency TX RX Link Display the number of independent spatial data flow the device is transmitting TX and receiving RX TX RX Rate Available in Station mode only Display the current...

Страница 31: ...can select the proper operating mode in terms of your network environment For specific configuration steps and application scenarios of different operating modes see Step 4 Quick Setup the AP Network...

Страница 32: ...ternate DNS Server Specify the IP address of the alternate DNS server This entry is optional and used only if the primary DNS server is not responding Click Save to apply your changes Note In static I...

Страница 33: ...led it will be disabled after you finished quick setup when choosing AP Station Universal Repeater Repeater P2MP mode Click Network DHCP Server to enter page below DHCP Server Check Uncheck it to enab...

Страница 34: ...your ISP only assigns one valid IP address and it is associated to a specific MAC address This is usually used by cable operators or some WISPs Note that this function is only available in Router mod...

Страница 35: ...the connected computer to the MAC Address field Wireless Basic To configure basic wireless settings like SSID WiFi name network mode TX power etc click Wireless Basic to enter page below WiFi Check t...

Страница 36: ...umbers One English letter or an Arabic numeral takes up one ASCII code 2 WPA WPA2 PSK A mode based on WPA WPA2 PSK You can enable personal PSK or mixed mode but you must make sure that the wireless cl...

Страница 37: ...n the network AP Isolation When this function is enabled wireless clients connected to the same SSID won t be able to communicate with each other which can enhance wireless network security TX Rate De...

Страница 38: ...eshold Specify a valid value between 1 and 2347 The default is 2347 If a packet exceeds the preset value RTS CTS scheme will be used to reduce collisions A smaller value is recommended if you have dis...

Страница 39: ...default Preamble Mainly used for preamble synchronization It is advisable to keep the default value unchanged Sensitivity Threshold Define the minimum client signal level accepted by the AP for the c...

Страница 40: ...and click Add If the MAC address of the device you wish to control its access has already connected to this AP you can directly click Select from the online device to add its MAC address Click Save to...

Страница 41: ...as you need To deactivate this feature select Disable Site Survey To get an overview of your nearby wireless networks in range on all supported channels click Advanced Diagnose and then select Site S...

Страница 42: ...ination computer To implement Ping action click Tools Diagnose and finish settings as shown below Select Ping from the Network Diagnose drop down menu Select the IP address you wish to diagnose or sel...

Страница 43: ...e or not When malfunctions occur to the network you can locate trouble spot of the network with this traceroute test To implement Traceroute action click Tools Diagnose and finish settings as shown be...

Страница 44: ...server Tip 1 To activate this feature verify that you have synchronized the device s system time with the Internet or your PC 2 To reboot your AP manually see Reboot Device To reboot your device regu...

Страница 45: ...80 Click Save at the bottom of this page to apply your changes Then you need to enter http login IP address port No in the address bar to log in to its web UI Here we enter http 192 168 2 1 80 in the...

Страница 46: ...then act on the report SNMP Disable Enable the SNMP function Device Name Device name of the device Read Community Indicate the community string for read access to permit reading this AP s SNMP inform...

Страница 47: ...e Provider ISP to connect to Internet the address may either be stable static or may change from one session on the Internet to the next dynamic However a numeric address is inconvenient to remember a...

Страница 48: ...to their IP address and forwards traffic directed at your domain to your frequently changing IP address Assume that you obtain the following account from your dyndns org service provider User Name ip...

Страница 49: ...managed remotely from the Internet via a web browser Click Advanced Network Service to locate the Remote Web Access section Note that this function is only available in WISP and Router mode Tip 1 For...

Страница 50: ...e management port to be open to outside access The default setting is 8080 This can be changed Click Save at the bottom of this page to apply your changes Type http 102 33 66 88 8080 into your browser...

Страница 51: ...s Note that maximum upstream downstream bandwidth should not exceed your router s WAN bandwidth limit Consult your ISP if you are not clear Port Forwarding Port forwarding is useful for web servers ft...

Страница 52: ...ort number you configured on the PC are identical 3 To ensure that your server computer always has the same IP address assign a static IP address to your PC 4 Operating System built in firewall and so...

Страница 53: ...in its drop down list select the corresponding one If not select None Click Save to apply your changes Now your friends only needs to enter ftp xxx xxx xxx xxx 21 in their browsers to access your FTP...

Страница 54: ...ss to the Internet All other devices not listed as Permitted will be forbidden Example To allow the computer MAC address 00 E4 A5 44 35 69 to access the Internet from 13 00 18 00 on Sunday to Saturday...

Страница 55: ...e GMT time from the Internet automatically System time can be configured using the following 2 methods Synchronized with the Internet If enabled system automatically connects to NTP server on the Inte...

Страница 56: ...ally Click Tools Date Time to enter page below Select Manual Specify the time and date manually or click Synchronized with local time to automatically copy your PC s time to the device Click Save And...

Страница 57: ...you cannot solve the problem you can reset the device once you reset your AP all your current settings will be lost and you need to reconfigure it To reset your AP two methods are available Method 1...

Страница 58: ...p the compressed upgrade file in the corresponding directory Click Tools Maintenance locate the Upgrade Firmware section and click Upgrade Click Choose File in Google browser to locate and select the...

Страница 59: ...p out window and follow on screen instructions to save your configurations in a directory on your hard disk To restore your configurations Click Backup Restore Click Choose File in Google browser to l...

Страница 60: ...dvanced Settings To change the login user name and password for the administrator click the Administrator edit icon To change the login user name and password for the guest click the Guest Account edi...

Страница 61: ...r page below Here you can view the history of the device s actions Three types of logs are supported on this device All System and WAN You can select any one of them from the drop down list Click Refr...

Страница 62: ...ndix 1 Configure PC Windows 8 Right click the icon on the bottom right corner of your desktop Click Open Network and Sharing Center Click Ethernet Properties Find and double click Internet Protocol Ve...

Страница 63: ...58 Appendix Select Use the following IP address type in the IP address 192 168 2 x 2 253 Subnet mask 255 255 255 0 and click OK Click OK on the Ethernet Properties window...

Страница 64: ...etwork and Sharing Center Tip If you cannot find the icon on the bottom right corner of your desktop follow steps below Click Start Control Panel Network and Internet Network and Sharing Center Click...

Страница 65: ...60 Appendix Select Use the following IP address type in the IP address 192 168 2 x 2 253 Subnet mask 255 255 255 0 and click OK Click OK on the Local Area Connection Properties window...

Страница 66: ...ppendix Windows XP Right click My Network Places on your desktop and select Properties Right click Local Area Connection and select Properties Scroll down to find and double click Internet Protocol TC...

Страница 67: ...62 Appendix Select Use the following IP address type in the IP address 192 168 2 x 2 253 Subnet mask 255 255 255 0 and click OK Click OK on the Local Area Connection Properties window...

Страница 68: ...The manufacturer is not responsible for any radio or TV interference caused by unauthorized modifications to this equipment 2 To avoid unnecessary radiation interference it is recommended to use a sh...

Страница 69: ...ble for compliance could void the user s authority to operate this equipment This transmitter must not be co located or operating in conjunction with any other antenna or transmitter The manufacturer...

Отзывы: