ioSafe 1513+ Скачать руководство пользователя страница 9


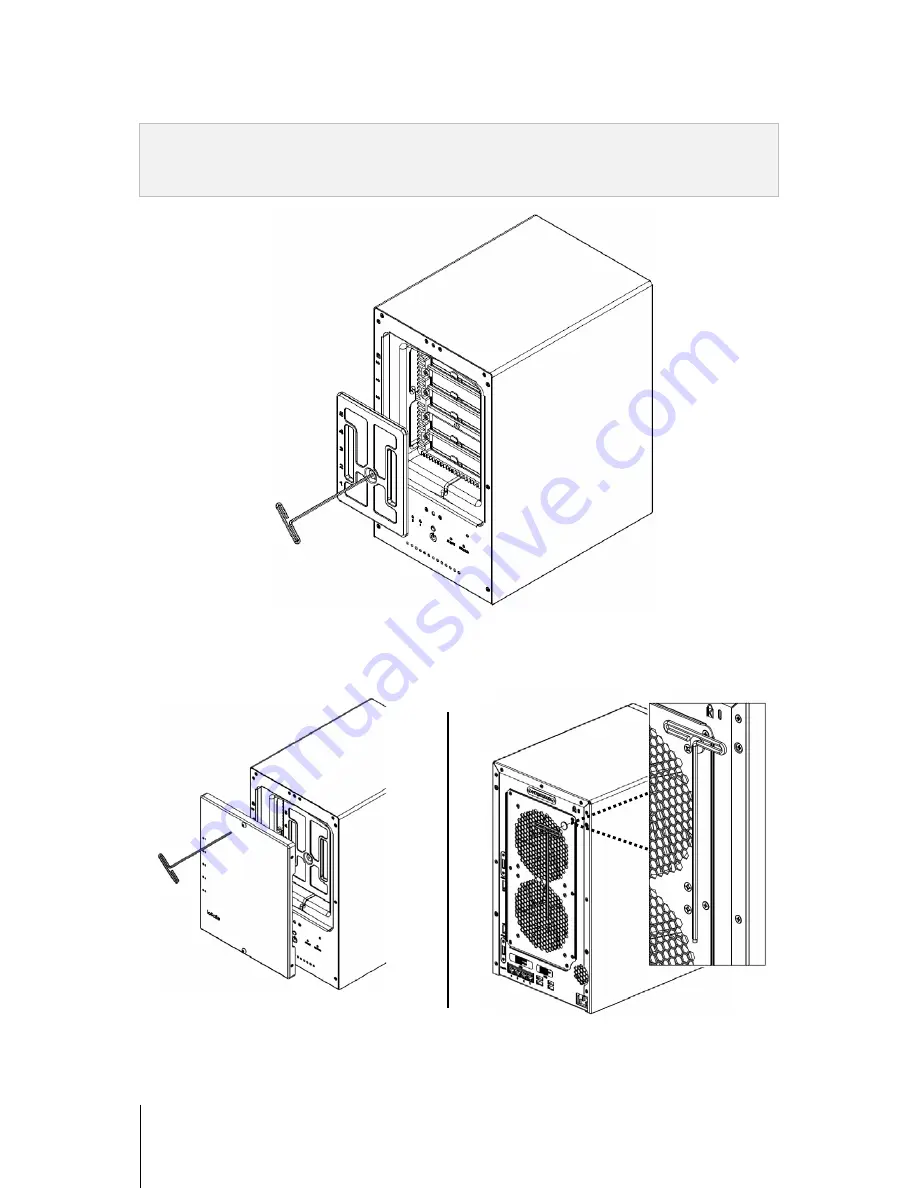
Replace the Waterproof Drive Cover and securely tighten using the supplied 3mm Hex Tool 

WARNING:

 BE SURE TO TIGHTEN THIS SCREW USING THE PROVIDED HEX TOOL.  THE HEX TOOL IS 

DESIGNED TO FLEX SLIGHTLY WHEN THE SCREW IS SUFFICIENTLY TIGHT AND THE WATERPROOF 
GASKET IS PROPERLY COMPRESSED.  AVOID USING TOOLS OTHER THAN THE SUPPLIED HEX TOOL AS 
YOU COULD UNDER TIGHTEN OR BREAK THE SCREW. 


Install the Front Cover to finish the installation and protect the drives from fire.  Keep the Hex Tool nearby for 
future use. A magnet is provided to attach the Hex Tool to the back of the ioSafe or some other convenient 
location.  


Содержание 1513+

Страница 1: ...ioSafe 1513 Quick Start Guide Powered by Synology DSM 910 11568 00 Rev03 QUICKSTART GUIDE NC 1513 ENG ...

Страница 2: ... Disk Installation 6 Install Hard Disks 6 Add a RAM Module on your ioSafe 10 Replace System Fan Assembly 12 Chapter 3 Initial Start Up and Synology DiskStation Manager Install Start Up Your ioSafe 13 Install DSM with Web Assistant 13 Chapter 4 Product Support Data Recovery Proceedure 15 Contact Us 15 Appendix A Specifications Appendix B LED Indication Table ...

Страница 3: ...age contents to verify that you have received the items below Please also read the safety instructions carefully before use to prevent your ioSafe from any damages Package Contents Main unit x 1 AC power cord x 1 RJ 45 LAN cable x 2 Screws for 3 5 hard drives x 24 3mm Hex Tool x1 Magnet x1 ...

Страница 4: ...inters or other USB devices 4 USB 3 0 Ports 5 eSATA 1 Back Panel The eSATA ports are used to connect external SATA disks or Expansion Units1 to the ioSafe 6 eSATA 2 7 RESET Button Back Panel 1 To restore IP DNS passwords for the admin account to default value 2 To reinstall the ioSafe 8 LAN Ports Back Panel The LAN ports are where you connect RJ 45 cable to the ioSafe 9 Power Port Back Panel The p...

Страница 5: ...ge Make sure that the supplied AC voltage is correct and stable To remove all electrical current from the device ensure that all power cords are disconnected from the power source Risk of explosion if battery is replaced with an incorrect type Dispose of used batteries appropriately 3 2 1 At ioSafe we suggest a minimum of the 3 2 1 Rule for backup Make 3 complete copies of your data keep them on a...

Страница 6: ...odels Warning If you install a hard disk that contains data the system will format the hard disk and erase all data If you need the data in the future please back it up before installation Install Hard Disks Note If you purchased your ioSafe preloaded with Hard Disks you can proceed to the next section Initial Start Up and Synology DiskStation Manager Install 1 Remove the Front Cover using the inc...

Страница 7: ...7 2 Remove the Waterproof Drive Cover using the 3mm Hex Tool 3 Remove the Drive trays using the provided 3mm Hex Tool ...

Страница 8: ...dels Note If you want to set up a RAID set it is recommended that all installed hard disks are of the same size to make the best use of hard disk capacity 5 Insert the loaded hard drive tray into the empty hard drive bay and tighten the screws using the 3mm Hex Tool Important Make sure the tray is pushed in all the way Otherwise the hard disk might not function properly ...

Страница 9: ...THE SCREW IS SUFFICIENTLY TIGHT AND THE WATERPROOF GASKET IS PROPERLY COMPRESSED AVOID USING TOOLS OTHER THAN THE SUPPLIED HEX TOOL AS YOU COULD UNDER TIGHTEN OR BREAK THE SCREW 7 Install the Front Cover to finish the installation and protect the drives from fire Keep the Hex Tool nearby for future use A magnet is provided to attach the Hex Tool to the back of the ioSafe or some other convenient l...

Страница 10: ... remove the access panel you expose sensitive internal components Avoid touching anything other than the memory assembly when you remove or add memory 3 Insert the new memory module in the slot a Align the notch on the gold edge of the module with the notch in the lower memory slot b Tilt the card and push the memory into the slot Make sure the module is pushed in all the way Use two fingers with ...

Страница 11: ... sure the ioSafe recognizes the new memory capacity 1 Install DiskStation Manager DSM See the next chapter for more information 2 Log in to DSM as admin or a user belonging to the administrators group 3 Check Total Physical Memory in Main Menu System Information If your ioSafe does not recognize the memory or does not start up successfully confirm that the memory is installed correctly DS1513 4096...

Страница 12: ... any possible damages 2 Remove the 7 perimeter screws that secure the malfunctioning fan assembly 3 Remove the malfunctioning fan assembly a Pull the assembly from the back panel of your ioSafe to expose the fan connections b Disconnect the fan cables from the connector located near the bottom of the fan socket and then remove the assembly 4 Install the new fan assembly a Connect the fan cables of...

Страница 13: ...to log into DSM and start enjoying all the features of your ioSafe powered by Synology To get started please see the steps below Start Up Your ioSafe 1 Use the LAN cable to connect the ioSafe to your switch router hub 2 Connect one end of the power cord to the power port of your ioSafe and the other to the power outlet 3 Press and hold the power button to turn on your ioSafe Your ioSafe is now onl...

Страница 14: ...DSM Internet access must be available during installation After confirming please follow the steps below 1 Power on your ioSafe 2 Open a web browser on your computer and go to find synology com Note Web Assistant is optimized for Chrome and Firefox web browsers 3 Web Assistant will find your ioSafe within the local network 4 Click Connect to begin the setup process Follow the onscreen instructions...

Страница 15: ...15 5 A web browser should open showing a Login screen Enter the default login and password Default login user name admin password ______ LEAVE EMPTY admin ...

Страница 16: ...number product type and date of purchase 2 If you cannot email call ioSafe Disaster Support Team at 1 888 984 6723 US Canada or 1 530 820 3090 International extension 430 3 Report disaster event and obtain return shipping address instructions 4 Follow ioSafe team instructions on proper packaging 5 ioSafe will recover all data which is recoverable according to the terms of the Data Recovery Service...

Страница 17: ...048 Max Group Accounts 256 Max Shared Folders 512 Max Concurrent Connections 512 Max Supported IP Cameras 20 File System EXT4 EXT3 FAT NTFS External disk only Volume Type Basic JBOD RAID 0 RAID 1 RAID 5 RAID 6 RAID 10 Synology Hybrid RAID Agency Certifications FCC Class B CE Class B BSMI Class B HDD Hibernation Yes Deep Sleep for Expansion Unit Yes Scheduled Power On Off Yes Wake on LAN Yes Langua...

Страница 18: ...ork is active Off Network is down Rear LAN on upper side of jack Green Static Gigabit connection Orange Static 100 Mb connection Off 10 Mb connection Rear LAN on lower side of jack Green Static Network is connected Blinking Network is active Off Network is down Hard Drive Status Indicator on tray Green Static Disk ready Blinking Disk is being accessed Off No internal disk Orange Static Cannot Read...

Отзывы: