


2
iOptron Corp. | 6E Gill Street | Woburn, MA 01801 USA | (781) 569-0200 | Toll Free (866) 399-4587 | www.iOptron.com
Quick Setup
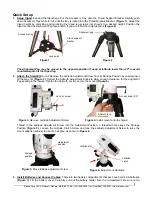
1. Setup
tripod
: Expand the tripod legs. Put the Accessory Tray onto the Tripod Support Bracket. Slightly push
down Accessory Tray while turn it, until the tray is locked into the Tripod Support Bracket.
(Figure 1)
. Adjust the
tripod height by unlocking and re-locking the tripod leg screws (not shown) to a desired height. Position the
tripod so that the Alignment Peg faces north, if you are in Northern Hemisphere
(Figure 2)
.
Figure 1
Figure 2
The Alignment Peg may be moved to the opposite position if used at latitude lower than 20º to avoid
counterweights hit the tripod leg
.
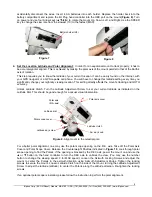
2. Attach the SmartEQ
mount: Remove the Latitude Adjustment Screw from its Storage Position by unscrewing it
all the way out
(Figure 3)
. Retract the Azimuth Adjustment Knobs to allow enough clearance for the Alignment
Peg seating in the house. Tighten the Azimuth Lock to secure the mount
(Figure 4)
.
Figure 3.
Remove Latitude Adjustment Screw
Figure 4.
Install mount onto the tripod
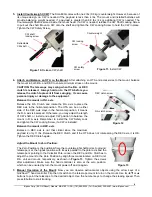
Thread in the Latitude Adjustment Screw into the Adjustment Position, a threaded hole above the Storage
Position
(Figure 5)
. Loosen the Latitude Clutch Screw and tune the Latitude Adjustment Screw to raise the
mount altitude (latitude) to about 30 degree, as shown in
Figure 6
.
Figure 5.
Move latitude adjustment screw
Figure 6.
Adjust mount latitude
3. Install Batteries and Connect Cables:
There are two battery compartments that each can hold 4 AA batteries
(Figure 7)
. Lift the battery cover. Carefully pull out the battery holder from the compartment. Be sure not to
Tripod support
bracket
Accessory tray
Lock point
Alignment peg
Lat. adj. screw
Azi. adj. knob (X2)
Azimuth lock
Adjustment
position
Storage
position
Latitude
clutch
Latitude dial