


Iomega StorCenter px2-300d User Guide
150
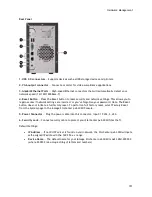
5. Key lock (front panel side)
— Use to secure access to the drive bays.
6. USB 3.0 connector —
Supports devices such as USB storage devices and printers.
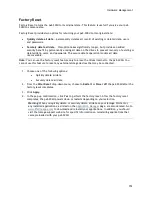
Drive Bay Access
1. Key lock
— Use key to open the front panel to access the drive bays.
2. Drive bays
— The px2-300d has two user-serviceable drive bays. Pull out a drive tray to install or
replace a hard disk drive.
Refer to the list of qualified hard disks on the Iomega support site at
www.iomega.com/support
before adding new drives. Add one drive at a time to ensure correct recognition on the device.
Содержание StorCenter px2-300d
Страница 1: ...Iomega StorCenter px2 300d User Guide D31621200 ...
Страница 2: ......
Страница 12: ......
Страница 60: ......
Страница 65: ...Storage Pool Management 53 learn more about how content is stored ...
Страница 72: ......
Страница 75: ...Drive Management 63 modify Storage Pools delete Storage Pools learn more about how content is stored ...
Страница 76: ......
Страница 116: ...Iomega StorCenter px2 300d User Guide 104 How do I create an Iomega Personal Cloud ...
Страница 126: ......
Страница 132: ......
Страница 154: ......
Страница 160: ......