

Warning
:
THIS
GUIDE
IS
FOR
DEMONSTRATION
PURPOSES
ONLY.
For
deployment
in
live
applications,
such
as
security,
safety
and
loss
prevention
programs,
installers,
owners
and
users
should
read
and
follow
the
prescribed
procedures
provided
in
the
installation
manual
and
user’s
guide.
Installation
should
follow
safety,
standards,
electrical
codes
and
security
best
practices
as
well
as
the
laws
that
apply
where
the
units
are
being
installed.
Notice
:
Failure
in
part
or
in
whole
of
the
installer,
owner,
or
user
in
any
way
to
follow
the
prescribed
procedures
or
to
heed
warnings
and
cautions
provided
in
the
installation
and
user
manual
shall
absolve
DVTEL
and
its
agents
from
any
resulting
liability.
P/N
M
A
0605
‐
20
‐
65
trk
‐
101_101
‐
P_QIG_Nov19_14
DVTEL, Inc. 65 Challenger Road Ridgefield Park, NJ 07660
Tel: 201-368-9700 Fax: 201-386-2615 Order Fax: 201.712.0343
[email protected] www.dvtel.com
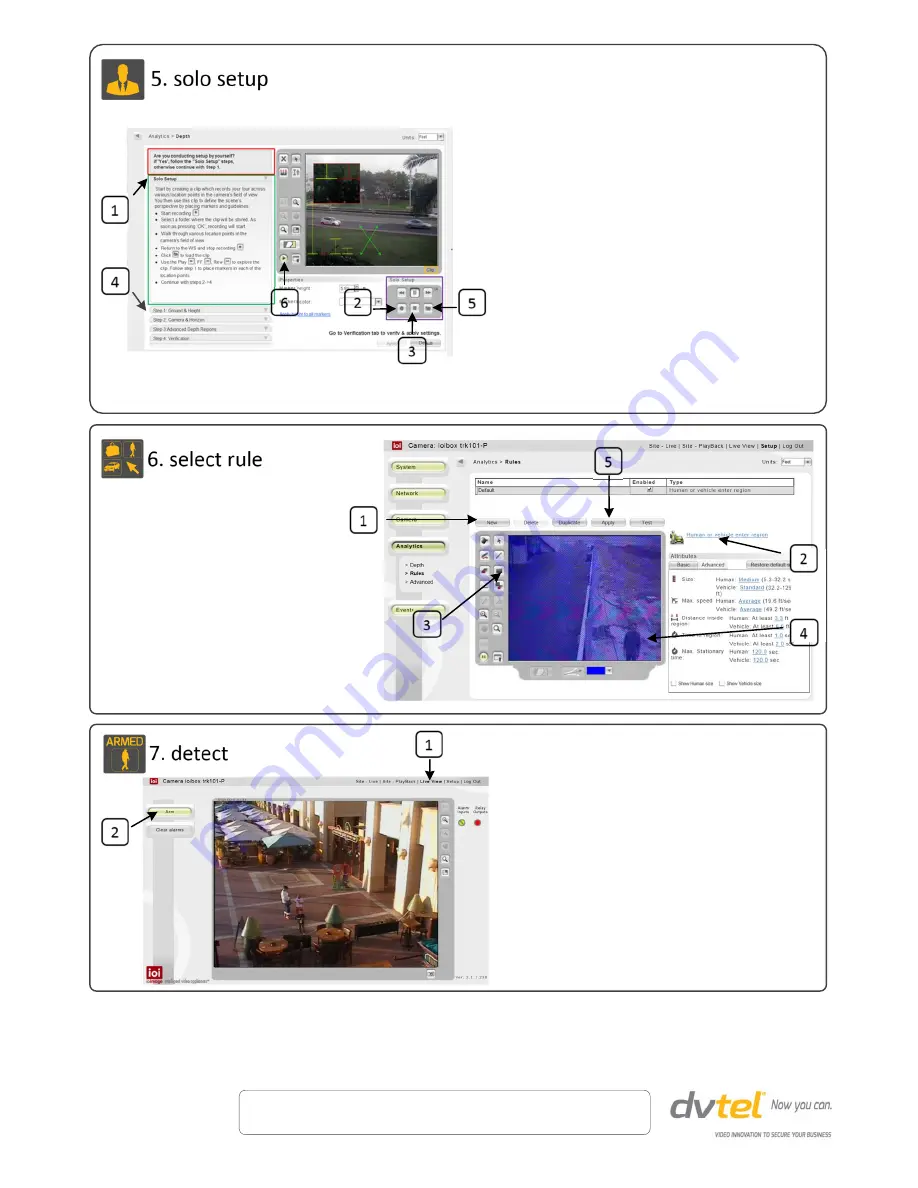
1.
Select
the
Live
View
tab.
2.
Select
Arm
.
The
camera
is
armed
and
ready
to
use.
The
label
of
the
Arm
button
is
renamed
Disarm
.
From
the
Setup
tab,
select
Analytics
>
Rules
.
A
rule
for
detecting
humans
or
vehicles
entering
the
scene
(blue
masked
area)
is
defined
by
default.
You
can
activate
rules,
modify
settings,
delete,
or
add
a
new
rule.
To
create
a
new
rule,
for
each
preset:
1.
Click
New
.
2.
Select
the
rule
type.
3.
Draw
on
the
video
scene
where
you
want
the
detection
to
take
place.
4.
Define
the
attributes
for
detection.
5.
When
finished,
click
Apply
to
save
the
settings.
1.
For
each
preset,
from
the
Live
View
window,
select
Setup
>
Analytics
>
Depth
>
Solo
Setup
.
The
following
instructions
are
displayed
on
the
screen.
2.
On
the
Solo
Setup
control
keypad,
click
the
Start
Recording
icon
and
select
a
folder
where
to
store
the
clip.
3.
Press
Stop
Recording
.
4.
Proceed
to
the
tab
for
Step
1:
Ground
&
Height
to
place
ground
and
height
markers
and
guidelines
in
the
clip.
5.
Click
Browse
to
load
and
view
the
clip.
Navigate
the
clip
and
add
human
markers.
6.
Exit
Clip
mode
and
return
to
Live
mode
by
pressing
the
round
Play
button
on
the
control
panel
located
to
the
left
of
the
monitor.
Continue
setting
depth
by
proceeding
to
the
tabs
for
Steps
2
‐
4.
Follow
the
on
‐
screen
instructions.
Expand
the
Help
section
included
with
each
step
for
detailed
information.
Verify
that
the
settings
provide
an
accurate
representation
of
the
sizes
and
distances
in
the
scene.
When
finished,
click
Apply
to
save
settings.