background image

3.6 Manage semi-static
objects

3.6.1 Immunity to semi-static
objects

Objects moving within the monitored area may
generate false alarms. If the objects oscillate or
move within a limited space (semi-static objects),
they can be recognized by the sensor and
ignored.

3.6.2 Identification of semi-static
objects

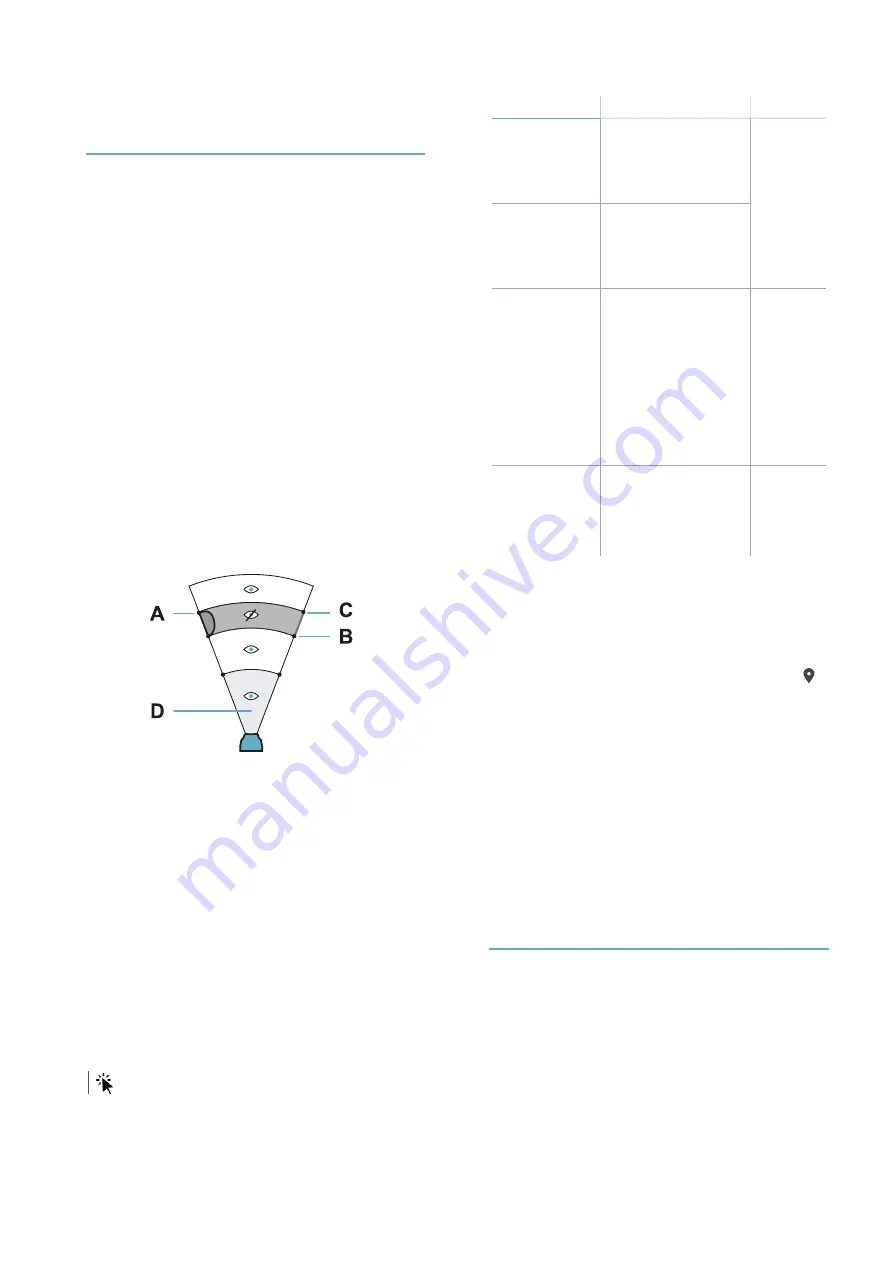
A semi-static object

[A]

is identified through the

distance between the sensor and the start of the
object

[B]

and the distance between the sensor

and the end of the object

[C]

.

It is possible to define a maximum security area
near the sensor

[D]

, in which semi-static objects

cannot be configured.

NOTICE

: configuration of semi-static objects

reduces the security level: in the area impacted by
the semi-static object, no motion is detected while
the semi-static object moves.

Note

: for indoor installations, consider that the motion

of the semi-static object may create projections on
walls and/or reflective objects. If necessary, set two
semi-static objects: one for the object and one for its
projection on the wall.

3.6.3 Examples of semi-static
objects

l

Wet fabrics or plastic films, for example patio
umbrellas or awnings exposed to rain

l

Air conditioner motors or fans

l

Fans

l

Plants in the wind

3.6.4 Define the semi-static
objects

main menu >

Semi static objects

Semi-static objects can be configured as follows:

Mode

Description

Settings

Automatic
(aggressive)

Automatic detection
of the position of the
semi-static objects
for a maximum
security level.

Maximum
security
area
distance

Automatic
(standard)

Automatic detection
of the position of the
semi-static objects
for a standard
security level.

Semiautomatic Automatic detection

of the position of the
semi-static objects

Maximum
security
area
distance

Number

Maximum
size of
semi-
static
objects

Manual

Manual insertion of a
maximum of four
objects

Number

Distance
from the
start and
end

3.6.5 Set the distance for semi-
static objects

The distance can be set in two ways:

l

manually.

l

moving the object and selecting the button

:

the field is automatically filled with the distance
measured by the sensor.

3.6.6 Check the setting of semi-
static objects

1. On the main menu select

Configuration

.

2. Move near the semi-static object or move the

semi-static object.

3. Check that the detected moving object

appears on the screen, and that the
alarm/pre-alarm LED stays off.

3.7 Other operations

3.7.1 Operations on the sensor

On the main menu >

Sensor settings

it is possible

to:

l

assign a name to the sensor name

l

set the Country of installation (default: Country
automatically detected by the device in use)

l

enable/disable the LED

l

to set the masking signal level, see "Set the
masking signal level" on page 20

l

set the tampering signal level, see "Set the
tampering signal level" on page 20 
and type of

3.  Installation and use

MSK-101-POE | Advanced configuration manual v1.1 DEC 2019 | msk-101-poe_advanced-config_en_wo v1.1 | © 2019 Inxpect SpA

23

Содержание Tsec MSK-101-POE

Страница 1: ...s entirety You will find useful information to take full advantage of the product s potential use it safely and obtain the best results MSK 101 POE Advanced configuration manual v1 1 EN Intelligent mo...

Страница 2: ...ginal format totally or partially l Transferring the document on websites or other electronic systems l Copying contents without any modification and stating Inxpect SpA as copyright owner Inxpect SpA...

Страница 3: ...3 5 Set the tolerance level for animals 22 3 6 Manage semi static objects 23 3 7 Other operations 23 4 Maintenance and diagnostics 25 4 1 Diagnostics and troubleshooting 25 4 2 Event log 26 4 3 Update...

Страница 4: ...AUG 2019 msk 101 poe_advanced config_en_wo v1 0 First publication Provided documentation Document Code Date Distribution format Advanced configuration manual this manual msk 101 poe_advanced config_en...

Страница 5: ...r and outdoor installations 1 1 2 Special features The sensor calculates the distance and estimates dimensions of the moving object in real time permitting advanced configuration possibilities in resp...

Страница 6: ...s possible to read and write the configuration of the sensor and see the status Access to most of the operations is password protected 1 2 2 Available information The sensor provides the following inf...

Страница 7: ...1 Applications 2 1 1 Types of applications The sensor is suitable for indoor and outdoor installations and can be mounted on the wall or ceiling According to the direction the sensor can be l a volum...

Страница 8: ...1 DEC 2019 msk 101 poe_advanced config_en_wo v1 1 2019 Inxpect SpA Outdoor installation 2 1 3 Examples of barrier sensor installation Indoor wall installation Indoor ceiling installation Indoor hallwa...

Страница 9: ...MSK 101 BM bracket according to the installation method allows directing the sensor to the left or the right Sensor directed towards the left Sensor directed towards the right 2 3 Field of vision 2 3...

Страница 10: ...to be monitored from 0 5 and 3 m from 1 6 to 10 ft For example it can be installed at 2 m from the floor or 0 5 m from the jamb of the window frame When installing the sensor consider the risk of a bl...

Страница 11: ...area triggers an alarm motion in the pre alarm area triggers a pre alarm Note not all motions occurring in the pre alarm or alarm area are signaled It depends on the level of tolerance set for animal...

Страница 12: ...rizontal 15 Vertical 30 Note see Examples of the field of vision with horizontal sensor direction volumetric on page 10 and Examples of the field of vision with vertical sensor direction barrier on th...

Страница 13: ...interference between the sensors present in the same area assign a different channel to each one Up to three channels are available channel A B C An example of an installation with nine sensors and r...

Страница 14: ...ge 7 2 Define the installation position considering possible interferences see Interferences on page 11 3 Define the height of installation for the sensor to obtain the desired field of vision see Fie...

Страница 15: ...lready has a terminal see Procedure with cable already with terminal on the next page 5 Terminate the cable using an RJ45 connector 6 Insert the RJ45 connector into the Ethernet port through the hole...

Страница 16: ...and the cable protector using your hands pulling it right and left to enlarge the hole 2 Insert the cable in the cable protector by pressing firmly 3 2 3 Assemble the sensor with the MSK 101 BM bracke...

Страница 17: ...plate passing the Ethernet cable into the bracket 3 Unscrew the fastening screws on the pre assembled plate of the bracket 4 Turn the plate 180 5 Tighten the screws 6 Pass the cable into the sensor ca...

Страница 18: ...the first start up procedure appears 5 If required set a new password Note the password must contain at least 8 characters of which at least one number one capital letter and one special character 6 C...

Страница 19: ...etwork settings 1 Access to the web interface on the previous page 2 On the main menu select Network settings Alarm and pre alarm thresholds 1 Access to the web interface on the previous page 2 On the...

Страница 20: ...d With the standard level tampering is signaled only if detected simultaneously with the presence of motions in proximity of the sensor Note with the tampering signal level set to Disabled the sensor...

Страница 21: ...the main menu select Configuration and check that a motion generates an alarm in the entire monitored area see Check the calibration below 3 4 5 Perform automatic calibration by areas main menu Calibr...

Страница 22: ...r direction volumetric on page 10 and Examples of the field of vision with vertical sensor direction barrier on page 11 Furthermore if the objects to be discerned have similar dimensions the capabilit...

Страница 23: ...utomatic aggressive Automatic detection of the position of the semi static objects for a maximum security level Maximum security area distance Automatic standard Automatic detection of the position of...

Страница 24: ...he tampering signal reset on page 20 l reset factory default settings 3 7 2 Operations on web interface On the main menu Sensor settings it is possible to l set the measurement system Imperial or Metr...

Страница 25: ...nnected to the network where the sensor is located 3 Open a web browser Note to check the compatibility of the browser with the web interface visit the www inxpect com security tools website 4 Insert...

Страница 26: ...the monitored area Adjust the pet tolerance level web interface main menu Configuration Note if the problem persists contact technical assistance see Service and warranty on page 29 4 2 Event log 4 2...

Страница 27: ...tion conditions Configurable in 30 cm 1 ft increments Field of vision Sensor horizontal plane 90 Sensor vertical plane 30 Height 0 5 3 m 1 6 10 ft Detection speed 0 05 ms 2 in s Power supply Power ove...

Страница 28: ...out disposal contact the relevant public authorities waste disposal services or the representative from whom you purchased the product 5 4 Conformity and restrictions 5 4 1 Declaration of conformity a...

Страница 29: ...artition nationale des fr quences ne permet pas l utilisation libre de la totalit de la bande 24 24 25 GHz D finissez correctement le pays dans l application Inxpect Security et la bande autoris e ser...

Страница 30: ...9 Inxpect SpA 5 6 Useful conventions for requesting assistance 5 6 1 Conventions Some useful conventions to communicate with Inxpect SpA technical assistance are provided below 5 6 2 Type of applicati...

Страница 31: ...5 7 Back plate dimensions 5 Appendix MSK 101 POE Advanced configuration manual v1 1 DEC 2019 msk 101 poe_advanced config_en_wo v1 1 2019 Inxpect SpA 31...

Страница 32: ...advanced config_en_wo v1 1 Copyright 2019 Inxpect SpA Distributor TSec SpA Via Luigi Becchetti 74 25081 Bedizzole BS Italy www tsec it info tsec it 39 030 57 85 302 Inxpect SpA Via Serpente 91 25131 B...

Отзывы: