background image

Secureuro Plus – User manual 

EN 


Página 7 

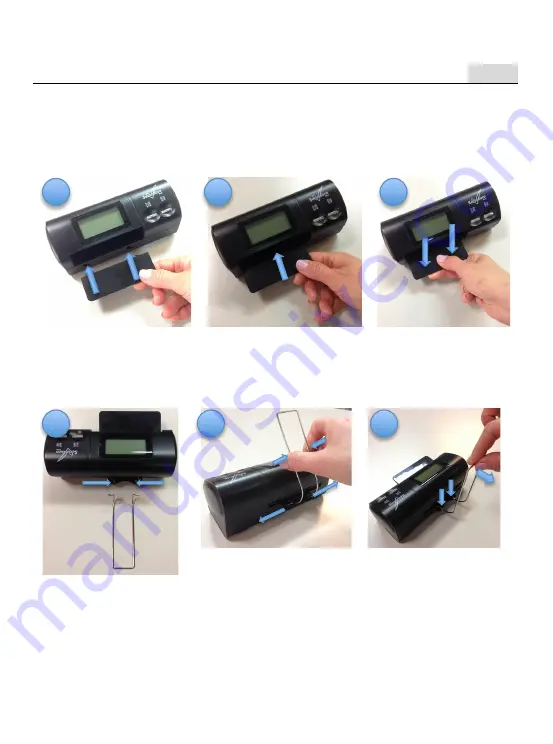
3.  Device preparation 


3.1.  Installing feeding plate. 


Align the feeding plate 
with the Wall-mount 
holes.  


Putt he plate into the 
holes. 


Pull it down.  


3.2.  Installing the receiving Steel bracket. 


Align the Steel 
bracket with the 
device holes.  


Press both sides inside 
and release it when 
the trims will be align 
with the device holes.  


Pull the Steel bracket 
back, make the 
plastic tracks hold 
the steel bracket. 


1   

2   

3   

1   

2   

3   

Содержание Secureuro Plus

Страница 1: ...User manual...

Страница 2: ......

Страница 3: ...ttery charging optional 8 4 Operating device placement 9 4 1 Desktop mode typical 9 4 2 Slant mode 9 4 3 Wall mounted 10 5 Operation 11 5 1 Switching ON OFF the device 11 5 2 Detection 12 5 3 REP CLR...

Страница 4: ...DC adapter when hands are wet To prevent fire or short circuit unplug the unit if you want to place it to another position Don t pull out the plug strongly in order to avoid damaging the power cord A...

Страница 5: ...l when working Distinguish currency type and denomination automatically Only Euro currency Displays number of sheets for banknotes and total value of each currency type Feed banknote at any side and i...

Страница 6: ...EN P gina 5 2 2 List of accessories 1 Counterfeit detector 2 Feeding plate 3 AC DC adapter with USB connection 4 USB cable 5 Receiving steel bracket 6 3 7V 1050mAH rechargeable battery optional 7 Quic...

Страница 7: ...LCD screen 4 REP CLR button allows to see the different type of banknotes inserted or to set counter to 0 5 ON Off button 6 Receiving Steel bracket 7 USB port 8 Slot for micro SD cards 9 Display rotat...

Страница 8: ...all mount holes Putt he plate into the holes Pull it down 3 2 Installing the receiving Steel bracket Align the Steel bracket with the device holes Press both sides inside and release it when the trims...

Страница 9: ...other side of the USB cable to the PC USB port or to the adapter USB port If you are using the adapter plug in to the nearest socket 3 4 Battery charging optional Open the battery compartment cover Pu...

Страница 10: ...hine can be placed flat or slant or hanging on the wall while working user can choose it according to own needs 4 1 Desktop mode typical Set the screen rotation switch to L 4 2 Slant mode Open the und...

Страница 11: ...Secureuro Plus User manual EN P gina 10 4 3 Wall mounted Hang the machine on the wall first by holding on the holes of the bottom Set the screen rotation switch to R R position...

Страница 12: ...e device By pressing ON OFF button and holding on for about 2 seconds the user can turn ON OFF the machine The ON OFF indicator lights up and self test will start after turning on the detector If the...

Страница 13: ...by one and the total value will be added with the current value then the banknote will go out at the exit When the number of sheets is beyond 99 or the total value is beyond 99999 the data will be au...

Страница 14: ...Press REP CRL button and hold it for 2 seconds to clear records 5 4 Power saving mode The detector will enter power sleep mode after 5 minutes of idling to save power The information on the display w...

Страница 15: ...be displayed on the display window and the detector will turn off automatically Connecting the detector to the external power supply or PC it will be charged automatically when the symbol is flashing...

Страница 16: ...the support manuals drivers menu option 2 In the family combo box choose validadores and in the scale combo box select Secureuro Plus Then press the Search button The latest firmware version will be...

Страница 17: ...the operating system capable of recognise and communicate with the device connected to the PC to the USB port with Windows operating system 5 Make sure the device has been turned off then connect the...

Страница 18: ...Secureuro Plus User manual EN P gina 17 7 Check through the control panel menu hardware item the port where the device has been installed the example shows the device installed in the COM2 port...

Страница 19: ...cted port is the correct one the button will light in green colour after pressing the Upgrade button select the downloaded firmware update version the file has the EUP extension the version in the exa...

Страница 20: ...n Upgrade the firmware version will be installed and ready to work in a few seconds every time the device will be turned on the screen will show the firmware new version Note The downloaded package wi...

Страница 21: ...h or a piece of soft cloth to clean the dust on the sensor or remove the banknotes and then restart the machine Error codes list during the post Error message display Error type P01 Top left sensor fa...

Страница 22: ...3 Magnetic feature error E04 E05 IR infrared feature error E06 Paper thickness error E07 Slant Banknote error E08 Hologram error E09 E10 E11 E12 Paper quality error E20 Banknote passing error 6 3 Impo...

Страница 23: ...cise financial detecting equipment that need periodic maintenance Periodically check the voltage of the power supply to ensure that the voltage is within the specified range Keep the banknote detector...

Страница 24: ...er AC100V 240V 50 60Hz or DC5V 1 0A Operating temperature 0 40 C Storage temperature 20 65 C Battery optional Rechargeable Lithium 3 7V 1050mAH Battery capacity 120 150 minutes approximately in contin...

Страница 25: ...mer service Phone 34 902 193 291 Send us your doubts and questions to the following email address cisi investronica es Customer service timetable from Monday to Friday from 8 00 to 20 00 excluding nat...

Страница 26: ......

Страница 27: ......

Страница 28: ...www inves es secureuroplus...

Отзывы: