2
The IP-LNB Set Up
The IP-LNB has the ability to receive and convert up to 8 individual channels simul-
taneously into SAT>IP streams. The LNB is connected from the dish to the home
over Cat5e or above cabling and into a PoE unit. The PoE normally sits in the home
and its function is to delivers both power to the LNB and is the data link for the
LNB. The output data port of the PoE is normally connected to either your router/
Wi-Fi Access point or to a Network Switch. Delivery of the SAT>IP streams is then
either over Wi-Fi, an Ethernet connection either directly or over a PLC data link.
Installing the IP-LNB with the Dish
An App is currently in development to support the installation of the IP-LNB to the
dish by a smart phone over the Wi-Fi network. However, for now our recommen-
dation is to tune the dish by using a standard LNB and once the dish is locked into
position replace the standard LNB with the IP-LNB.
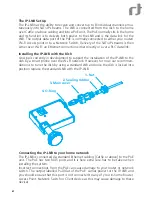
1. Nut
2. Sealing rubber
3. Main cover
4. O-Ring
Connecting the IP-LNB to your home network
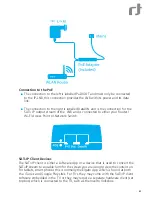
The IP-LNB is connected via standard Ethernet cabling [Cat5e or above] to the PoE
unit. The PoE has two RJ45 ports and it is here extra care has to be taken when
installing the system.
Incorrect connections from the PoE can cause damage to your router or network
switch. The output labelled P+D/Out of the PoE carries power for the IP-LNB and
you should ensure that this port is not connected to any of your in-home Router,
Access Point, Network Switch or Client device as this may cause damage to these
devices.
Содержание IP-LNB
Страница 1: ...Installation Guide IDLI 8CHE20 OOPOE OSP ...


