background image

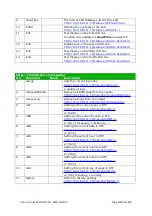
7 Communication with module
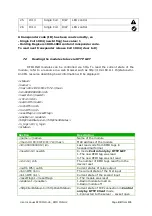
7.1

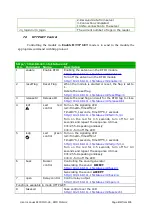
The MODBUS Addresses

The device supports the following MODBUS RTU functions:
- 0x01 Read Coils
- 0x03 Read Holding Register
- 0x05 Write Single Coil
- 0x06 Write Single Register
- 0x0F Write Multiple Coils
- 0x10 Write Multiple Register

O.n. Address

Type

R/W

Description

1

1000

Holding Reg R

Transponder code [0]

2

1001

Holding Reg R

Transponder code [1]

3

1002

Holding Reg R

Transponder code [2]

4

1003

Holding Reg R

Transponder code [3]

5

1004

Holding Reg R

Transponder code [4]

6

1005

Holding Reg R

Device Mode l (IND-U4   05534)

7

1006

Holding Reg R

Software version 

8

1007

Holding Reg R

Hardware version

9

2000

Holding Reg R/W

LCD Mode:
0-standard
1-control by MODBUS

10

2001

Holding Reg R/W

LCD TIME:
if LCD Mode=1:
0-do not show time on LCD 
1-show time on LCD

11

2002

Holding Reg R/W

LCD Clear:
1-delete content of LCD

12

2010-
2019

Holding Reg W

First line of LCD display (only if LCD TIME = 0)

13

2020-
2039

Holding Reg W

Second line of LCD display

14

2040-
2059

Holding Reg W

Third line of  LCD display

15 

2060-
2079

Holding Reg W

Fourth line of  LCD display

16

1000

Single Coil

R

State of bolt relay (door)

17

1001

Single Coil

R

State of the input nr 1

18

1002

Single Coil

R

State of the input nr 2

19

1003

Single Coil

R

Reserve

20

1004

Single Coil

R/W

Read flag
Reading: 1 - new transponder read
Write: 0 - read flag reset

21

1005

Single Coil

R/W

Reset status
Read: 1 - reader restarted (eg by power failure)
Record: 1 - force reset of device
0 - reset flag of restart

22

1010

Single Coil

W

1-turn on the bolt relay (door)

23

1011

Single Coil 

W

1-tone Accept

24

1012

Single Coil

W

1-tone Reject

User manual RFID IND-U4, RFID IND-U2                      

                      Page 

21

 from 

31

Содержание RFID IND-U2

Страница 1: ...User manual RFID IND U4 RFID IND U2 Soft 0 12 2017 04 28 User manual RFID IND U4 RFID IND U2 Page 1 from 31...

Страница 2: ...h this device the basic principles of safety and maintenance Please also keep the user manual so that you can read it during later use Remember The manufacturer is not liable for any damage caused by...

Страница 3: ...AB 9 6 3 CARD MANAGEMENT CARDS TAB ADD AND REMOVE CARDS FROM THE BROWSER 10 6 4 LOGS 11 6 5 TEXT MESSAGE 13 6 6 REACTIONS TO THE EVENTS I O SETTINGS 14 6 7 NETWORK CONFIGURATION 16 6 8 SNMP 18 6 9 COM...

Страница 4: ...rtant information Failure to follow warnings could cause injury or damage to the module Important informations and guidelines Following this guidelines makes the use of the module easier Attention The...

Страница 5: ...facturer undertakes to comply with the contract of guarantee if the following conditions are met all repairs alterations extensions and device calibrations are performed by the manufacturer or authori...

Страница 6: ...foreign objects resistance to water jet directed directly to the device storage and operation at temperatures from 25 C to 60 C 4 3 Installation and use of the module The module should be used followi...

Страница 7: ...MODBUS RTU RS485 SNMP The module depending on the version is equipped with an LCD display IND U4 or LEDs IND U2 that signal the power and current state of the device 5 2 Technical data Supply voltage...

Страница 8: ...right click on the current network connection and click Properties Choose the Internet Protocol TCP IP press Properties Tick the box Use the following IP address and type as following IP address 192...

Страница 9: ...changes click Save 6 2 The device status HOME tab After selecting the HOME are displayed Status table Input 1 the current input status number 1 binary input Input 2 the current input status number 2...

Страница 10: ...rd closer to the reader The assignment of the card will be signalised by the appropriate beep In the same way master cards can be added by clicking the Add Master button After adding the card to the r...

Страница 11: ...age events in the reader memory in the Administration Logging Log mode and select the appropriate logging mode Log mode Disabled login disabled Log mode Based ID Table the reader in the Log table will...

Страница 12: ...reader has a built in real time clock Clicking on the Update time button will synchronize the internal clock with the current time set in the computer Clicking the Remove logs button removes all logs...

Страница 13: ...mode 229000 logs can be saved in the reader memory By using Card ID Number mode 152000 logs can be saved 6 5 Text Message In the Text Message menu set the text showed on the display during various act...

Страница 14: ...ol 1 Pulse After the activation of the output the relay is switched on for a certain time eg the control of the bolt Toggle After activating the output the state changes to the opposite 2 Time on Rela...

Страница 15: ...he reader s memory 2 LED LCD Backlight Action An action that activates the LCD display or LEDs None control by protocol The control is carried out through the protocol HTTP SMNP MODBUS Every Card Sign...

Страница 16: ...h time server by SNTP protocol Configuration of the settings can be done in the tab Administration SNTP To plug in the service of synchronization in the field Server type IP address of any time server...

Страница 17: ...er on which the reader will send data 2 Port The port on which the server listens 3 Resource The resource referenced by the reader for example somefile php 4 Poll time The period of sending data to th...

Страница 18: ...in the tab Administration Services Enable SNMP SNMP allows to download the inputs state set the output state and download read out tag number MIB file describing the structure is available for downlo...

Страница 19: ...he password request leave the field New Password empty Service setting The device allows to select which services are to be available Selecting the check box next to the service name activates the sel...

Страница 20: ...port setting for MODBUS RTU communication O n Name Description 1 PDU Modbus address of the device 2 Baudrate Data transfer rate Available speeds 1200 2400 4800 9600 19200 34800 57600 115200 3 Parity...

Страница 21: ...D Mode 1 0 do not show time on LCD 1 show time on LCD 11 2002 Holding Reg R W LCD Clear 1 delete content of LCD 12 2010 2019 Holding Reg W First line of LCD display only if LCD TIME 0 13 2020 2039 Hol...

Страница 22: ...resetFlag enable 1 enable httpClientStatus 0 httpClientStatus n_logs 0 n_logs status Section Description name name Name of the module mac 00 1E C0 F8 1F 72 mac MAC address of the module id 0000000000...

Страница 23: ...ntrol Turn on the signaling LED led TimeOn TimeOff Cnt TimeOn 0 1seconds TimeOff 0 1 seconds http 192 168 111 15 status xml ledr 5 3 4 Turn on the led for 0 5 seconds turn off for 0 3 seconds and repe...

Страница 24: ...2 removeAllCards Remove all RFID tags from the reader http 192 168 111 15 msg php removeAllCards 1 3 removeLog Remove all logs from the reader http 192 168 111 15 msg php removeLog 1 4 clkY Setting i...

Страница 25: ...er 20 characters For example if the second line is to start with the HELLO text the text should be preceded by 20 SPACE characters 4 textxy Writes text on the LCD display in the correct position Synta...

Страница 26: ...Administration Enable HTTP Get or as a client select Administration Enable HTTP Client Server mode HTTP GET In this mode the external host connects to the module and manages it through the http protoc...

Страница 27: ...r or control application An example might be writing to the database or file on the server the read rfid tag the reader MAC number and read time 7 6 Communication with a module from an external networ...

Страница 28: ...nector 4 RS485 RS485 connector modbus 5 RelayMode Jumper to set the relay operating mode In positions 1 2 potential free in position 2 3 12V output 6 Relay Relay connector 7 IN1 General purpose input...

Страница 29: ...reader eg 12VDC If the reader is powered from 24VDC then the voltage will be 24VDC NORMAL OPEN mode the configuration jumpers set to 1 2 ssee the picture below In this mode an external power source i...

Страница 30: ...vided as a bin file Warning Incorrect use of the programming update feature may damage the module To perform programming operations go to the Windows command line Start Run type cmd and confirm with E...

Страница 31: ...Notes User manual RFID IND U4 RFID IND U2 Page 31 from 31...

Отзывы: