INVENTOR LV4MCI-07 Скачать руководство пользователя страница 6

2

1

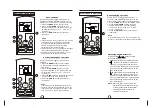
Timer operation

Press the TIMER ON button can set the auto-on 
time of the unit. Press the TIMER OFF button 
can set the auto-off time of the unit.

1. Press the TIMER ON button. The remote 
    controller shows TIMER ON, the last Auto-on 
    setting time and the signal "H" will be shown on 
    the LCD display area. Now it is ready to reset 
    the Auto-on time to START the operation.
2. Push the TIMER ON button again to set desired
    Auto-on time. Each time you press the button, 
    the time increases by half an hour between 0 
    and 10 hours and by one hour between 10 and 
    24 hours.
3. After setting the TIMER ON ,there will be a one
    second delay before the remote controller 
    transmits the signal to the air conditioner. Then,
    after approximately another 2 seconds, the 
    signal "h" will disappear and the set temperature
    will re-appear on the LCD display window.

 To set the Auto-on time.

To set the Auto-off time.

1. Press the TIMER OFF button. The remote 
    controller shows TIMER OFF, the last Auto-off 
    setting time and the signal "H" will be shown on 
    the LCD display area. Now it is ready to reset 
   the Auto-off time to stop the operation.
2. Push the TIMER OFF button again to set 
    desired Auto-off time. Each time you press the 
    button, the time increases by half an hour 
    between 0 and 10 hours and by one hour 
    between 10 and 24 hours.
3. After setting the TIMER OFF ,there will be a 
    one second delay before the remote controller 
    transmits the signal to the air conditioner. Then,
    after approximately another 2 seconds, the 
    signal "H " will disappear and the set temperature
    will re-appear on the LCD display window.

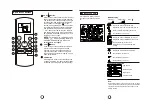
MODE

FAN

TEMP

ON/OFF

SHORT
   CUT

TIMER
  ON

TIMER
  OFF

   When you select the timer operation, the remote controller automatically transmits the 
   timer signal to the indoor unit for the specified time. Therefore, keep the remote 
   controller in a location where it can transmit the signal to the indoor unit properly.
   The effective operation time set by the remote controller for the timer function 
   is limited to the following settings: 0.5, 1.0, 1.5, 2.0, 2.5, 3.0, 3.5, 4.0, 4.5, 5.0, 
   5.5, 6.0, 6.5, 7.0, 7.5, 8.0, 8.5, 9.0, 9.5, 10, 11, 12, 13, 14, 15,16,17, 18, 19, 20, 
   21, 22, 23 and 24.

CAUTION

!

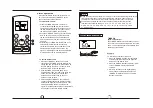
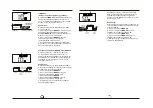
Example of timer setting

Start

Off

6 hours later

(Auto-on Operation)

The TIMER ON feature is useful when you want 
the unit to turn on automatically before you return 
home. The air conditioner will automatically start 
operating at the set time.

To start the air conditioner in 6 hours.
1. Press the TIMER ON button, the last setting 
    of starting operation time and the signal "H" 
    will show on the display area.
2. Press the TIMER ON button to display  "6.0H " 
    on the TIMER ON display of the remote 
    controller.
3. Wait for 3 seconds and the digital display 
    area will show the temperature again. The 
    "TIMER ON" indicator remains on and this 
    function is activated. 

TIMER ON

Example:

Set

9

9

10

10

SLEEP  

TURBO

LED

Содержание LV4MCI-07

Страница 1: ...ILIZATORULUI MODELS REMOTE CONTROLLER REMOTE CONTROLLER LV4MCI 07 LV4MCI 09 LV4MCI 12UR LV4MCI 18UR LV4MLI 07 LV4MLI 09 LV4MLI 12 LV4MLI 18 U4MRSL 2 14 U4MRSL 2 18 U4MRSL 3 21 U4MRSL 3 27 U4MRSL 4 28...

Страница 2: ...cribed are accomplished by the unit If the unit has no this feature there is no corresponding operation happened when press the relative button on the remote controller When there are wide differences...

Страница 3: ...he previous settings including operating mode setting temperature fan speed level and sleep feature if activated If pushing more than 2 seconds the system will automatically restore the current operat...

Страница 4: ...is activated and display when the swing feature is stopped LED Button Disable Active indoor screen Display When pushing the button the indoor screen display is cleared press it again to light the disp...

Страница 5: ...Auto mode is not comfortable for you the desired mode can be selected manually NOTE MODE FAN TEMP ON OFF SHORT CUT TIMER ON TIMER OFF 4 1 3 2 MODE FAN TEMP ON OFF SHORT CUT TIMER ON TIMER OFF 3 1 2 D...

Страница 6: ...g the TIMER OFF there will be a one second delay before the remote controller transmits the signal to the air conditioner Then after approximately another 2 seconds the signal H will disappear and the...

Страница 7: ...lay 5 Wait for 3 seconds and the digital display area will show the temperature again The TIMER ON OFF indicator remains on and this function is activated TIMER OFF TIMER ON On Stop Start operation Th...

Страница 8: ...r back on NOTE When the batteries are removed the remote controller erases all programming After inserting new batteries the remote controller must be reprogrammed Replacing batteries CAUTIONS The air...

Страница 9: ...1 2 8m 3 0V R03 LR03 2 RG57B2 BGE 5C 60C LCD Timer 2 3 6 7 7 7 8 8 9 13 SHORT CUT TIMER ON TIMER OFF...

Страница 10: ...FF 1 C 30 C 1 C 17 C 26 C sleep 2 sleep 10 1 24 0 0 10 1 24 0 0 MODE FAN AUTO DRY SLEEP MODE FAN SPEED ON OFF Turbo ON OFF SH OR T CU T 1 2 4 3 7 8 6 5 9 10 11 12 MODE FAN TEMP ON OFF SH OR T CU T TIM...

Страница 11: ...Swing Swing LED LCD 5 6 6 2 TIMER ON SLEEP TIMER OFF TIMER 6 2 LC 3 SWING OFF IIII MODE FAN ON OFF SH OR T CU T 1 2 4 3 7 8 6 5 9 10 11 12...

Страница 12: ...1 MODE Auto 2 UP DOWN 17 C 30 C 1 C 3 ON OFF OPERATION 1 MODE DRY 2 UP DOWN 17 C 30 C 1 C 3 ON OFF 1 AUTO 2 AUTO 3 AUTO FAN 1 3 4 1 MODE 2 UP DOWN 17 C 30 C 1 C 3 FAN 4 ON OFF 4 1 3 2 3 1 2 3 1 2 SWI...

Страница 13: ...9 5 10 11 12 13 14 15 16 17 18 19 20 21 22 23 and 24 Timer 9 10 TIMER TIMER ON TIMER OFF 1 TIMER ON TIMER ON H 2 TIMER ON 30 10 1 24 3 TIMER ON 2 1 TIMER OFF TIMER OFF 2 TIMER OFF 30 10 1 24 3 TIMER...

Страница 14: ...FF TIMER ON TIMER OFF 2 2 5 10 11 12 TIMER OFF 10 1 TIMER OFF TIMER OFF H 2 TIMER OFF 10h 3 3 2 10 1 TIMER OFF 2 TIMER OFF 2 0H 3 TIMER ON 4 TIMER ON 10H 5 2 5 1 TIMER ON 2 TIMER ON 2 0 3 TIMER OFF 4...

Страница 15: ...8m 13 14 8m 2 R03 LR03X2 1 2 3 2 3...

Страница 16: ...lzire Ventilare Functia de dezumidificare Functia de programare Design ul tastelor se bazeaz pe modelul tipic i pot fi u or diferite fa de cel pe care l a i achizi ionat Forma actuala va prevala Toate...

Страница 17: ...fiseaza la mesajul 0 0 Tasta OPRIRE PROGRAMARE Ap sa i acesta tasta pentru a ini ia oprirea programata Fiecare ap sare va ajusta setarea n trepte de 30 minute Atunci cand display ul va afisa mesajul 1...

Страница 18: ...losit pentru a opri sau a porni mi carea verticala a flapsurilor sau setarea in stanga sau in dreapta a direc iei fluxului de aer Flapsul isi schimb pozitia cu un unghi de 6 grade la fiecare ap sare D...

Страница 19: ...uto Mica Medie sau Mare 4 Ap sa i butonul PORNIT OPRIT pentru a porni aparatul de aer conditionat Temperatura poate fi setat ntr un interval de 17o C 30o C n trepte de 1o C NOTA In modul de VENTILARE...

Страница 20: ...l se va ajusta in trepte de 30 de minute pana la 10 ore si in trepte de 1h in intervalul 10 24h 3 Dupa programarea temporizatorului transmisia setarilor de la telecomanda la unitatea interioara va dur...

Страница 21: ...sa il porni i din nou n diminea a c nd va treziti sau atunci c nd v ntoarce i acas PORNIRE PROGRAMATA OPRIRE PROGRAMATA Oprit Pornire Oprire functionare Aceast caracteristic este util atunci c nd dori...

Страница 22: ...noi Nu este emis un semnal sonor atunci c nd un semnal este transmis catre unitatea interioara Afisajul de pe telecomanda dispare Telecomanda este alimentata de dou baterii R03 LR03X2 asezate n parte...

Отзывы: