www.inventini.com
EN
11
STARTENT
ASSEMBLY
INSTRUCTIONS
UNHARDENED GROUND:
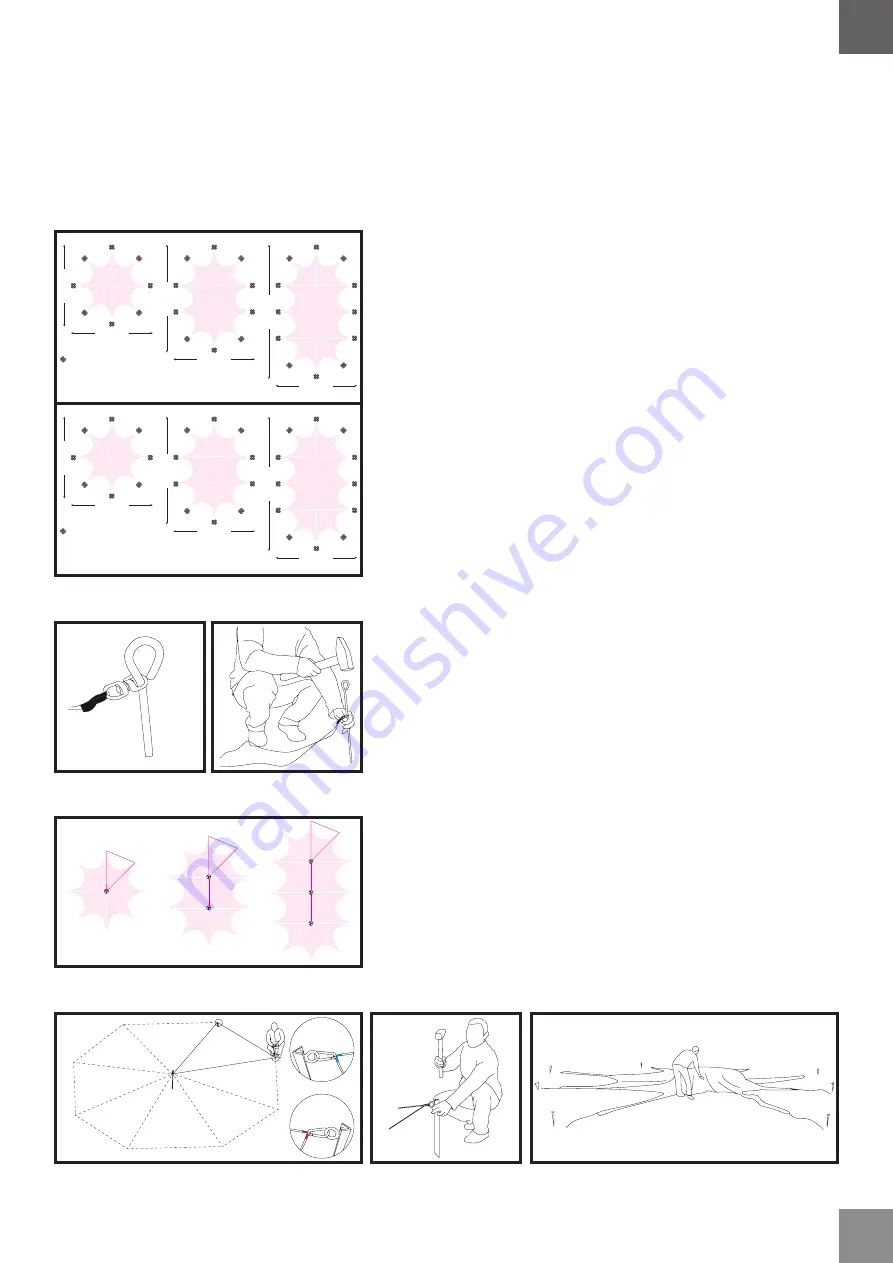
1. Choose a flat even spot where you want to pitch the tent. Make
sure the spot is big enough to do it (check the dimensions given in
a corresponding picture - Fig. 1).
2. Open the bag with your tent and check the content of the set
according to a corresponding table (Table 1 or Table 2).
3. Prepare the measuring tool and anchors. If you set up a tent with
2 or more poles, define the points i to set the poles (A, B, C) before
the anchoring points will be measured.
4. Unroll the measuring tool and find the spike with black marked
rope (Fig. 2).
5. Drive the spike into the ground to define the centre point of your
tent (Fig. 3).
6. If you set up a tent with 2 or more poles, first define the places of
all poles (Fig. 4).
7. Unfold the measuring tool to form a triangle. Fasten the carabiners
attached to the measuring tool to metal rings at try square anchors
(Fig. 5).
8. Stretch the rope with the anchor number 1 and put it vertically
to the ground to define the place of the first angle. Make sure the
rope is taut then drive the anchor into the ground (Fig. 6). When
setting up a tent with 2 or more poles, the assembly point number
1 must be in a stright line with the poles connecting line.
9. Stretch the other ropes of the measuring tool with the anchor
number 2. Define the place of the second angle and drive the anchor
into the ground. Remember to stretch the ropes all the time.
10. Unfasten the rope with the blue marking from anchor number 1
and fasten it to the anchor number 3.
11. Use the anchor number 3 to stretch the ropes and drive it into the
ground. Repeat the routine for the remaining anchors. If you set
up a tent with 2 or more poles, follow the sequence of defining
the points presented on Fig. 4.
12. Fastening anchors number 1 and 9 should square with each other.
Any possible difference is caused by inaccurate stretching the
ropes while measuring. There is no need to eliminate the differences
in measuring if your tent has no sidewalls and the difference is not
bigger than 10 cm.
13. Unfold the canopy inside the area defined by the anchors (Fig. 7).
Fig. 1
Fig. 4
Fig. 5
Fig. 7
Fig. 6
Fig. 2
Fig. 3
8B
1A
A
B
2B
4B
5A
6B
7A
3A
1
1
1
6
7
8
10
9
2
3
12
5
11
4
2
3
5
4
2
3
4
5
6
7
8
10
9
6
7
8
A
A
A
B
C
B
4 x 30kg
14 m
14 m
14 m
14
m
18
,5
m
23
m
Big 8
Big10
Big12
11,2 m
4 x 30kg
11,2 m
11,2 m
11
,2
m
14
,8
m
18
,4
m
Normal 8
Normal 10
Normal 12


