background image

4005 User Manual             


28 

10. 

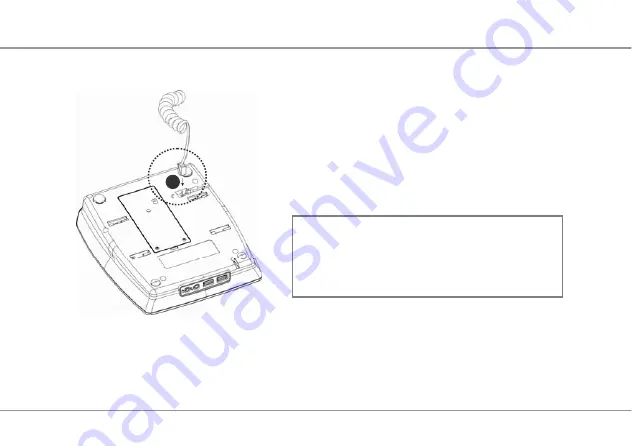
Plug the other end of the phone cord to the phone cord jack, which is on the back of the device.


12


NOTE


To remove/unplug the phone cord, 

press the clip on the plug and then pull it. 

11. 

Fix the phone cord in the slot, which is located next to the phone cord jack. 

12. 

Take out the power adapter from the package. 

All right reserved 

Содержание Pacific 4005

Страница 1: ...Pacific 4005 User Manual...

Страница 2: ...clude technical inaccuracies or typographical errors INVENTEC may make improvements and or changes in the product Information and specifications contained in this document are subject to change at any...

Страница 3: ...his will void your warranty z Do not strike shake or heat the device the battery and power adapter in a way which may cause battery leakage or rupture and damage to the device z Do not push objects of...

Страница 4: ...The device is designed to conform to the authoritative international radio frequency RF specifications Use manufacturer specified accessories only z Please observe the national local regulations in t...

Страница 5: ...device is prohibited Traffic Safety z Observe the rules and regulations of airline companies Turn off the device before boarding an aircraft z The device may interfere with the navigation and or comm...

Страница 6: ...ce in water Never use the product in a wet location z Do not place magnetic storage media such as magnetic cards and floppy disks near the device Radiation from the device may erase the information st...

Страница 7: ...its in ANSI IEEE C95 1 1999 and had been tested in accordance with the measurement methods and procedures specified in OET Bulletin 65 Supplement C This device was tested for contacting directly to th...

Страница 8: ...fluid leakage overheat fire or explosion may result z If there is battery leakage smoke or strange smell stop using the battery and keep it away from open flame to avoid fire or explosion z Disconnect...

Страница 9: ...he power adapter from the socket before cleaning or maintaining it Otherwise electric shock or short circuiting of the battery or power adapter may result z Ensure the plug of the power adapter is pro...

Страница 10: ...ed by turning the equipment on and off the user is encourage to try to correct the interference by one or more of the following measures Reorient or relocate the receiving antenna Increase the separat...

Страница 11: ...4005 User Manual 10 antenna or transmitter All right reserved...

Страница 12: ...ing device avoid touching the antenna area unnecessarily while the antenna is transmitting or receiving Contact with such an antenna affects the communication quality and may cause the device to opera...

Страница 13: ...ions 2 Chapter 1 Introduction 17 1 1 Front View and Rear View 17 1 2 Side Views 20 1 3 Accessories 22 1 4 Installation Procedure 23 Chapter 2 Getting Started 31 2 1 Standby Mode 31 Reading Missed Call...

Страница 14: ...ng a Call 37 Making a Call 37 Receiving a Call 37 Managing a Call Waiting 38 2 4 Setting a Speed Dial 39 Creating a Speed Dial from the Phonebook 39 Making a Call from Speed Dial 40 2 5 Basic Settings...

Страница 15: ...ontact 41 Viewing a Contact 42 Copying Contacts 43 Deleting All Contacts 44 3 2 Call History 44 3 3 SMS 46 Creating a Text Message 46 Viewing Messages 47 Editing a Draft Message 48 Deleting All Messag...

Страница 16: ...g the PIN Security 51 Factory Reset 52 Chapter 4 Using Applications 54 4 1 Installing External Devices 54 4 2 Browser 59 Navigating a Web Page 65 Using Speed Dial 65 Browsing the Tabs Tray 66 4 3 Sett...

Страница 17: ...4005 User Manual 16 4 6 Photo Album 73 4 7 SMS 75 4 8 Phonebook 77 Specification 79 All right reserved...

Страница 18: ...4005 User Manual 17 Chapter 1 Introduction 1 1 Front View and Rear View All right reserved...

Страница 19: ...he device 4 Function Keys Press to perform the functions showed above the keys 5 Speed Dial Keys Allows you to dial frequently called numbers by pressing a single key 6 Number Keys Enter numbers and c...

Страница 20: ...o hold a phone call 10 Speaker Key Press to speak and listen to a phone call hands free 11 Back Cover Remove the back cover to install batteries and the SIM card Refer to chapter 1 4 for more informat...

Страница 21: ...External Antenna Jack Connect an external antenna 2 Reset Insert a straightened paper clip into the reset hole to soft reset the device 3 DC Jack Connect the supplied power adapter 4 D Sub Socket Con...

Страница 22: ...input connectors with an adequate cable 7 USB Ports Connect the supplied mouse keyboard or other compatible devices 8 Audio Jack Connect an external headset 9 Microphone Jack Connect an external micro...

Страница 23: ...4005 User Manual 22 1 3 Accessories The product package includes 2 1 3 1 Main Device 2 Handset 3 USB Keyboard 4 USB Mouse 5 Coiled Phone Cord 4 6 Power Adapter 5 7 6 7 User Manual All right reserved...

Страница 24: ...3 1 4 Installation Procedure Complete the following steps before you start using the device 1 Remove the screws fixed on the back cover with a screw driver 2 Lift the back cover as shown Screw holes A...

Страница 25: ...4005 User Manual 24 3 Slide the latch of the SIM card case in the direction of the embossed arrow and then lift the SIM card case 1 2 All right reserved...

Страница 26: ...ser Manual 25 4 Make sure that the gold contact on the SIM card is facing down and then insert the SIM card 5 Push the SIM card case back and then lock the latch of the SIM card case 2 1 All right res...

Страница 27: ...ections Pleasecheckthepowercapacityofthe installedalkalinebatteriesregularlyand replacethemwhenthepowerlevelislow NOTE Batteriesareforemergencyuse e g accidentlypowerfailure pleaseavoidrelying ontheba...

Страница 28: ...h is locked every time after you install replace the SIM card or batteries in case internal components are damaged by accident 8 Take out the handset and the coiled phone cord from the package 9 Plug...

Страница 29: ...cord jack which is on the back of the device 12 NOTE To remove unplug the phone cord press the clip on the plug and then pull it 11 Fix the phone cord in the slot which is located next to the phone co...

Страница 30: ...he power adapter into the DC jack on the top side of the device and then insert the other side into a functioning power outlet If you want to replace batteries or SIM card disconnect the device from t...

Страница 31: ...now complete the basic installation and ready to use basic features of the device such as making a call and sending a text message Refer to chapter two and three for more information on how to operate...

Страница 32: ...ures such as making receiving calls viewing editing Call History and creating contacts etc 2 1 Standby Mode In standby mode you can see information showed on the screen as below Missed Call Time Date...

Страница 33: ...epeat steps described above Pressing Up Down to scroll through menus and then press Select to make a selection z In sub menus or the editing mode press Menu to stop your operations and go back to the...

Страница 34: ...d select Missed to view the missed call list The following options are available z Press Delete A highlighted entry will be deleted immediately z Press Dial Redial Make a call to a highlighted entry z...

Страница 35: ...g a new text message z Press Delete The message you are reading will be deleted immediately z Press Dial Redial Make a call to the sender of this message z Press Save Send If you select Save enter a n...

Страница 36: ...atically You can then enter numbers or characters by using the keypad Press to delete the last character you enter Press to select a character Press to toggle between uppercase and lowercase input Thr...

Страница 37: ...d one appears If the characters you want to input are in the same key select a character first and then repeat the same steps Indicators When the device is in editing mode you can see the following in...

Страница 38: ...ypad You can still lift the handset during a call to have a private conversation z If you want to speak privately lift the handset and then enter a phone number by using the keypad Receiving a Call Wh...

Страница 39: ...een Consult with your service provider to see if the call waiting feature is enabled Press Up Down to scroll to Yes or No and then press Select z If you select Yes the first call will be put on hold P...

Страница 40: ...Short press a speed dial key to show its assigned phone number z Long press a key to enter a phone number or edit the assigned number Press Save when finish editing Creating a Speed Dial from the Pho...

Страница 41: ...Call from Speed Dial z Lift the handset or press Speaker and then press a speed dial key 2 5 Basic Settings Setting Date and Time 1 In standby mode press Menu 2 Press Up Down to scroll to Setting and...

Страница 42: ...press Menu 2 Press Up Down to scroll to Phonebook and then press Select 3 Scroll to Add and then press Select 4 Enter the contact s name and then press Save 5 Enter the phone number and then press Sa...

Страница 43: ...information will be deleted permanently z Press Dial You can make a call immediately z Press Select You can edit the contact s information Press Save when finish editing the contact s name Press Save...

Страница 44: ...press Select 3 Scroll to Backup and then press Select 4 Scroll to Device to SIM or SIM to Device and then press Select All the contacts in the device or in the SIM card will be copied immediately NOTE...

Страница 45: ...r Device Contacts and then press Select 5 Follow the prompts on the screen press Up Down and Select to complete all steps 3 2 Call History In Call History you can view the calls you missed received an...

Страница 46: ...ries will be listed in time sequence if the call is made by a contact you will see the contact s name otherwise you will see a phone number and do any of the following steps z Press Dial to call a cal...

Страница 47: ...llow the prompts on the screen 3 3 SMS In SMS you can create and send a text message moreover you can view the unread read and sent text messages Creating a Text Message 1 In standby mode press Menu 2...

Страница 48: ...r 6 When entering your message the following options are available z Press Save Send and select Save This message will be saved as a draft You can edit and send it later z Press Save Send and select S...

Страница 49: ...n make a call immediately z Press Save Send If you select Save enter a name and then press Save again this sender or recipient will be saved to the Phonebook Select Send if you want to forward or repl...

Страница 50: ...g steps z Press Delete This message will be deleted permanently z Press Dial You can make a call immediately z Press Select You can edit this draft message When finished press Save and then select Sen...

Страница 51: ...l be sent as one message if contains less than 160 character If this number is exceeded the message will be divided into several messages and sent one by one All messages including received and sent m...

Страница 52: ...reset with a personal identification number PIN that is provided by your wireless service provider When PIN security is activated you need to enter the PIN whenever you use the device 1 In standby mod...

Страница 53: ...immediately NOTE If your PIN is entered incorrectly three times the SIM card will be blocked If this happens you can unblock it with the PIN Unblocking Key PUK obtained from your wireless service prov...

Страница 54: ...Select to back to the sub menu of Setting 5 When the screen shows a confirmation message press Select to continue 6 Scroll to Yes press Select and then enter the PIN The system will be reset to its d...

Страница 55: ...creen You can then access these applications using keyboard and mouse 4 1 Installing External Devices Complete the following steps before using the applications 1 Refer to chapter 1 4 make sure that t...

Страница 56: ...ision Prepare a TV cable not supplied connect the device and your TV as the diagram shown If there are color coded jacks in your TV you can match the plug and jack colors when installing the cable TV...

Страница 57: ...o connect to a computer monitor or projector Prepare a VGA cable not supplied connect the device and the monitor as shown Make sure that the D sub connectors are locked correctly on both the device an...

Страница 58: ...here are four USB ports on the device according to your preference or convenience select any two of them to connect the keyboard and mouse 5 Plug the USB end into the USB port on the device Make sure...

Страница 59: ...below Click any one of the icons to access the programs NOTE You may find the images on your monitor is not exactly the same as the illustrations on chapter four because the TV Out GUI image and VGA...

Страница 60: ...cannot have a phone call and Internet connection at the same time when only 2G GPRS or EDGE data connection is available The device will disconnect the Internet connection automatically when there is...

Страница 61: ...arch field enter a search term e g INVENTEC and then press the Enter key Speed Dial area click to open a saved Web page Title bar showing the title of the Web page that is displayed Enter an Internet...

Страница 62: ...k to go forward Click to reload or stop the current Web page Click to browse the tabs tray Click to access tools as below Button This button Open Page Opens a file A file picker allows you to browse a...

Страница 63: ...ookmarks which are links to Web pages that you want to view again To add a bookmark 1 Select this button The current Web page is usually shown at the top 2 Select the Add icon 3 In the Add Bookmarks d...

Страница 64: ...r it select Clear All Downloads Displays a list of recent downloads Find in Page Allows you to search for text within in a Web page Help Provides a guide to shortcuts and information about the browser...

Страница 65: ...d the page Privacy Manage passwords cookies and private data using this setting Password Manager When enabled the Password Manager remembers your usernames and passwords for sites you often use Accept...

Страница 66: ...atively click Tools Settings Zoom and select a percentage to expand the page z Click the Zoom out button to return to the normal page view z Right click an item such as a link an image a Speed Dial or...

Страница 67: ...ill appear in the dial you chose just click the dial to access it 4 To edit or clear a dial right click it Browsing the Tabs Tray Click the Tabs button to displays the tabs tray where you can switch t...

Страница 68: ...4005 User Manual 67 To close a tab 1 In the tabs tray select the Close button of the tab you want to close The close button expands 2 Select the Close button again to close the tab All right reserved...

Страница 69: ...4005 User Manual 68 4 3 Setting Click to open the Setting window You can view system information and change settings here Click in the top right corner of the window to close it All right reserved...

Страница 70: ...ection arrows to set date and time Click OK to save settings click Cancel if you do not want to save it z Background Click to switch the background pictures z Screen Saver Click ON to open this functi...

Страница 71: ...Select a language 4 4 File Explorer Click to open the File Explorer window You can view and manage all files stored in the device If there is a USB flash disk or other compatible devices connected yo...

Страница 72: ...go one directory level up File Click to perform the corresponding functions Click to go to the first or last page directly Click to go to the previous or next page Click to go to the previous or next...

Страница 73: ...les stored in the device and or a connected device e g mp3 player or USB flash disk When finished click in the top right corner of the window to close it File path Click to go one directory level up S...

Страница 74: ...o the previous or next five pages Click to adjust volumes when playing music 4 6 Photo Album Click to open the Photo Album window You can view and manage image files stored in the device and or a conn...

Страница 75: ...next page Click to go to the previous or next five pages NOTE When viewing photos in full screen mode click any part on the screen to back to the Photo Album window Click to go one directory level up...

Страница 76: ...se it NOTE You have to install a valid SIM card into the device in order to use the SMS function You can do any or more of the following steps z Click a message to show its content on the lower part o...

Страница 77: ...4005 User Manual 76 Click to go to the first or last page directly Click to go to the previous or next page Click to go to the previous or next five pages All right reserved...

Страница 78: ...here When finished click in the top right corner of the window to close it Enter a new contact s name and phone number in the text fields Click the Add to Contact button on the right side to save it...

Страница 79: ...click the Message button to launch the SMS program The selected contact will be passed as the recipient automatically Edit Select a contact and then click the Edit button to edit this contact s inform...

Страница 80: ...200A 65nm 528MHz Dimension 217 x 194 x 53 mm Weight 821g Antenna Embedded plus optional external antenna MCX USB USB port x 4 2 0 high speed host SIM Card SIM USIM Handset Connector RJ 9 connector Vid...

Страница 81: ...up Battery Alkaline battery No 3 AA battery x3 not included Reset Supported External Display VGA out supported up to 800x600 SVGA 60Hz 24 bit true color Embedded LCD Graphic type Resolution 128x32 dot...

Отзывы: