background image

1  Contents

1 General  .  .  .  .  .  .  .  .  .  .  .  .  .  .  .  .  .  .  .  .  .  .  .  .  .  .  .  .  .  .  .  .  .  . 4

1.1 Introduction. . . . . . . . . . . . . . . . . . . . . . . . . . . . . 4

1.2  Symbols in this Document . . . . . . . . . . . . . . . . 4

1.3  Preliminary System Check  . . . . . . . . . . . . . . . . 4

2 Safety  .  .  .  .  .  .  .  .  .  .  .  .  .  .  .  .  .  .  .  .  .  .  .  .  .  .  .  .  .  .  .  .  .  .  . 5

2.1  General Safety Information  . . . . . . . . . . . . . . . 5

2.2  Personal Safety Information. . . . . . . . . . . . . . . 5

2.3  Electrical Safety Check . . . . . . . . . . . . . . . . . . . 5

3  Digital Control Unit   .  .  .  .  .  .  .  .  .  .  .  .  .  .  .  .  .  .  .  .  .  .  . 6

3.1  Components' Overview. . . . . . . . . . . . . . . . . . . 6

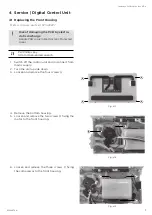
4  Service | Digital Control Unit   .  .  .  .  .  .  .  .  .  .  .  .  .  .  . 7

4.1  Replacing the Front Housing. . . . . . . . . . . . . . 7

4.2  Replacing the Mains Cable Socket . . . . . . . . . 9

4.3  Replacing the User Interface . . . . . . . . . . . . . . 9

4.4  Replacing the Compressor. . . . . . . . . . . . . . . 10

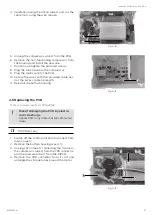
4.5  Replacing the PCB . . . . . . . . . . . . . . . . . . . . . . . 11

4.6  Replacing the CPR Connector. . . . . . . . . . . . .14

4.7  Replacing the Tubbing Set. . . . . . . . . . . . . . . .14

4.8  Replacing the Motor  . . . . . . . . . . . . . . . . . . . . .15

4.9  Replacing the Power Switch  . . . . . . . . . . . . . .16

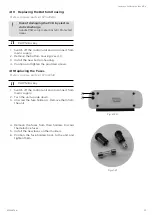
4.10 Replacing the Bottom Housing . . . . . . . . . . . .17

4.11  Replacing the Fuses  . . . . . . . . . . . . . . . . . . . . .17

5  Service | Mattress  .  .  .  .  .  .  .  .  .  .  .  .  .  .  .  .  .  .  .  .  .  .  .  .  .18

5.1  Replacing the CPR Connector. . . . . . . . . . . . .18

5.2  Replacing the Air Cell Set. . . . . . . . . . . . . . . . .18

Содержание Softform Active 2 RX

Страница 1: ...Invacare Softform Active 2 Rx Powered Hybrid Support Surface Service Manual en PROVIDER Keep this manual The procedures in this manual MUST be performed by a qualified technician...

Страница 2: ...ation duplication or modification in whole or in part is prohibited without prior written permission from Invacare Trademarks are identified by and All trademarks are owned by or licensed to Invacare...

Страница 3: ...Digital Control Unit 7 4 1 Replacing the Front Housing 7 4 2 Replacing the Mains Cable Socket 9 4 3 Replacing the User Interface 9 4 4 Replacing the Compressor 10 4 5 Replacing the PCB 11 4 6 Replacin...

Страница 4: ...injury or property damage See the information below for definitions of the signal words WARNING Indicates a hazardous situation that could result in serious injury or death if it is not avoided CAUTI...

Страница 5: ...Always use the complete new kit when replacing a part Spare parts kits can be ordered from Invacare Refer to your local Invacare website to access the electronic spare parts catalogue ESPC IMPORTANT...

Страница 6: ...ig 3 3 Fig 3 2 B H G I C E F D B Top housing C User s interface circuit board UIPCB D Compressor E IEC1 Mains socket F Bottom housing G Circuit board PCB H Air tube connector I Motor A User s interfac...

Страница 7: ...rostatic Protected Areas PH1 Phillips key 14 mm Open ended wrench 1 Switch off the control unit and disconnect from mains supply 2 Turn the unit upside down 3 Loosen and remove the four screws A 4 Rem...

Страница 8: ...nt housing 11 Remove the digital control s label from the front housing 12 Loosen and remove the seven screws J from the front housing 13 Remove the User s interface from the front hous ing Discard th...

Страница 9: ...rol Unit Ensure the brown A and blue B wires are plugged back into their original positions 4 Plug the brown A and blue B wires to the new mains socket C ensuring they are installed in the original po...

Страница 10: ...tube B and wires C into the new UIPCB 10 Reinstall the bottom housing see 4 1 11 Place the unit with the Invacare logo facing forward and install the new digital control s stick on label as illustrate...

Страница 11: ...ble ties Cut the excess cable tie length 11 Reinstall the bottom housing 4 5 Replacing the PCB Refers to spare parts kit SP1633122 Risk of damaging the PCB by electro static discharge Handle PCB s onl...

Страница 12: ...cables to the new PCB in their original position green and black power switch wire F green and black micro switch wire G 6 pin user interface wire H red compressor wires I and red and black fuse hold...

Страница 13: ...ading it under the microswitch wires D 16 Install the CPR connector in its place making sure the longer silicon tube is underneath 17 Slide the T valve underneath the microswitch connect the wider tub...

Страница 14: ...o tube is kinked or clamped 6 Reinstall the bottom housing 4 7 Replacing the Tubbing Set Refers to spare parts kit SP1633112 Risk of damaging the PCB by electro static discharge Handle PCB s only in E...

Страница 15: ...silicon tubes A connected to the motor 4 Unplug the black B and green C wires from the microswitch Risk of malfunction or damage to the Control Unit Ensure the black B and green C wires are plugged b...

Страница 16: ...t from mains supply 2 Remove the bottom housing see 4 1 3 Unplug the red A green B and two black C wires from the defective power switch Discard it Risk of malfunction or damage to the Control Unit En...

Страница 17: ...ottom housing see 4 1 3 Install the new bottom housing 4 Position and tighten the provided screws 4 11 Replacing the Fuses Refers to spare parts kit SP1633143 PH1 Phillips key 1 Switch off the control...

Страница 18: ...t Refers to spare parts kits SP1538771 SP1629717 SP1639718 SP1639719 1 Switch off the control unit and disconnect from mains supply 2 Open the zipper of the mattress and remove the top cover 3 Remove...

Страница 19: ...60129676 A 19 Invacare Softform Active 2 Rx page left intentionally blank...

Страница 20: ...re com www invacare no Deutschland Invacare GmbH Alemannenstra e 10 D 88316 Isny Tel 49 0 7562 700 0 Fax 49 0 7562 700 66 kontakt invacare com www invacare de Suomi Camp Mobility Patam enkatu 5 33900...

Отзывы: