Invacare Matrx SMH Скачать руководство пользователя страница 5

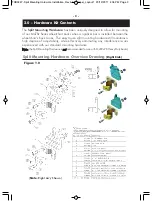
4.0  Hardware and MaTRx Back Installation

Important!

Prior to installation, ensure the 

left 

and 

right 

mounting plates

are in the proper orientation and secured to the back canes at the same height.

Important!

To function effectively and provide proper support, all MaTRx

backs should be centered between the back canes.

1

Remove existing wheelchair back upholstery (if applicable).

2

Establish the desired cane clamp/mounting plate seat depth configuration for
the end user (

as per Section 3.0

). 

3

Loosen the screws on the 

Lower Cane Clamp

ass’y and loosely install the clamps

(with mounting brackets) onto each back cane. 

(Install plastic inserts if required

).

4

Starting with the 

left*

back cane, position/slide the Lower Cane Clamp to the de-

sired height and tighten the clamp screws enough to hold it in place. 

(Clamps

can be fully tightened after the back is installed and all final adjustments have been
made.) 

5

From a fixed point on the wheelchair measure the exact height of the 

installed

Cane

Clamp assembly, and install the second Cane Clamp at the 

same height 

on the

right*

back cane.  Ensure the Cane Clamps/Mounting Plates are also mounted

parallel

with each other.  

6

With the lower cane clamp assemblies installed, loosen the screws 

on the 

Upper

Cane Clamp

assemblies and install the clamps (with mounting brackets) loosely

onto each back cane- approximately 7” (18cm) above the lower clamp ass’y. 

(Install

plastic inserts if required

). 

(Clamps can be fully tightened after the MaTRx back is

installed and all final adjustments have been made.)

7

To install the MaTRx-PB elite back onto the mounting plates: 

Step 1:

Slide the lower mounting pins from the MaTRx back into the notch in

the top of the lower mounting plates 

Step 2:

With the lower pins in place, adjust the height of the upper cane clamp

ass’y as needed so that the upper pins (on the MaTRx back) lock/snap into the
latch mechanism of the Upper Mounting Plates.

8

With the Split Mounting Hardware (upper and lower clamp ass’y) properly ad-
justed, fully tighten all clamp assembly hardware.

9

The mounting pins for the MaTRx back may require adjustment to ensure the back-
rest is propely fitted/secured to the wheelchair.; For instructions on adjusting the
mounting pins, please refer to the installation manual provided with the MaTRx
Series back.

*note:

refer to 

Figure 3.0

to confirm proper mounting plate orientation.

Installation Instructions:

TRD0247- Split Mounting Hardware Installation, Rev 4.0 (Europe)_Layout 1  20/12/2011  4:06 PM  Page 5

- 5 -

Содержание Matrx SMH

Страница 1: ...lisation 7 DE Gebrauchsanweisung 12 IT Manuale Utente 17 ES Manual de usuario 22 PT Manual de utiliza o 27 DA Brugsanvisning 32 SE Bruksanvisning 37 FI K ytt opas 42 TRD0247 Split Mounting Hardware In...

Страница 2: ...ortant 4 0 Hardware MaTRx Back Installation Wrench 22mm provided Torx Key T25 provided Hex Key 2mm provided Utility Knife Scissors Phillips Screwdriver Tape Measure Ruler 1 0 Tools Required EN TRD0247...

Страница 3: ...ing hardware still maintains a high degree of adjustability while effectively eliminating any interference issues experienced with our standard mounting hardware Note the Split Mounting Hardware is no...

Страница 4: ...vide up to 1 5 38mm of fore and aft adjustment relative to the cane clamp When establishing the mounting position for the MaTRx back ensure the stability of the wheelchair is not compromised Adjusting...

Страница 5: ...lel with each other 6 With the lower cane clamp assemblies installed loosen the screws on the Upper Cane Clamp assemblies and install the clamps with mounting brackets loosely onto each back cane appr...

Страница 6: ...rom a seated position in the wheelchair i e forward facing position Figure 3 0 Split Mounting Hardware Profile Left Right Assemblies Left Mounting Plates Left Mounting Plates Right Mounting Plates Rig...

Страница 7: ...t 4 0 Installation du mat riel et du dossier MaTRx Cl 22 mm fournie Cl Torx T25 fournie Cl hexagonale 2 mm fournie Couteau Ciseaux Tournevis Phillips Ruban mesurer R gle 1 0 Outils requis FR TRD0247 S...

Страница 8: ...TRX6286 PLAQUE DE FIXATION SUPERIEURE DIVISEE DU CHASSIS DE DOSSIER RT METRIQUE 7 2 TRX6287 CLAME DE DOSSIER DIVISEE METRIQUE 8 2 TRX6288 CLAME DIVISEE METRIQUE 9 2 TRH0101 RONDELLE PLATE SAE BZ 10 4...

Страница 9: ...nt galement 1 5 38 mm d ajustement avant et arri re relativement la clame de canne Lors du choix de la position de montage du dossier MaTRx assurez vous de la stabilit du fauteuil L ajustement de la p...

Страница 10: ...utres 6 Avec les ensembles de clames de cannes inf rieurs install s desserrez les vis de l ensemble de clames de cannes sup rieur et installez les clames avec les supports de fixation sans serrer sur...

Страница 11: ...ition assise dans le fauteuil roulant ex position tourn e vers l avant Figure 3 0 Profil du mat riel de fixation divis e ensembles gauche et droit Plaques de fixation gauches Plaques de fixation gauch...

Страница 12: ...und Befestigung der MaTRx R ckenlehne Schraubenschl ssel 22 mm enthalten Torx Schl ssel T25 enthalten Inbusschl ssel 2 mm enthalten Universalmesser Schere Kreuzschlitzschraubendreher Meterma Lineal 1...

Страница 13: ...TRX6107 SPERRVERRIEGELUNG METRISCH 6 1 TRX6286 HINTERER SPLIT RAHMEN OBERE MONTAGEPLATTE RT METRISCH 7 2 TRX6287 HINTERE SPLIT KLEMME METRISCH 8 2 TRX6288 SPLIT KLEMME METRISCH 9 2 TRH0101 0 63 cm UNT...

Страница 14: ...ein stellung von 38 mm 1 5 in Abh ngigkeit von der Klemme am Gest nge ausgelegt Stellen Sie bei der Einstellung der Montageposition der MaTRx R ckenlehne sicher dass die Stabilit t des Rollstuhls nich...

Страница 15: ...icher dass die Gest ngeklemen Befestigungs platten parallel zueinander montiert sind 6 Die untere Gest ngeklemme ist montiert Lockern Sie nun die Schrauben an der oberen Gest ngeklemme und installiere...

Страница 16: ...nden Position im Rollstuhl d h der Benutzer schaut nach vorne Abbildung 3 0 Die Teile f r das getrennte Befestigen im Profil Montages tze f r linke und rechte Seite Befestigungsplatten links Befestigu...

Страница 17: ...elementi di montaggio e dello schienale MaTRx Chiave fissa 22 mm in dotazione Chiave Torx T25 in dotazione Chiave esagonale 2 mm in dotazione Coltellino multiuso forbici Cacciavite Phillips Metro a n...

Страница 18: ...HIUSURA METRICO 6 1 TRX6286 PIASTRA DI FISSAGGIO SUPERIORE DEL TELAIO DELLO SCHIENALE A INTAGLIO DX METRICO 7 2 TRX6287 MORSETTO A INTAGLIO DELLO SCHIENALE METRICO 8 2 TRX6288 MORSETTO A INTAGLIO METR...

Страница 19: ...pollici 38 mm di in avanti e indietro rispetto al morsetto del tubo Nello stabilire la posizione di montaggio per Io schienale MaTRx assicurarsi che la stabilit della carrozzina non sia compromessa La...

Страница 20: ...le piastre di fissaggio siano inoltre montati in parallelo l uno con l altro 6 Con i gruppi morsetti dei tubi inferiori installati allentare le viti sui gruppi dei morsetti dei tubi superiori e insta...

Страница 21: ...ta in avanti Figura 3 0 Profilo degli elementi di montaggio a intaglio gruppi sinistro e destro Piastre di fissaggio sinistre Piastre di fissaggio sinistre Piastre di fissaggio destre Piastre di fissa...

Страница 22: ...n de componentes y del respaldo MaTRx Llave de tubo 22 mm suministrada Llave torx T25 suministrada Llave hexagonal 2 mm suministrada Cuchillo tijeras Destornillador Phillips Cinta m trica regla 1 0 He...

Страница 23: ...ICO 6 1 TRX6286 PLACA DE MONTAJE SUPERIOR DEL CHASIS TRASERO SEPARADO RT M TRICO 7 2 TRX6287 8 2 TRX6288 ABRAZADERA SEPARADA M TRICO 9 2 TRH0101 ARANDELA PLANA DE SAE NC 10 4 TRH0143 ARANDELA PLANA DE...

Страница 24: ...inferior tambi n proporcionan un margen de ajuste de 38 mm 1 5 pulg respecto a la abrazadera del m stil Cuando determine la posici n de montaje del respaldo MaTRx aseg rese de que la esta bilidad de l...

Страница 25: ...otra 6 Cuando los conjuntos de abrazaderas del m stil inferior est n instaladas afloje los tornillos del conjunto de abrazaderas del m stil inferior e instale sin apretar las abrazaderas con los sopo...

Страница 26: ...n sentada en la silla de ruedas posici n de cara a la marcha Figura 3 0 Perfil de los componentes para el montaje por separado conjuntos izquierdo y derecho Placas de montaje izquierdas Placas de mon...

Страница 27: ...em e do encosto MaTRx Chave de caixa 22 mm facultado Chave interna hexalobular T25 facultado Chave hexagonal 2 mm facultado L mina utilit ria tesouras Chave de fendas Phillips Fita m trica r gua 1 0 F...

Страница 28: ...TRX6286 PLACA DE FIXA O SUPERIOR DA ESTRUTURA POSTERIOR DIVIDIDA M TRICA 7 2 TRX6287 GRAMPO POSTERIOR DIVIDIDO M TRICO 8 2 TRX6288 GRAMPO DIVIDIDO M TRICO 9 2 TRH0101 ANILHA PLANA DE POL SAE ZP 10 4...

Страница 29: ...juste frontal e recuado de 38 mm 1 5 pol relativamente ao grampo de barra Quando definir a posi o de fixa o do MaTRx assegure que a estabilidade da cadeira n o comprometida O ajuste da posi o frontal...

Страница 30: ...dos paralelamente um com o outro 6 Com as unidades de grampo de barra inferiores instaladas desaperte os parafusos nas unidades do Grampo de barra superior e instale os grampos com os suportes de fixa...

Страница 31: ...i o sentada na cadeira de rodas ou seja numa posi o orientada para a frente Figura 3 0 Perfil da ferragem de montagem dividida unidades esquerda e direita Placas de fixa o esquerdas Placas de fixa o e...

Страница 32: ...Beslag og montering af MaTRx rygl n Skruen gle 22 mm medf lger Torx skruetr kker T25 medf lger Unbrakon gle 2 mm medf lger Hobbykniv saks Phillips skruetr kker M leb nd lineal 1 0 N dvendigt v rkt j...

Страница 33: ...TOP METRISK 6 1 TRX6286 DELT BAGRAMME VERSTE MONTERINGSPLADE RT METRISK 7 2 TRX6287 DELT BAGKLEMME METRISK 8 2 TRX6288 DELT KLEMME METRISK 9 2 TRH0101 FLAD SP NDESKIVE SAE BZ 10 4 TRH0143 0 281 x 3 8...

Страница 34: ...t ogs muligt at foretage en justering p 1 5 38 mm for og bag i forhold til r rklemmen N r du bestemmer MaTRx rygl nets monteringsposition skal du sikre at k re stolen st r stabilt Ved at justere rygl...

Страница 35: ...klemmesamlinger er installeret l snes skruerne p de verste r rklemmesamlinger og klemmerne installeres med monteringsbeslag l st p begge bagr r ca 7 18 cm over den nederste klemmesamling Installer eve...

Страница 36: ...ds tning af at brugeren sidder i k restolen dvs med ansigtet pegende fremad Figur 3 0 Delt monteringsbeslagprofil venstre og h jre samlinger Venstre monteringsplader Venstre monteringsplader H jre mon...

Страница 37: ...ngsmaterial och montering av MaTRx ryggst d Skiftnyckel 22 mm tillhandah lls Torx nyckel T25 tillhandah lls Insexnyckel 2 mm tillhandah lls K kskniv sax Stj rnskruvmejsel M ttband linjal 1 0 Verktyg s...

Страница 38: ...RE MONTERINGSPLATTA TILL DELAD RYGGST DSRAM H METRIC 7 2 TRX6287 KL MMA TILL DELAT RYGGST D METRIC 8 2 TRX6288 DELAD KL MMA METRIC 9 2 TRH0101 PLATT BRICKA SAE BZ 10 4 TRH0143 0 281 x 3 8 OD x 0 031 T...

Страница 39: ...ing p 38 mm 1 5 fram t och bak t i f rh llande till r rkl mman N r monteringspositionen f r MaTRx ryggst det fastst lls ska du se till att rullstolens stabilitet inte p verkas N r ryggst dets position...

Страница 40: ...monterats parallellt med varandra 6 Med de nedre r rkl msanordningarna monterade ska du lossa p skruvarna p de vre r rkl msanordningarna och montera kl mmorna med monteringsf sten provisoriskt p varj...

Страница 41: ...s fr n sittande position i rullstolen dvs fram triktad position Bild 3 0 Profil f r materialet f r delad montering v nster och h ger anordning V nster monteringsplatta V nster monteringsplatta H ger m...

Страница 42: ...an asennus Ruuviavain 22 mm kuuluu toimitukseen Torx avain T25 kuuluu toimitukseen Kuusiokoloavain 2 mm kuuluu toimitukseen Yleisveitsi sakset Phillips ruuvimeisseli Rullamitta viivain 1 0 Vaaditut ty...

Страница 43: ...ETRINEN 6 1 TRX6286 HALKAISTU TAKARUNGON YLEMPI KIINNITYSLEVY OIKEA METRINEN 7 2 TRX6287 HALKAISTU KIINNITTIMEN TAKAOSA METRINEN 8 2 TRX6288 HALKAISTU KIINNITIN METRINEN 9 2 TRH0101 LITTE ALUSLEVY SAE...

Страница 44: ...n kiinnityslevyn aukot mahdollistavat enint n 1 5 38 mm ennen ja j lkeen s d n suhteessa kepin puristimeen Kun luot MaTRx selk nojan kiinnitysasentoa varmista ettei py r tuolin vakaus vaarannu Selk no...

Страница 45: ...ettu vastakkaisesti toisiinsa n hden 6 Kun alemman kepin puristimen kokoonpanot on asennettu l ys ruuveja ylem m ss kepin puristimen kokoonpanossa ja asenna puristimet ja kiinnityskehikot l ys sti jok...

Страница 46: ...ttaessa py r tuolissa eli kasvot menosuuntaan asennosta Kuva 3 0 Jaetun kiinnityslaitteen profiili vasen ja oikea kokoonpano Vasemmat kiinnityslevyt Vasemmat kiinnityslevyt Oikeat kiinnityslevyt Oikea...

Страница 47: ...TRD0247 Split Mounting Hardware Installation Rev 4 0 Europe _Layout 1 20 12 2011 4 18 PM Page 47 47...

Страница 48: ...Grensesvingen 9 Postboks 6230 Etterstad N 0603 Oslo Tel 47 0 22 57 95 00 Fax 47 0 22 57 95 01 norway invacare com island invacare com Italia Invacare Mecc San s r l Via dei Pini 62 I 36016 Thiene VI T...

Отзывы: