background image

IVC™ Bariatric Bed Rail

2

Part No 1125060


WARNING

For the Bariatric Bed, use the mounting brackets attached to the bed frame to 

assemble the 6640 half bed rail side adjustment clamps. These side adjustment 

clamps MUST be used when installing half length bed rails onto the Bariatric Bed. 

DO NOT use the chrome colored side adjustment clamps supplied with the half 

length bed rail kits, as these are not designed for the bariatric bed.
After any adjustments, repair or service and before use, make sure all attaching 

hardware is tightened securely. Bed rails with dimensions different from the original 

equipment supplied or specified by the bed manufacturer may not be 

interchangeable and may result in entrapment or other injury. 
To reduce the risk of entrapment make certain that the crossbraces DO NOT 

exceed the width of the mattress. Mattress MUST fit bed frame and side rails snugly 

to reduce the risk of entrapment.
Unless the bed rail is in the lowest position, ensure that the plunger pins fully 

protrude through the adjustment hole of each bed rail tube. This ensures that the 

bed rail is securely locked in position. (The lowest position for the bed rail occurs 

when the bed rail rests against the bed rail stop. Spring loaded pins DO NOT engage 

into an adjustment hole when the bed rail in the lowest position.)

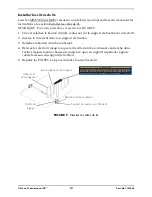
BAR6640IVC Rails for Bariatric Bed Model BAR600IVC

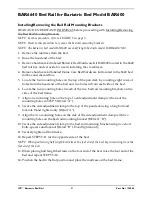
Installing/Removing the Bed Rail Mounting Brackets

READ AND UNDERSTAND WARNINGS before proceeding with Installing/Removing 

the Bed Rail Mounting Brackets.

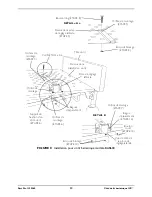
NOTE: For this procedure, refer to FIGURE 1 on page 3.
NOTE: Reverse this procedure to remove the bed rail mounting brackets.
NOTE: The bed rails can be mounted on either the head and/or foot end of the bed.

1. Locate the two bed rail mounting holes on the head or foot end of the bed frame.
2. Align the bed rail mounting bracket holes with the two bed rail mounting holes.
3. Using two bolts, washers and locknuts, secure the bed rail mounting bracket to the bed 

frame. Securely tighten.

4. Repeat STEPS 1-3 to install the remaining bed rail mounting brackets.

Содержание IVC BAR6640IVC

Страница 1: ...OCCUR Proper patient assessment and monitoring and proper maintenance and use of equipment is required to reduce the risk of entrapment Variations in bed rail dimensions and mattress thickness size or density could increase the risk of entrapment Visit the FDA website at http www fda gov to learn about the risks of entrapment Review A Guide to Bed Safety published by the Hospital Bed Safety Workgr...

Страница 2: ...rail is in the lowest position ensure that the plunger pins fully protrude through the adjustment hole of each bed rail tube This ensures that the bed rail is securely locked in position The lowest position for the bed rail occurs when the bed rail rests against the bed rail stop Spring loaded pins DO NOT engage into an adjustment hole when the bed rail in the lowest position BAR6640IVC Rails for ...

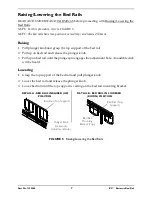
Страница 3: ...upport of the bed rail rests securely against the top of the bed rail mounting bracket 5 Repeat STEPS 1 4 to install the remaining bed rail FIGURE 2 Installing the Bed Rails Bed Rail Mounting Bracket Holes Bolts Bed Rail Mounting Holes Washer Locknut WARNING Patient entrapment with bed side rails may cause injury or death Mattress must fit bed frame and side rails snugly to prevent patient entrapm...

Страница 4: ...end of the bed and two holes in from each side of the bed 6 Locate the two mounting holes in each of the two bed rail mounting brackets on the sides of the bed frame 7 Align one mounting hole on the top of a side adjustment clamp with one of the mounting holes in STEP 5 Detail A 8 Secure the side adjustment clamp to the top of the pan deck using a long bolt and locknut Hand tighten only Detail A 9...

Страница 5: ... of Side Adjustment Clamp STEP 5 Head End of Bed Top of Pan Deck Side Adjustment Clamp Mounting Holes STEP 5 Mounting Hole MountingHoles STEP 6 Bed Rail Mounting Bracket STEP 6 Side View of Side Adjustment Clamp Locknut STEP 10 Short Bolt Step 10 Spacer STEP 10 Mounting Hole STEP 9 Locknut STEP 8 DETAIL A See DETAIL A DETAIL B Spacers ...

Страница 6: ... the top support of the bed rail rests securely against the top of the bed rail mounting bracket 5 Repeat STEPS 1 4 to install the remaining bed rail FIGURE 4 Installing the Bed Rails Top Support Bar Half Length Bed Rail Adjustment Hole Bed Rail Mounting Bracket Plunger Knob WARNING Patient entrapment with bed side rails may cause injury or death Mattress must fit bed frame and side rails snugly t...

Страница 7: ...ase the plunger knob 3 Pull up on bed rail until the plunger pin engages the adjustment hole An audible click will be heard Lowering 1 Grasp the top support of the bed rail and pull plunger knob 2 Lower the bed rail and release the plunger knob 3 Lower bed rail until the top support is resting on the bed rail mounting bracket FIGURE 5 Raising Lowering the Bed Rails Bed Rail Top Support Bed Rail Mo...

Страница 8: ...entification within thirty 30 days of return authorization date DO NOT return products to our factory without our prior consent C O D shipments will be refused please prepay shipping charges LIMITATIONS AND EXCLUSIONS THE WARRANTY SHALL NOT APPLY TO PROBLEMS ARISING FROM NORMAL WEAR OR FAILURE TO ADHERE TO THE ENCLOSED INSTRUCTIONS IN ADDITION THE FOREGOING WARRANTY SHALL NOT APPLY TO SERIAL NUMBE...

Страница 9: ...it et l autre près du pied du lit si c est autorisé POSSIBILITÉ DE COINCEMENT Une évaluation et une surveillance adéquates du patient sont nécessaires en plus de l entretien et de l utilisation appropriés de l équipement pour réduire le risque que le patient se coince Certaines dimensions des côtés de lit ainsi que l épaisseur les dimensions et la densité du matelas peuvent augmenter ce risque Vis...

Страница 10: ...s chevilles de son tube coulissant dépassent de chaque côté des orifices d ajustement Cela assure que le côté de lit est solidement verrouillé en position Le côté de lit est descendu à sa plus basse position quand il touche aux butées d arrêt Les chevilles à ressort ne peuvent pas s enclencher dans un orifice d ajustement quand le côté de lit est à sa plus basse position Côtés de lit BAR6640IVC po...

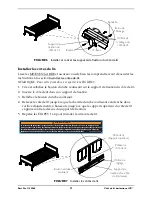
Страница 11: ...t s appuie contre le dessus du support de fixation 5 Répétez les ÉTAPES 1 à 4 pour installer l autre côté de lit FIGURE 7 Installer les côtés de lit Support de fixation du côté de lit Orifices Boulons Orifices de montage du côté de lit Rondelle Écrou de blocage Le coincement du patient dans l espace entre les côtés de lit peut causer des blessures ou la mort Le matelas doit être ajusté au cadre et...

Страница 12: ...artir des orifices de la tête du lit et à deux orifices à partir des côtés du lit 6 Sur les barres latérales du cadre du lit localisez les orifices de montage sur chacun des deux supports de fixation du côté de lit 7 Alignez un orifice de montage sur le dessus de la pince de réglage latérale avec l un des orifices de montage décrits à l ÉTAPE 5 détail A 8 Fixez solidement la pince de réglage latér...

Страница 13: ...du lit Dessus de la plateforme du lit Pince de réglage latérale Orifices de montage ÉTAPE 5 Orifice de montage Orifices de montage ÉTAPE 6 Support de fixation d un côté de lit ÉTAPE 6 Vue de côté de la pince de réglage latérale Écrou de blocage ÉTAPE 10 Boulon court ÉTAPE 10 Bague d espacement ÉTAPE 10 Orifice de montage ÉTAPE 9 Écrou de blocage ÉTAPE 8 DÉTAIL A Voir DÉTAIL A DÉTAIL B Bagues d esp...

Страница 14: ...n support supérieur s appuie contre le dessus du support de fixation 5 Répétez les ÉTAPES 1 à 4 pour installer l autre côté de lit FIGURE 9 Installer les côtés de lit Barre supérieure de support Côté de lit demi longueur Orifice de réglage Support de fixation du côté de lit Bouton du tube coulissant Le coincement du patient dans l espace entre les côtés de lit peut causer des blessures ou la mort ...

Страница 15: ...e bouton du tube coulissant 3 Montez le côté de lit jusqu à ce que la cheville du tube coulissant s enclenche dans l orifice d ajustement Vous entendrez un clic Pour baisser le côté de lit 1 Tenez fermement le support supérieur du côté de lit et tirez sur le bouton du tube coulissant 2 Baissez le côté de lit et relâchez le bouton du tube coulissant 3 Baissez le côté de lit jusqu à ce que son suppo...

Страница 16: ...duits à l usine avant d avoir obtenu notre autorisation Les envois contre remboursement seront refusés veuillez payer les frais d expédition RESTRICTIONS LA GARANTIE NE S APPLIQUE PAS AUX PROBLÈMES DÉCOULANT DE L USURE NORMALE OU DU NON RESPECT DE CES DIRECTIVES DE PLUS LA PRÉSENTE GARANTIE NE S APPLIQUE PAS AUX PRODUITS DONT LE NUMÉRO DE SÉRIE A ÉTÉ MODIFIÉ OU EFFACÉ AUX PRODUITS MAL ENTRETENUS A...

Отзывы: