background image

User Manual 
jetSpeed 520 
Getting Started 

Ver.1.0 

10/03 


page 6 / 84 


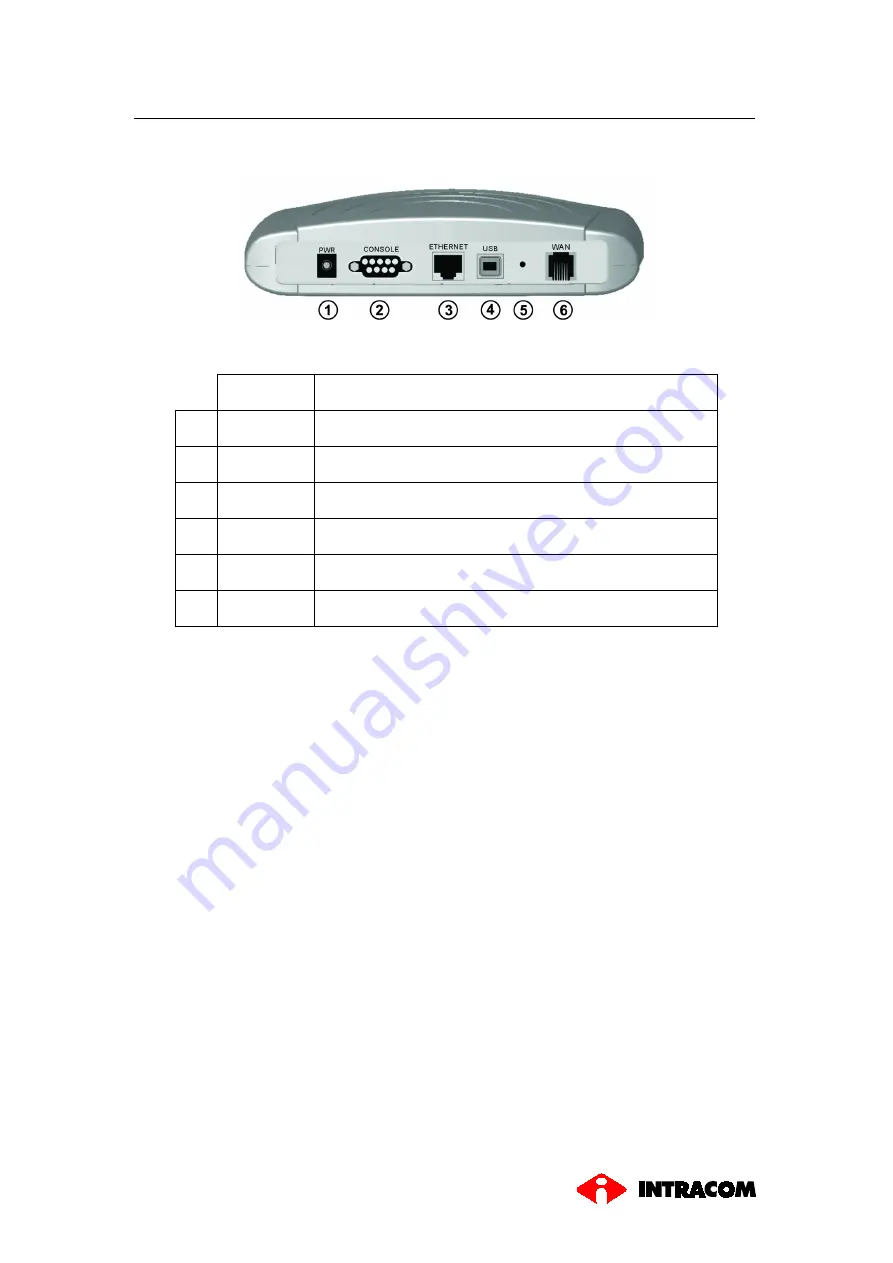
1.3.2 REAR 

PANEL 


Fig. 1-2 


LABEL 

DESCRIPTION 

1 PWR 

Power jack; connect to a power adapter 

2 CONSOLE 

Serial port; connect to an ASCII data terminal 

3 ETHERNET 

RJ-45 port; connect to a PC or LAN 

4 USB 

USB port; connect to a PC 

5 RESET 

Resets jetSpeed 520 to its factory default settings 

6 WAN 

RJ-11port; connect to the ADSL outlet 

Table 1-2 

Содержание jetSpeed 520

Страница 1: ......

Страница 2: ......

Страница 3: ...2 1 OVERVIEW 12 2 2 PREPARATION 12 2 3 LOGIN 13 2 3 1 HOME 14 2 3 2 LAN 16 2 3 3 WAN 21 2 3 4 BRIDGING 31 2 3 5 ROUTING 33 2 3 6 SERVICES 35 2 3 7 ADMIN 47 3 QUICK PROTOCOL SETUP 54 3 1 RFC 1483 BRID...

Страница 4: ...User Manual jetSpeed 520 Getting Started Ver 1 0 10 03 page 2 84 page intentionally left blank...

Страница 5: ...ream and up to 1Mbps upstream G lite operation up to 1 5Mbps downstream rate and 512Kbps upstream rate One 10 100BaseT Ethernet Port and one USB Port for PC connection DHCP server supported for easy L...

Страница 6: ...ts of the following items jetSpeed 520 ADSL Device Unit RJ 45 Cable Ethernet Cable RJ 11 Cable Telephone Cable USB Cable AC Adapter CD ROM includes User s Manual and USB Driver Line Filter Splitter Li...

Страница 7: ...3 2 1 5 Fig 1 1 LABEL LED STATUS COLOR DESCRIPTION 1 LAN ON Green Ethernet port is connected 2 USB ON Green USB port is connected 3 PWR ON Green Power supply is connected 4 WAN Blinking Green Synchron...

Страница 8: ...SCRIPTION 1 PWR Power jack connect to a power adapter 2 CONSOLE Serial port connect to an ASCII data terminal 3 ETHERNET RJ 45 port connect to a PC or LAN 4 USB USB port connect to a PC 5 RESET Resets...

Страница 9: ...devices to the TEL output of the central splitter 3 Use a RJ 45 cable to connect one end to the Ethernet port of the jetSpeed 520 and the other end to the LAN or a PC with an Ethernet adapter install...

Страница 10: ...From the command window type telnet 192 168 1 1 Local Ethernet Port Web Browser Connect the Ethernet port to your local network or directly to a PC Start the web browser and enter default local Ether...

Страница 11: ...sk 255 255 255 0 Trellis Mode Enable Full Duplex Auto FDM Mode Fdm Protocol RFC1483 Bridge Mode Coding Gain Auto VPI VCI 8 35 Transmit Power Atten 0dB Class QoS UBR Spanning Tree Disable Packet Filter...

Страница 12: ...ping jetSpeed 520 The default local IP address is 192 168 1 1 3 Under DOS prompt execute FTP command open IP address of jetSpeed 520 then input user name and password 4 Execute upload command put tep...

Страница 13: ...Click Hypertrm exe Enter Connection Name Select Icon Click on the OK button 3 Select COM port to communicate with the jetSpeed 520 Choose direct to COM1 or COM2 and click on the OK button 4 Set Port...

Страница 14: ...will describe the detailed settings on various ADSL configurations 2 2 PREPARATION To start the Web Management proceed as follows Step Action 1 Open the Web Browser in any of each PC 2 Type in the IP...

Страница 15: ...ord You can also change the User Name and Password or add new users For further details see paragraph 2 3 7 Admin User Config 2 Click OK to start the web management Operation After you log into the we...

Страница 16: ...ware version device mode uptime current time time zone daylight savings time and domain name DSL Displays operation status last state DSL version and DSL standard WAN Interface Displays the WAN interf...

Страница 17: ...Management page 15 84 Step Action 1 Click on the interface name to add change or remove any of the interface settings 2 Click on the Modify button to set the device date time time zone and other relat...

Страница 18: ...nterface Management Ver 1 0 10 03 page 16 84 2 3 2 LAN Click on the LAN tab to view its sub menu s and configure the LAN settings The four sub menu s are LAN Config DHCP Mode DHCP Server DHCP Relay Ea...

Страница 19: ...Manual if you would like to enter your own IP address Select External DHCP Server if a DHCP server other than this device assigns the IP addresses Select Internal DHCP Server if you would like this de...

Страница 20: ...8 84 DHCP Mode Step Action 1 Click on the DHCP Mode link to select a DHCP setting 2 From the drop down list select DHCP Server DHCP Relay or None 3 Click on the Submit button when completed NOTE jetSp...

Страница 21: ...ver Step Action 1 Click on the DHCP Server link to view the DHCP Server settings The table displays the DHCP server settings Start IP End IP Domain Name Gateway Address and Status 2 Click on the Add b...

Страница 22: ...20 84 DHCP Relay Step Action 1 Click on the DHCP Relay link to view the DHCP Relay settings 2 Fill in the DHCP server IP address in the text boxes and select an interface name from the drop down list...

Страница 23: ...anual jetSpeed 520 Web Interface Management page 21 84 2 3 3 WAN Click on the WAN tab to view its sub menu s and configure the WAN settings The five sub menu s are DSL ATM VC PPP EoA IPoA Each sub men...

Страница 24: ...k on the DSL Param button to view the DSL parameters and the Stats button to view the DSL statistics Both the DSL Parameters and DSL Statistics are described below 3 Click on the Clear button to clear...

Страница 25: ...Step Action 1 Click on the DSL Param button to view the DSL parameters Another window will then display the DSL parameters which may be different due to the type and speed of the network 2 Click on t...

Страница 26: ...tats Step Action 1 Click on the Stats button to view the DSL status Another window will then display the DSL status which may be different due to the type and speed of the network 2 Click on the Close...

Страница 27: ...can icon to delete the current interface or edit the current interface by clicking on the pencil icon 3 Click on the Add button to another interface 4 After you click on the Add button another window...

Страница 28: ...e type protocol WAN IP gateway IP default route DHCP DNS and operation status 2 Click on the trash can icon to delete the current interface or edit the current interface by clicking on the pencil icon...

Страница 29: ...public private or DMZ Status Select start stop or start on data Protocol Select between PPPoA and PPPoE Service Name Enter a name for this service in the text box Use DHCP Select between enable and di...

Страница 30: ...y type lower interface config IP network IP DHCP default route gateway IP and status 2 Click on the trash can icon to delete the current interface or edit the current interface by clicking on the penc...

Страница 31: ...Interface Sec Type Select between public private or DMZ Lower Interface Select a lower interface name from the drop down list Conf IP Address Enter the LAN IP address here Netmask Enter the subnet ma...

Страница 32: ...button to add another interface 4 After you click on the Add button another window will pop up The following is a list of field names and their descriptions After filling in the table click on the Su...

Страница 33: ...4 BRIDGING Click on the Bridging tab to view its sub menu s and configure the bridge settings The five sub menu s are Bridging LAN Config DSL ATM VC RFC 1483 Interface EoA The bridging sub menu is de...

Страница 34: ...on This table displays bridge information such as the Interface Name 2 Click on the trash can icon to delete the current interface or edit the current interface by clicking on the pencil icon 3 There...

Страница 35: ...5 ROUTING Click on the Routing tab to view its sub menu s and configure the routing settings The eight sub menu s are IP route IP address LAN Config DSL ATM VC PPP EoA IPoA The IP route sub menu is de...

Страница 36: ...r requests to send data to a listed destination the device uses the Next Hop to identify the first Internet router it should contact to route the data most efficiently 2 After you click on the Add but...

Страница 37: ...Interface Management page 35 84 2 3 6 SERVICES Click on the Services tab to view its sub menu s and configure the service settings The six sub menu s are NAT RIP Firewall IP filter DNS Blocked Protoc...

Страница 38: ...ange the times and click on the Submit button 2 The NAT feature offers three sections First click on the Enable radio box to enable the NAT feature Then select a NAT option from the drop down list The...

Страница 39: ...agement page 37 84 NAT Entry Rule Step Action 1 The table displays NAT route configuration Click on the trash can icon to delete the current rule or click on the Add button to add another rule 2 After...

Страница 40: ...from where NAT will be used Local Address To Enter a local IP address to where NAT will be used Global Address From Enter an Internet IP address from where NAT will be used Global Address To Enter an...

Страница 41: ...20 Web Interface Management page 39 84 NAT Translations Step Action 1 The table displays the current NAT translations if any exist 2 Click on the trash can icon to delete a translation or click on the...

Страница 42: ...ersion of the protocol used In order to add a RIP configuration follow the steps below Step Action 1 First click on the Enable radio box to enable the RIP configuration 2 Select an interface name from...

Страница 43: ...CRIPTION Blacklist Status Select enable or disable blacklist Blacklist Period Enter a time period to hold the blacklist Attack Protection Select enable or disable Attach protection DOS Protection Sele...

Страница 44: ...lect if you would like to accept or deny the private default action This will apply the security level to the private domain 3 Select if you would like to accept or deny the public default action This...

Страница 45: ...ge 43 84 8 Click on the Stats button to view the IP filter rule statistics You may click on the Clear button to clear the table or click on the Close button to close the window 9 To add an IP filter r...

Страница 46: ...interface from the drop down list Log Option Select to enable or disable logging Blacklist status Select to enable or disable the blacklist End time Select an end time for the IP filter Src IP Address...

Страница 47: ...adding and deleting DNS server IP addresses You may also enable disable DNS relay from this page In order to add a DNS server IP addresses follow the steps below Step Action 1 Select the enable radio...

Страница 48: ...Step Action 1 Click on the Blocked Protocols link to view the list of protocols This page is used to block or unblock protocols running across the system 2 Check the box if you would like the protoco...

Страница 49: ...ace Management page 47 84 2 3 7 ADMIN Click on the Admin tab to view its sub menu s and configure the admin settings The six sub menu s are User Config Commit Reboot Image Upgrade Alarm Diagnostics Po...

Страница 50: ...is case sensitive Step Action 1 To add a new user click on the Add button or click on the pencil icon to edit the settings of an existing user 2 After you click on the Add button another window will...

Страница 51: ...emory and reboot the device using different options Step Action 1 Click on the Commit button to save the changes 2 In order to reboot the device select an option from the drop down list The six option...

Страница 52: ...tware by obtaining the compressed upgrade firmware file from the service provider and then follow the steps Step Action 1 Click on the Browse button to select the upgrade file tepatch bin 2 Click on t...

Страница 53: ...20 Web Interface Management page 51 84 Alarm Step Action 1 Click on the Alarm link to view the list of alarms The alarms shown in the table have been recorded in response to system events 2 Click on t...

Страница 54: ...nagement Ver 1 0 10 03 page 52 84 Diagnostics Step Action 1 Click on the Diagnostics link to test the device Results will be displayed as pass fail or N A depending on your settings 2 Click on the Sub...

Страница 55: ...nterface Management page 53 84 Port Settings Step Action 1 Click on the Port Settings link to change the port settings on the device 2 Change the settings by entering the new value into the text box a...

Страница 56: ...ation steps are listed for each of the protocols in their respective sections The seven sections are RFC 1483 Bridge PPPoE Route Configuration RFC 1483 NAT PPPoA Route Configuration IPoA Route Configu...

Страница 57: ...ve an IP address assigned from an external internal DHCP server Modem IP 192 168 1 1 192 168 2 1 if USB is used Gateway IP None VPI VCI 8 81 Table 3 1 Step Action 1 Click on the WAN tab to view its su...

Страница 58: ...confirm the changes 4 Click on the EoA link below the WAN tab 5 Enter the IP address and subnet mask based on your ISP settings The default gateway is not required in RFC 1483 bridge mode Then click o...

Страница 59: ...the Add button Then click on the Submit button to confirm the changes 8 Click on the Admin tab to view its sub menu s and configure the bridging settings then click on the Commit Reboot link below it...

Страница 60: ...ttings then click on the PPP link below it 2 The PPP Configuration table appears Click on the Add button to add a new PPPoE setting Select an Interface Name PPP 1 Select a Protocol PPPoE Select Defaul...

Страница 61: ...dress or have an IP address assigned from an external internal DHCP server Modem IP 192 168 1 1 Gateway IP None VPI VCI 8 81 Table 3 2 Step Action 1 Click on the WAN tab to view its sub menu s and con...

Страница 62: ...click on the Submit button to confirm the changes 4 Click on the EoA link below the WAN tab 5 Enter the IP address and subnet mask based on your ISP settings 6 Enable DHCP and Default Route and click...

Страница 63: ...the drop down list Basic Rule ID Enter a number here Local Address From Address from where this device will receive IPs Local Address to 255 255 255 255 broadcast or other Login Name Enter username h...

Страница 64: ...168 1 xxx Modem IP 192 168 1 1 Gateway IP Not required VPI VCI 8 81 Username From ISP Password From ISP Table 3 3 Step Action 1 Click on the Routing tab to view its sub menu s and configure the Routi...

Страница 65: ...nto the VPI and VCI text boxes Then click on the Submit button to confirm the changes 4 Click on the PPP link in the Routing tab and then click on the Add button to add a PPPoA configuration Select an...

Страница 66: ...password here from ISP 5 Click on the Submit button to confirm the changes 6 Click on the Admin tab to view its sub menu s and configure the bridging settings then click on the Commit Reboot link belo...

Страница 67: ...AN IP 192 168 1 xxx Modem IP 192 168 1 1 Gateway IP 210 62 8 1 VPI VCI 8 81 WAN IP 210 62 8 2 Table 3 4 Step Action 1 Click on the Routing tab to view its sub menu s and configure the Routing settings...

Страница 68: ...button to confirm the changes 4 Click on the IPoA link in the Routing tab and then click on the Add button to add an IPoA configuration Select an Interface Name IPoA 0 Conf IP Address From ISP Net mas...

Страница 69: ...age 67 84 6 Click on the Admin tab to view its sub menu s and configure the bridging settings then click on the Commit Reboot link below it 7 Select the Reboot from last configuration option from the...

Страница 70: ...TION Step Action 1 Click on the LAN tab to view its sub menu s and configure the LAN settings then click on the DHCP Mode link below it 2 From the drop down list select DHCP Server and click on the Su...

Страница 71: ...Address Enter the Start IP Address 192 168 2 2 End IP Address Enter the End IP Address 192 168 2 33 Net mask Based on IP address 255 255 255 0 Domain Name Enter a name here Gateway IP Address Enter a...

Страница 72: ...NAT settings then click on the NAT link below it 2 From the NAT Options drop down list select NAT Rule Entry 3 Click on the Add button to add a new NAT Rule Entry Rule Flavor Select a Rule flavor fro...

Страница 73: ...Setup page 71 84 Login Name Enter username here from ISP Global Address From Global Address from where this device will receive IPs Global Address Global Address where this device will send its packet...

Страница 74: ...teps below in order to install the USB driver Step Action 1 Insert the Installation CD into your CD ROM drive The installation begins automatically and the Welcome screen appears NOTE If the installat...

Страница 75: ...tton to continue The Installing screen appears 3 The DSL installer prompt you to plug in the USB cable into the device Plug in the rectangular end of the USB cable in the USB port of your PC and the s...

Страница 76: ...taller will continue to install the USB driver After a few seconds a new screen will inform you that you must reboot your computer Click on the Close to reboot your computer 5 As soon as the system st...

Страница 77: ...us of this device you need to run the control panel that is provided with this device Step Action 1 To run the control panel click on the Start button Programs jetSpeed 520 ADSL Modem ADSL Status The...

Страница 78: ...User Manual jetSpeed 520 USB Driver Installation Ver 1 0 10 03 page 76 84 2 Click on the System Info tab to view the USB driver and control panel version 3 Click on the Close button when completed...

Страница 79: ...Programs DSL Modem Uninstall The following message appears 2 Click on the Yes button to confirm the uninstallation You will then se the following message 3 The above message is to remind you not to un...

Страница 80: ...8 84 5 At this point unplug the modem and then click on the OK button The Reboot screen appears 6 Select the Yes reboot the computer now radio box and then click on the Close button This will then res...

Страница 81: ...For POTS line ITU G 992 1 G dmt Annex A ITU G 992 2 G lite ANSI T1 413 issue 2 For ISDN Line ITU G 992 1 G dmt Annex B ETSI TS 101 388 Deutsche Telekom U R2 Line Impedance 100 Connection Loop One Pai...

Страница 82: ...b management Environmental Conditions Operation Temperature 0 C 45 C Operation Humidity 5 95 Storage Temperature 20 85 C Storage Humidity 5 95 Power Requirements AC Adapter Input Output 230VAC 50Hz 15...

Страница 83: ...CHAP and PAP supported RFC2516 PPPoE PPP over Ethernet over ATM Bridging Transparent Bridging IEEE 802 1D RFC2684 RFC1483 Bridged Spanning Tree Protocol IEEE 802 1D Supporting IP IGMP v1 v2 and PPPoE...

Страница 84: ...e 82 84 Configuration and Network Management DHCP server for IP management FTP TFTP Telnet for local or remote management TFTP for firmware upgrade Web configuration SNMP v1 and MIB II RFC 1213 Auto D...

Страница 85: ...page 83 84 DECLARATION OF CONFORMITY Hereby INTRACOM S A declares that the jetSpeed 520 520i is in compliance with the essential requirements and other relevant provisions of Directive 1999 5 EC For f...

Страница 86: ...User Manual jetSpeed 520 Declaration of Conformity Ver 1 0 10 03 page 84 84 page intentionally left blank...

Отзывы: